
PXLtools — Tool guide
TurnTable — Maya Builder + Nuke Comp Setup
A two-part turntable pipeline for presenting models and shaders the way a supervisor expects to review them. The Maya Builder sets up scene, lighting, and render layers; the Nuke Comp Setup builds and drives the review comp. Both share one UI kit and a guided, gated flow, and both auto-update on launch — so a clean, client-ready turntable is a few clicks, not a pipeline project.
The interface
Autodesk Maya
TurnTable Builder
Set up the scene, lighting, and render layers. Guided, gated flow from scene load and HDRI selection through to render.
Foundry Nuke
Nuke Comp Setup
Build and drive the review comp. Load the template, wire up renders, set look options and export, all from one panel.
01
Overview
TurnTable is a two-part turntable pipeline for presenting models and shaders the way a supervisor expects to review them. It ships as a Maya Builder that sets up the scene, lighting and render layers, and a Nuke Comp Setup tool that builds and drives the review comp.
The two tools share one UI kit, so they feel like a single product, and both auto-update the moment you launch them. It was forged on the Thresholds production and built so small teams can run a clean turntable without a pipeline department behind them.
02
Requirements
TurnTable is developed and tested on this exact stack:
- Autodesk Maya 2025
- Arnold — MtoA 5.4.2.1 (Arnold 7.3.2.1), the version that ships with Maya 2025
- ACES 1.2 colour management — required
- Foundry Nuke 15
- Python 3 — bundled with the host, nothing to install
You do not need to update Arnold. TurnTable is verified on the MtoA that ships with Maya 2025 (5.4.2.1 / Arnold 7.3.2.1). The turntable scene file internally declares a newer MtoA (5.5.4.2), so the Builder's preflight may show an informational note about the difference — that is expected, it never blocks a render, and it is not a reason to install anything.
Newer Maya or Nuke releases generally work, but the versions above are what every release is actually tested against — if you hit something odd on a newer host, that is worth telling me about.
Maya 2025 already includes PySide6. You do not install it, you do not pip anything, you do not touch your Python environment.
Network access
PXLtools needs outbound HTTPS (TCP 443) to www.pxlmentor.com and
objects.githubusercontent.com. On a studio or corporate machine, check this
before you install — see Troubleshooting.
03
ACES 1.2 — required, not optional
TurnTable is built for ACES 1.2 colour management. The scene, the lighting, the HDRIs and the render layers all assume it. If Maya and Nuke are not set to ACES 1.2, your textures and renders come out wrong — washed out, mis-graded, or colour-shifted. Set this up before you load the turntable.
The clean way: one system-wide OCIO variable
The most reliable setup is a single OCIO environment variable on your system. Set it once and every DCC — Maya, Nuke, and anything else — reads the same ACES 1.2 config automatically. No per-app fiddling, no drift between tools.
- Download the ACES 1.2 OCIO config — colour-science / OpenColorIO-Configs v1.2. Unzip it somewhere permanent and note the path to
aces_1.2/config.ocio. - Set a system environment variable named
OCIOwhose value is the full path to thatconfig.ociofile. - Restart Maya / Nuke. With
OCIOset, Maya switches on Colour Management and “Use OCIO configuration” automatically on launch, and Nuke uses the same config — both tools now in lockstep.
Watch the walkthrough. The full step-by-step for installing ACES 1.2 as an OCIO environment variable is here — How to set up OCIO / ACES 1.2 colour management (video). If you would rather not use a system variable, the video also shows how to point each tool at the config by hand — but then it is on you to keep every tool on ACES 1.2.
Confirm it is actually on
From TurnTable Builder v1.0.44 the tool checks this for you properly, and says so in Preliminary Steps · step 2. It no longer asks the vague question “is ACES on?” — it checks whether the exact colour spaces the turntable scene uses (Utility - Linear - sRGB, Utility - sRGB - Texture, ACES - ACEScg) exist in the config Maya has actually loaded, and if any are missing it names them. That check reads Maya’s own colour-management preferences, so pointing Maya at the config by hand works just as well as the OCIO environment variable. Fix your settings, then press Re-check Colour Management — no need to restart. Earlier versions could report ACES as active on a machine that had none, because Maya’s default rendering space is already ACEScg; if you are on v1.0.43 or older, update.
Maya
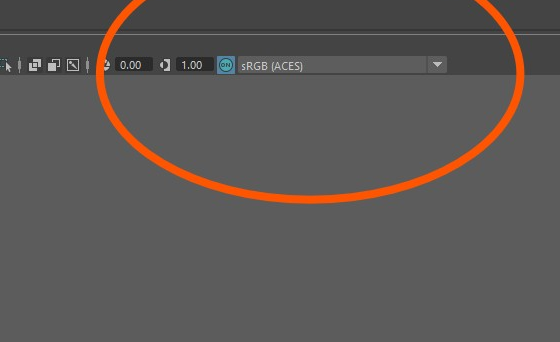
Read the viewport
With ACES 1.2 active, the viewport heads-up (top of the panel) shows the view transform as sRGB (ACES). If you see that, Maya is correct.
Nuke
Project Settings · Color
Colour Management must be OCIO (using the ACES 1.2 config) — not the default Nuke option. If it reads Nuke, the comp will not match the render.
sRGB (ACES)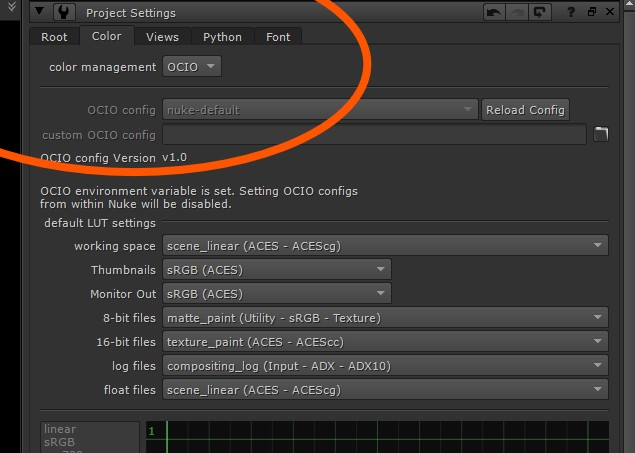
color management: OCIO04
Install
TurnTable is free on the PXLmentor store, and it stays on your licence. Claim it there and you are
emailed your licence key and your own copy of INSTALL.py — that copy already carries the
key, which is why the download comes from the email rather than from here. No GitHub account, no token.
The tool checks its licence on every launch — not just at install time. It keeps working offline for up to 14 days between successful check-ins, after which it needs to reach the licence server once. If your machine is behind a strict firewall, read the network entry in Troubleshooting first.
Maya
Drag and drop
Download INSTALL.py and drag it from a file browser straight into a running Maya viewport. It installs the Maya module, the Nuke toolbox, optionally the turntable asset pack (you will be prompted), and builds the PXLtools shelf.
To update later, drag the same file in again. That is the whole process.
Nuke
One-line install
Nuke cannot run a dragged file, so the install is a single line. Paste it into Nuke's Script Editor on the Python side and run it. It installs or updates only the Nuke side and rebuilds the PXLtools menu live. No restart.
Nuke Script Editor · Python tab
Copy the one-line install from your licence email — it carries your key.
That is the whole install — there is no separate zip to hunt down. INSTALL.py pulls everything it needs.
05
Auto-update
Both tools check for a newer stable release on launch, in the background, and never block the tool. When a new version ships, you get it without thinking about it.
To force a check yourself, use the Check for Updates button in the tool header — it updates both the tool and the turntable asset pack, and tells you if you are already current.
The turntable assets are a separate download. The tool code is about 1 MB. The
turntable scene, the Nuke comp, the six 4K HDRIs, the utility textures and the LUT are roughly
310 MB, and they live in their own package so a routine tool update does not
re-send them. The installer fetches them once into
~/Documents/PXLtools/TurnTable_ROOT and points the Builder at that folder for you.
They are versioned independently, so you are only ever prompted to re-download them when the scene
or comp actually changes.
Getting the assets again. In the Builder, under
Preliminary › 1 Set Turntable Root Folder, there is a
Re-download Asset Pack button. Use it whenever the scene or the textures are
missing or incomplete: a folder that was emptied to reclaim disk space, a download that was
interrupted half-way, a folder that was moved, or an install that never received the assets at all.
It always fetches a fresh copy, even when the version on disk claims to be current, which is the
one thing Check for Updates deliberately will not do. Your existing folder is kept
as TurnTable_ROOT_OLD until the new one has landed, so a failed download cannot leave
you with nothing. Budget about 310 MB.
The header menu. Top-right of every tool header there is a ☰ menu button. Click it for Check for Updates (checks both the tool and the turntable asset pack), View Guide (opens this page), About / System Info (the versions the tool is tested on next to the ones you are actually running), Report a bug, Request a feature, and Settings ▸ Reset to defaults. The version shown in the header and title is always the current release. Hover any important control in the tools to see a tooltip explaining what it does.
Telling me something is wrong. Report a bug and Request a feature both open the same short box, and you can switch between the two after it opens. You only type the message: the tool, its version, the PXLtools version, your host application and its version, and your licence name all travel with it automatically, so you never have to explain who you are or which build you are on. A bug report also offers to attach this session's log, ticked by default. Leave it on unless the message is sensitive, because it usually turns “it broke” into something answerable without a second email. The box lists exactly what it sends, underneath where you type.
06
Using the Maya TurnTable Builder
The Builder has two tabs: 1 · SETUP and 2 · RENDER.
The step-gating flow
Every numbered step is gated. This is the part worth understanding once before you start.
Step states at a glance
Green — done
This step has already been satisfied. No action needed.
Orange — do this now
The one enabled step. Complete it, and the next step wakes up.
Grey — locked
Intentionally un-clickable until it is its turn. Finish the orange step first.
The tool walks you through the correct order. You cannot do step 3 before step 1. If a button looks dead, that is the gating doing its job — finish the orange step and the next one enables.
The interface, area by area
Every section is colour-coded and collapsible. Here is what each one does, top to bottom.
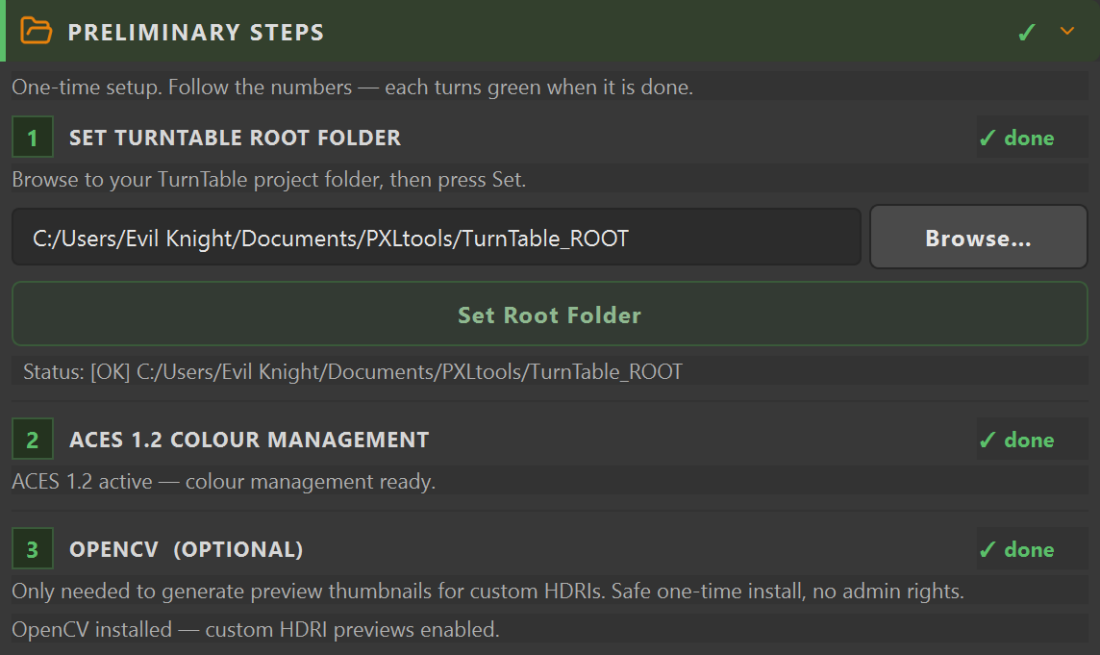
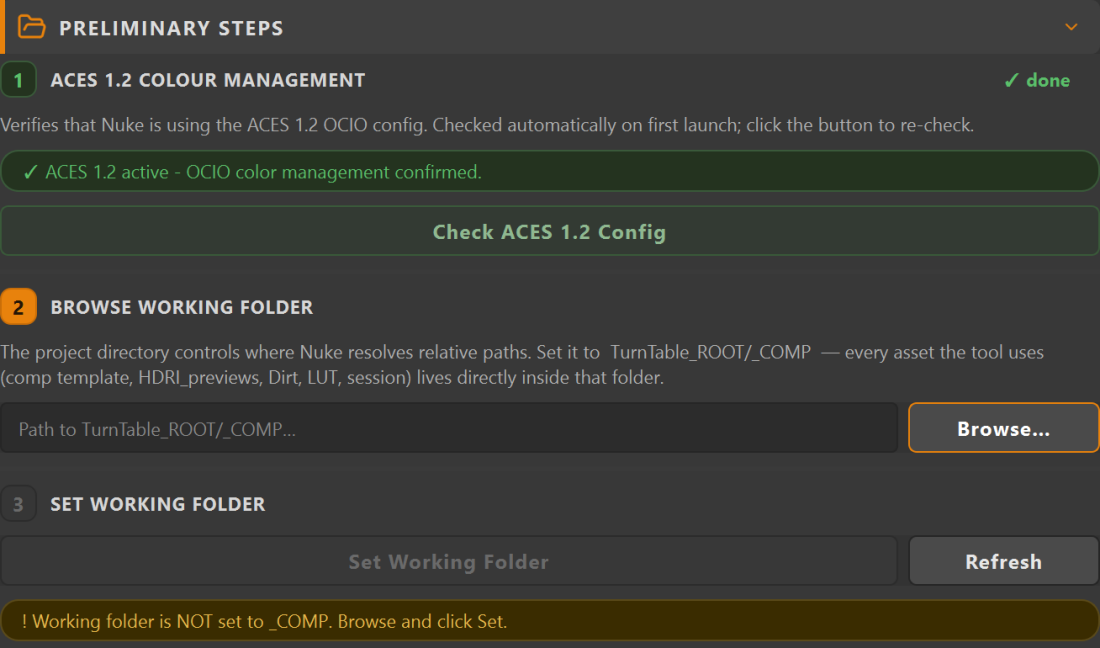
TurnTable_ROOT, confirm ACES 1.2 is active, and (optionally) install OpenCV for HDRI preview thumbnails.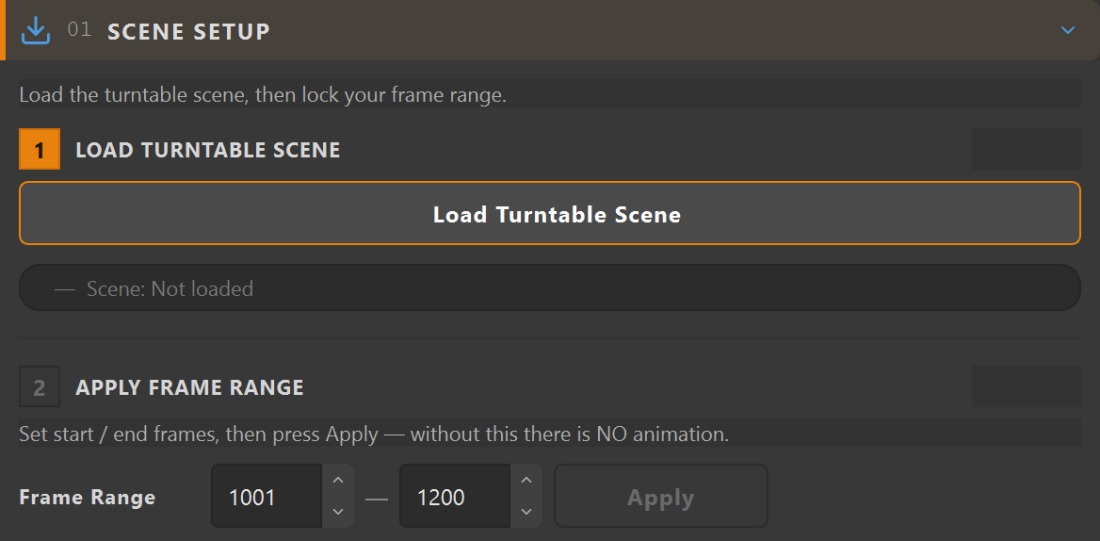
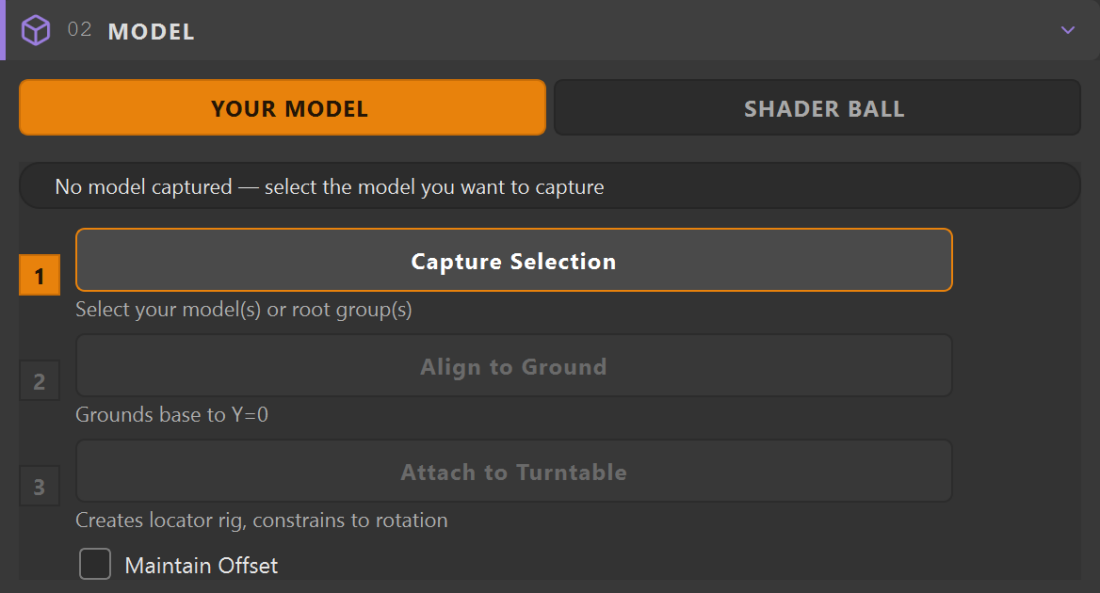
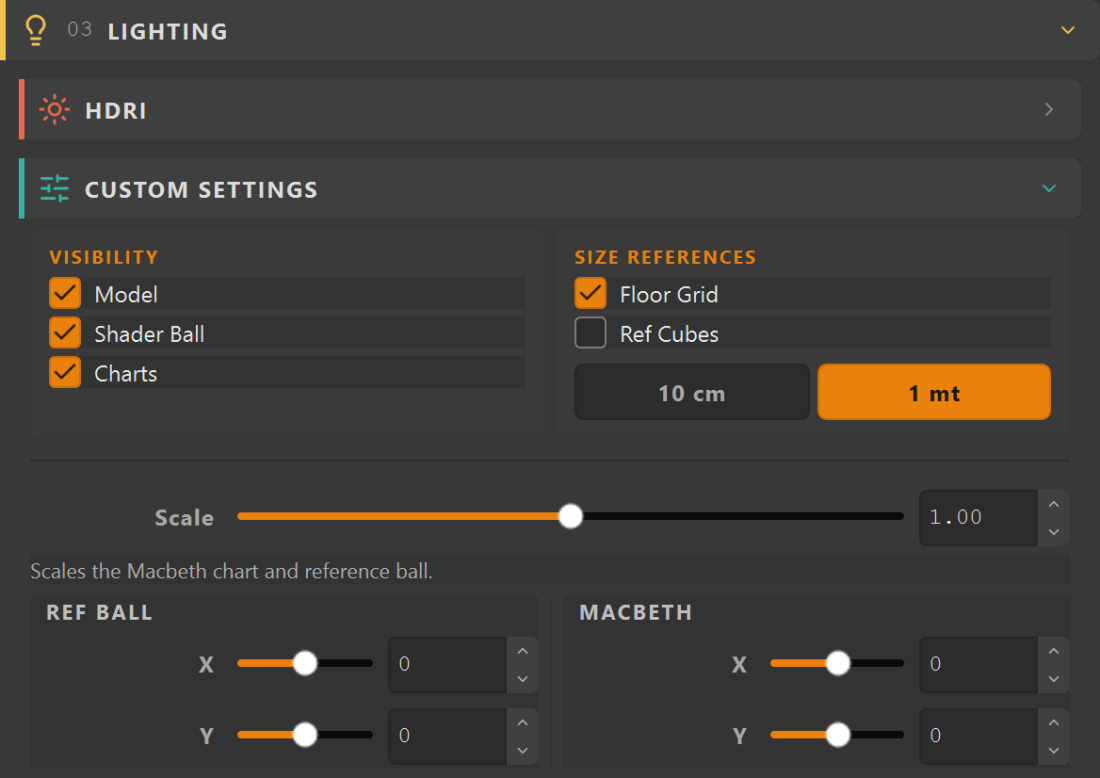
SETUP tab
Work top to bottom. The orange step is always your next action.
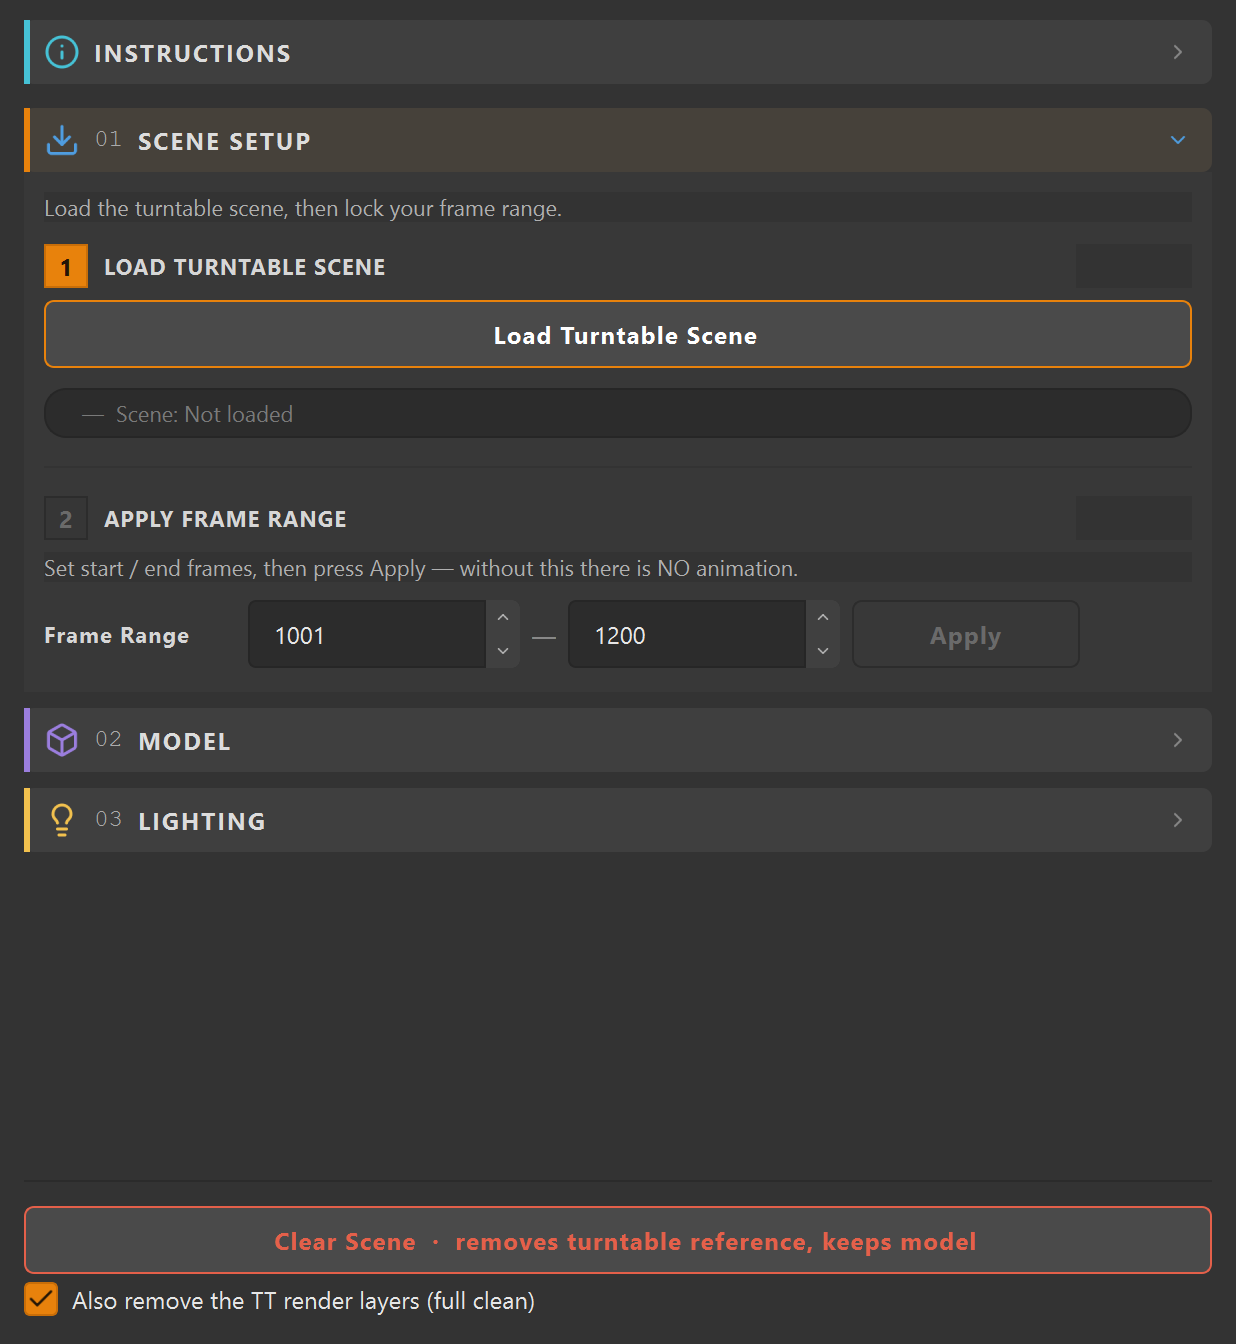
01 Scene Setup
- Load Turntable Scene. Brings the rig in as a reference.
- Apply Frame Range. Set the start and end frames (default 1001 to 1200), then press Apply. Skip this and you have no animation.
02 Model
Choose Shader Ball or Your Model, then attach what you are presenting.
03 Lighting
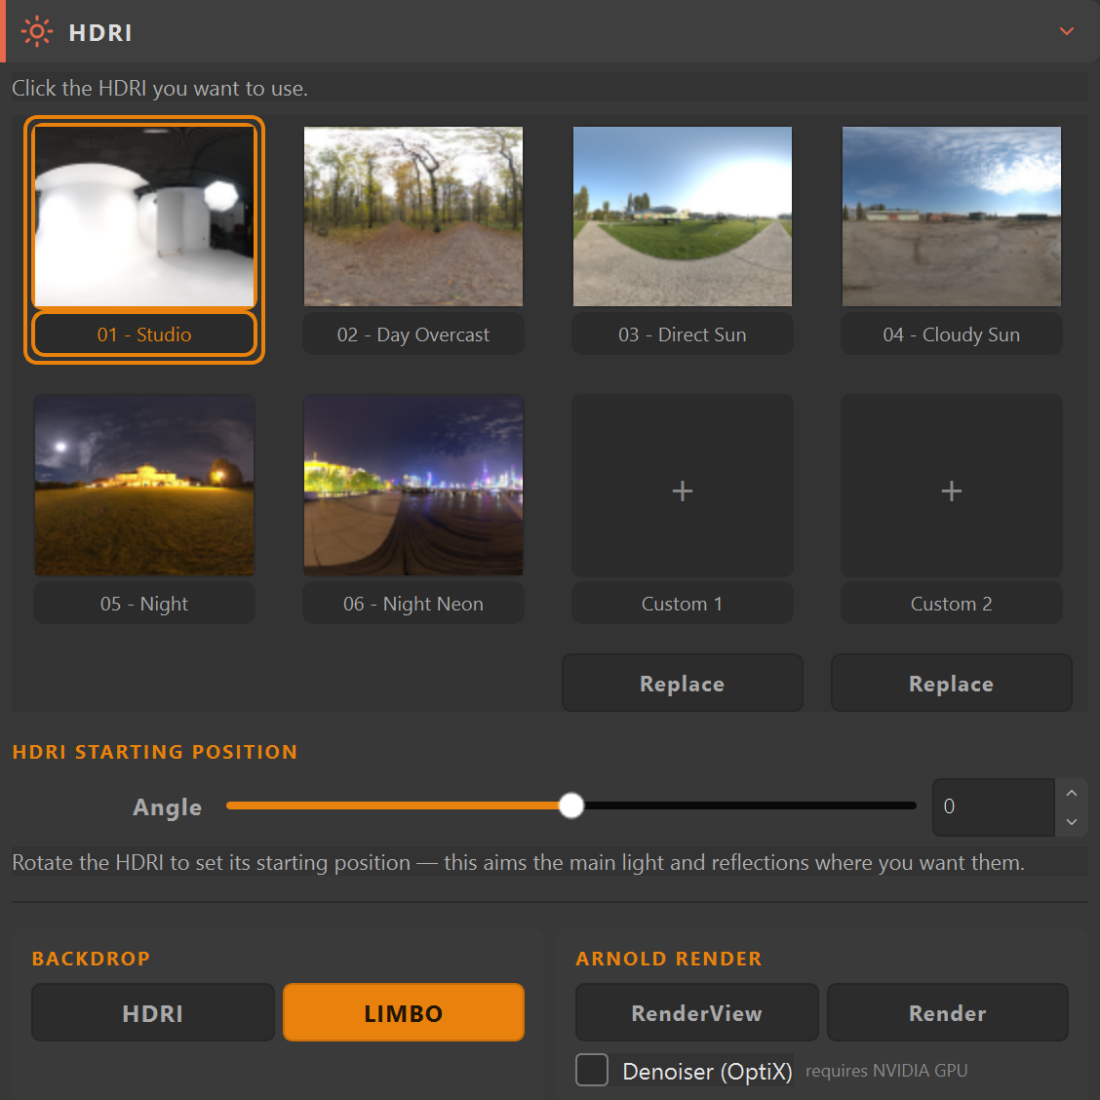
Pick the HDRI environment, the backdrop, and your Arnold settings.
Clear Scene
At the bottom of the SETUP tab. Removes the turntable reference but keeps your model. There is an option to also remove the TT render layers if you want a full clean.
RENDER tab
Render Layers Setup
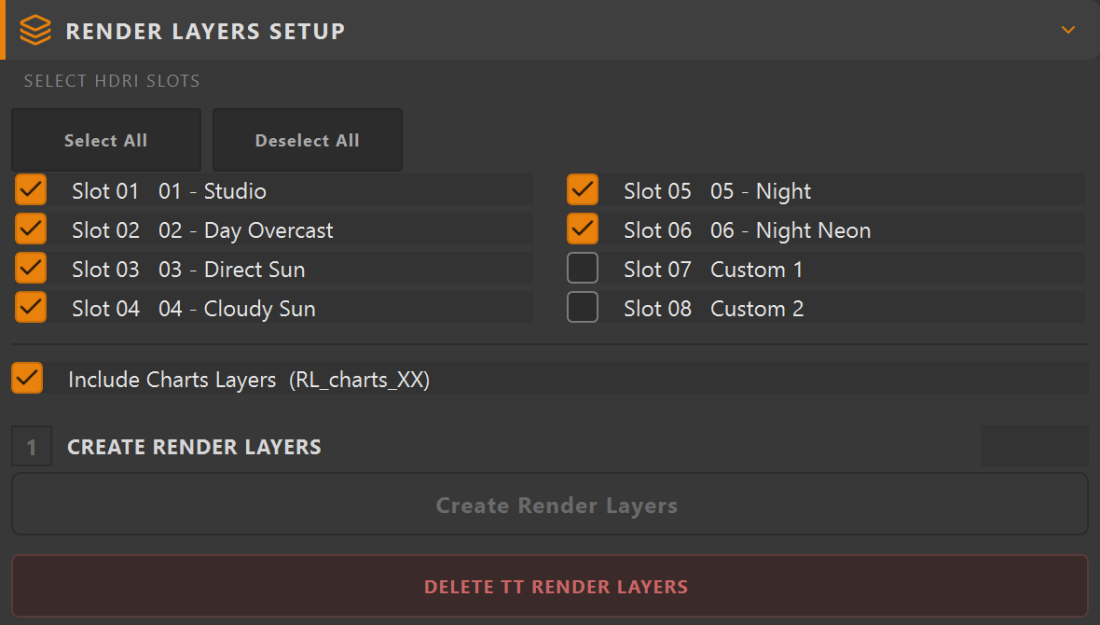
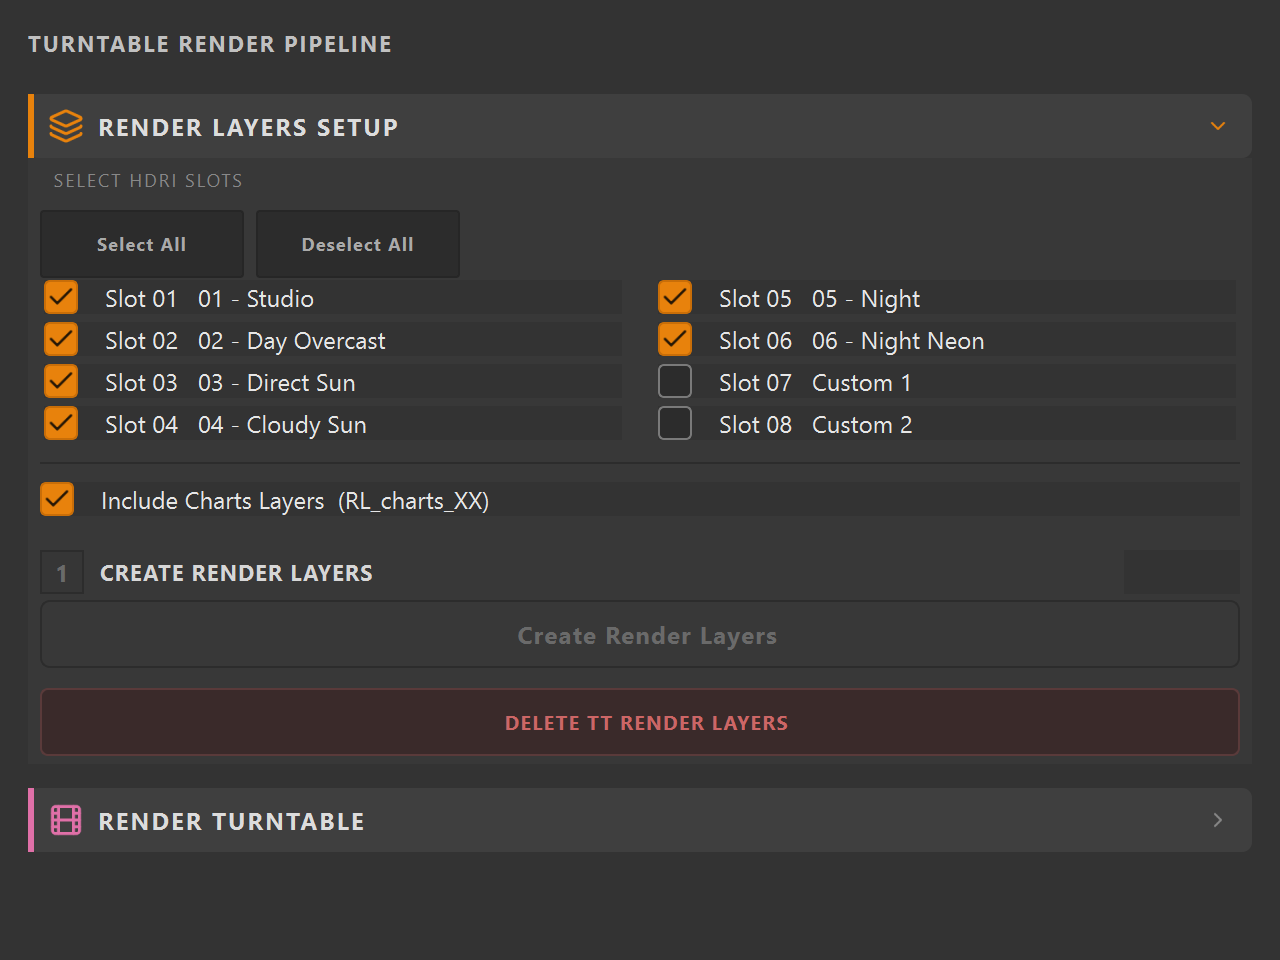
- Tick the HDRI slots you want: Studio, Day Overcast, Direct Sun, Cloudy Sun, Night, Night Neon, plus two custom slots.
- Optionally tick Include Charts Layers.
- Press Create Render Layers.
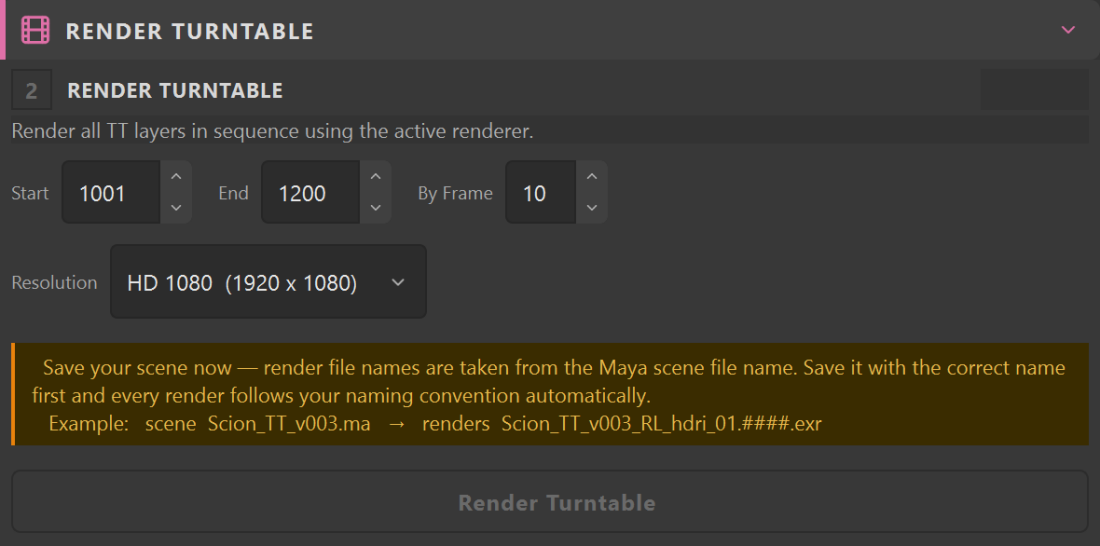
Render Turntable
Kick off the render.
Tip: Save your scene first. Render names derive from the scene file name, so a saved, sensibly named scene gives you sensible outputs.
07
Using the Nuke TurnTable Comp Setup
Same guided, gated flow as the Maya tool. Work the orange step, the next one opens.
The interface, area by area
Every section is colour-coded and collapsible, exactly like the Maya Builder. Here is what each one does, top to bottom.
TurnTable_ROOT/_COMP folder — every asset the comp uses (template, HDRI previews, Dirt, LUT, session) resolves from there. Finish each orange step to unlock the next.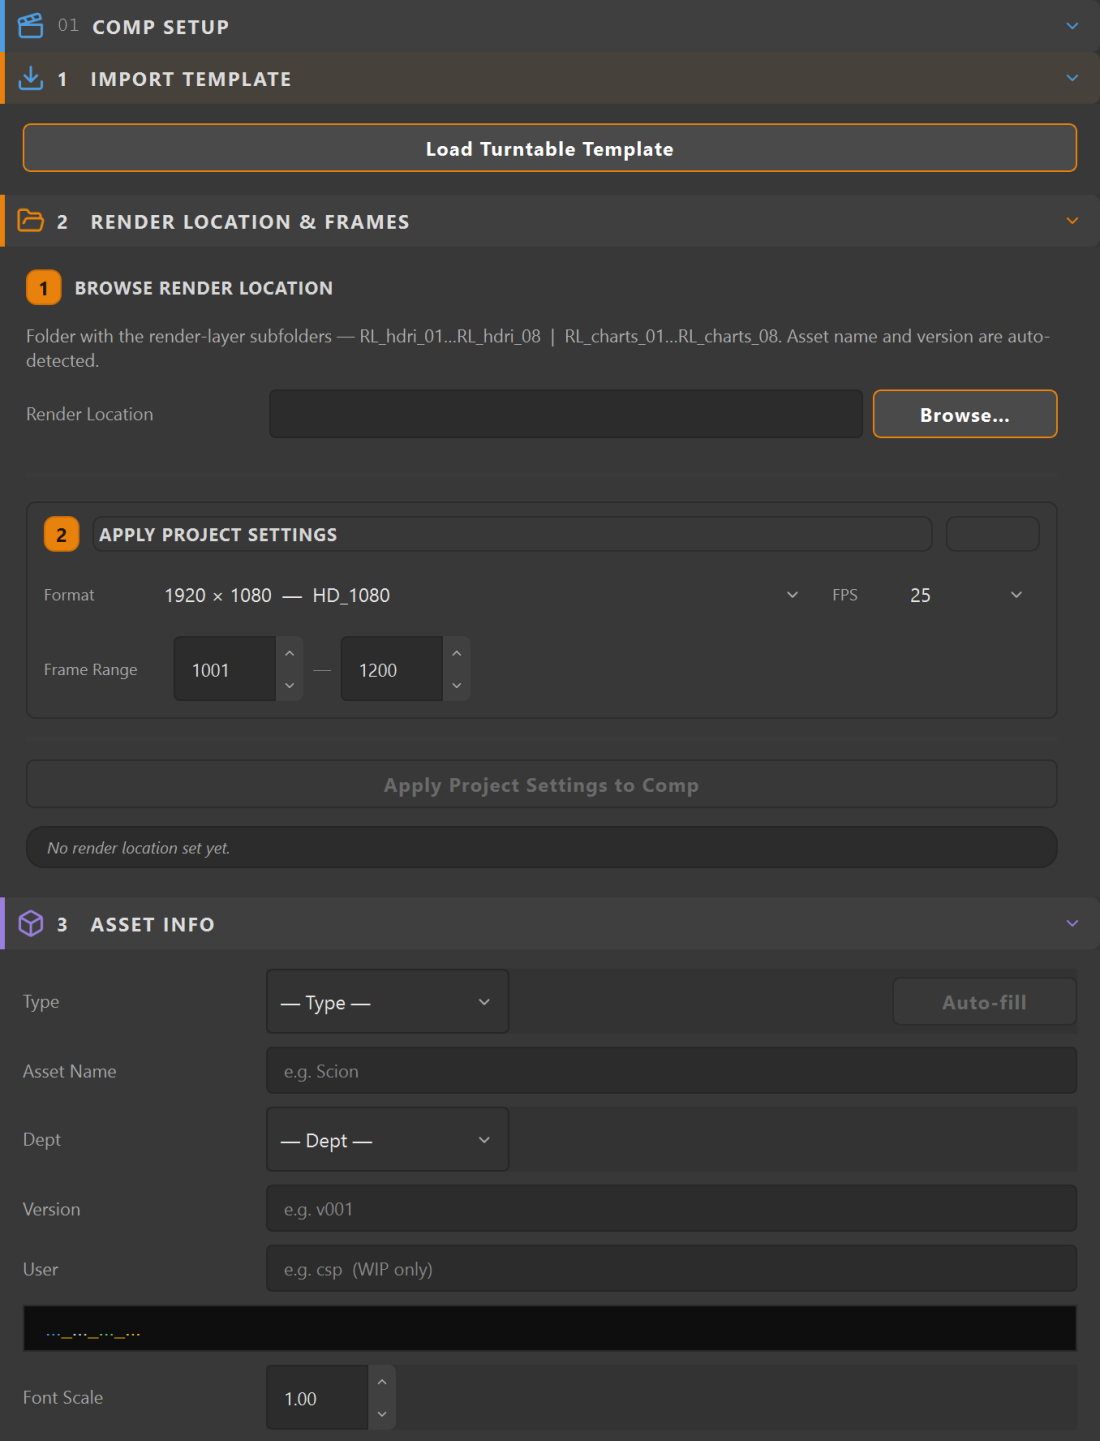
RL_hdri_XX / RL_charts_XX render layers), apply your format and frame range, then Auto-fill the asset Type, Name, Dept and Version.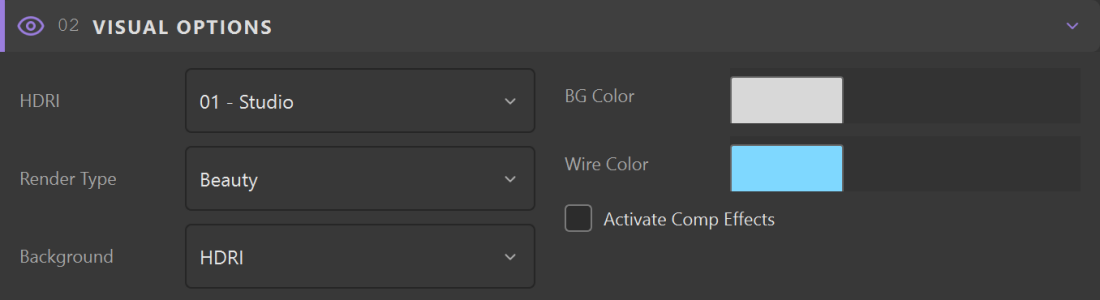
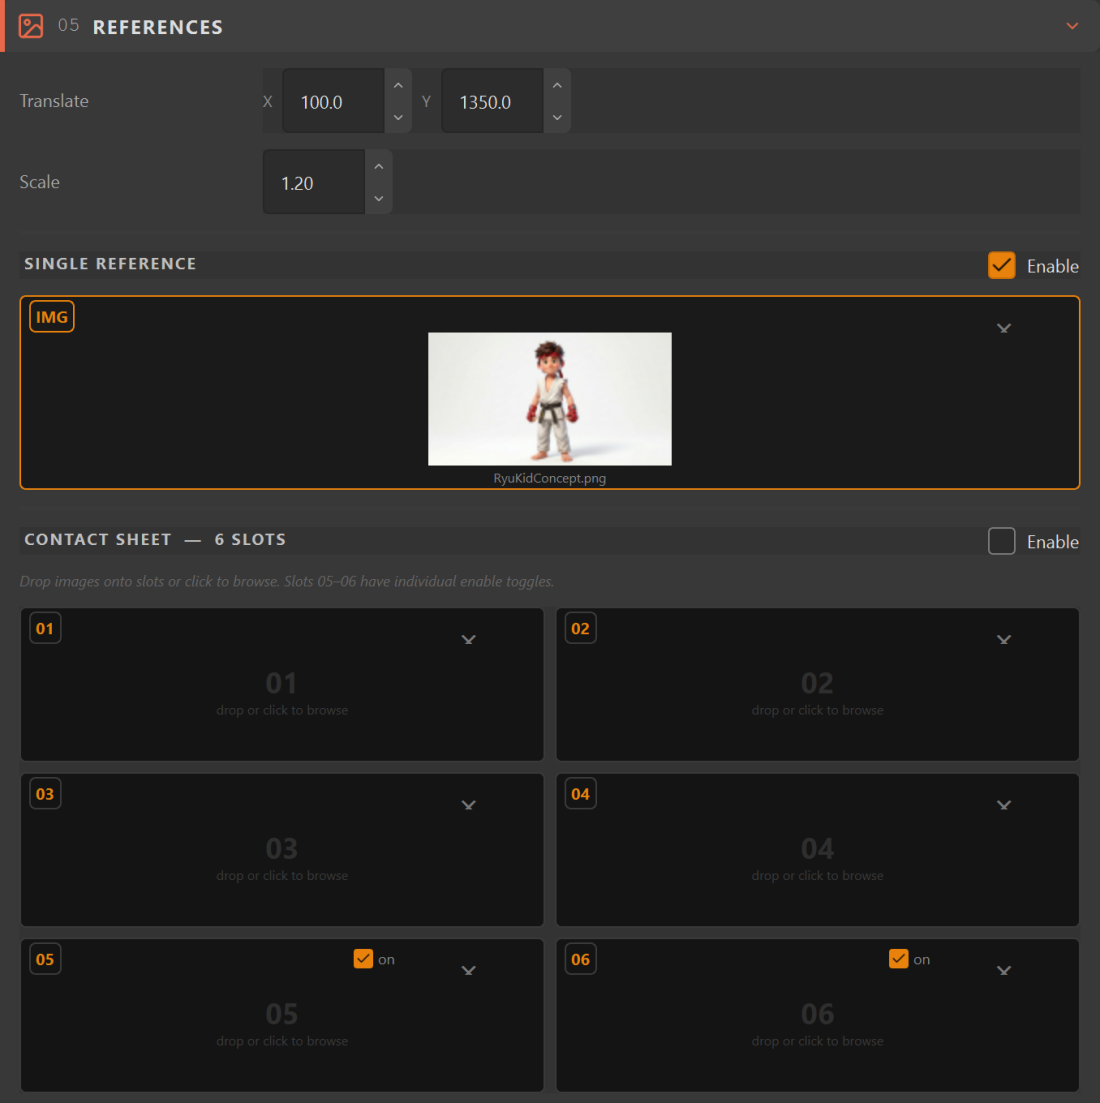
Preliminary Steps
- Check ACES 1.2 Config.
- Browse to your working folder.
- Set Working Folder.
Comp Setup
- Load the Turntable Template.
- Browse the render location.
- Apply Project Settings.
- Fill in Asset Info: Type, Department, Asset name, Version.
Visual Options
Set the background and wireframe colour.
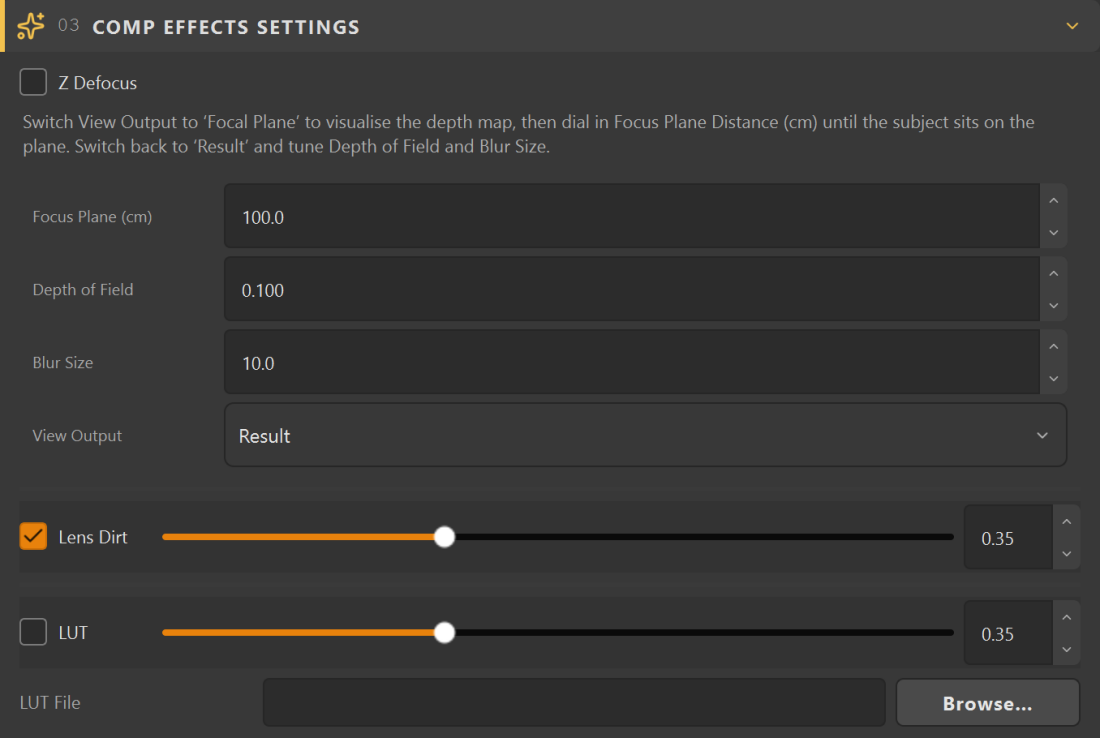
Comp Effects Settings
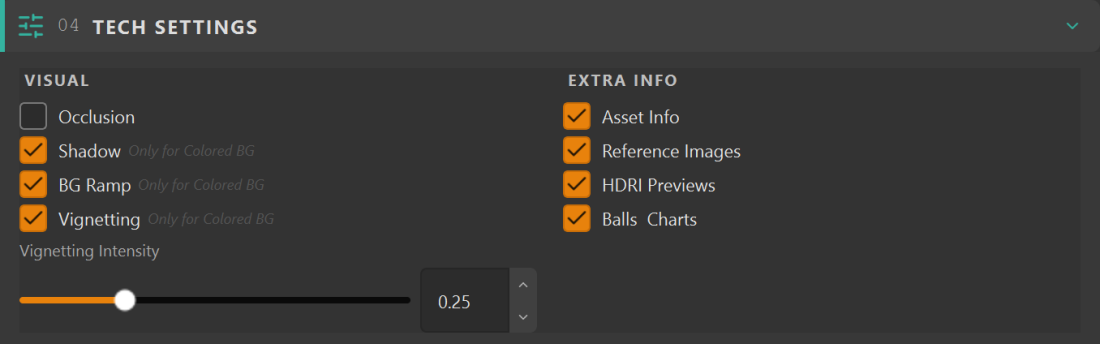
Vignette (default intensity 0.25), Z-Defocus, and the other look controls live here.
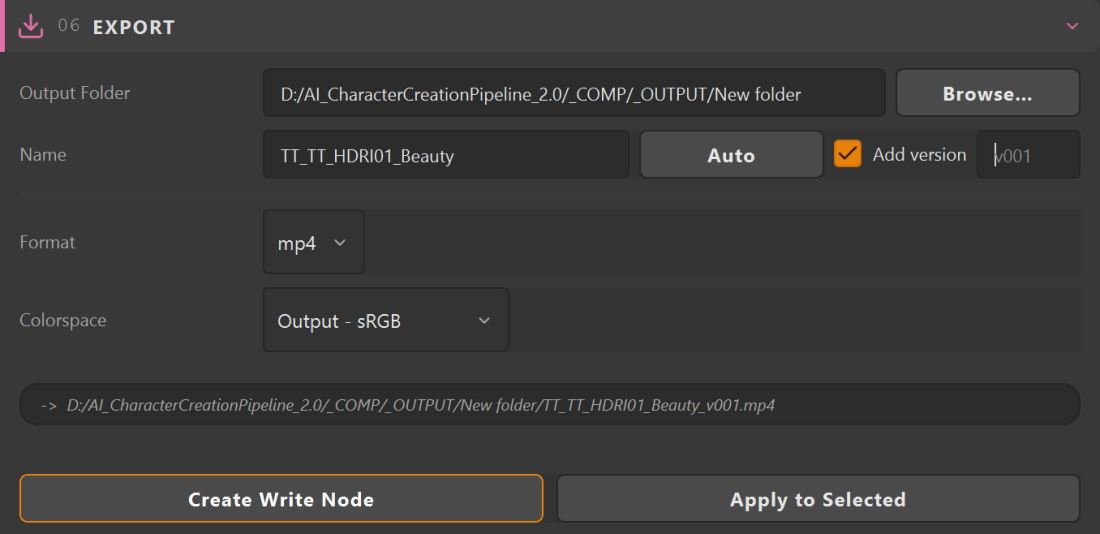
Export
- Set the output name and version.
- Choose PNG sequence or MP4.
- Create the Write node and render.
08
Troubleshooting
The install fails, or the tool says it cannot reach pxlmentor.com.
This is a firewall almost every time, not a broken installer — and it is very common on studio and corporate machines. PXLtools needs outbound HTTPS on TCP 443 to two hosts:
Send this to your IT team
www.pxlmentor.com  (TCP 443) — licence checks, update checks, downloads
objects.githubusercontent.com  (TCP 443) — the actual file download
Both hosts, not just the first. The download is handed off to a signed link on objects.githubusercontent.com, so a rule that allows pxlmentor.com but blocks the second host lets the version check succeed and then fails the download — which is why “it sees the update but cannot install it” is almost always this.
If you get a certificate error instead, your network is inspecting HTTPS traffic (Zscaler, Netskope, a corporate SSL appliance). That needs an SSL-inspection exception for those hosts rather than a port being opened.
The installer writes the full details to ~/Documents/PXLtools/install_failure.log. Email that file to support@pxlmentor.com and I will tell you exactly which case it is. If your IT will not budge, ask me for the offline package — it installs with no internet at all. (Licence activation still needs one online check-in.)
The Builder shows a note about my Arnold / MtoA version.
Expected on a stock Maya 2025, and nothing is wrong. The turntable scene file declares MtoA 5.5.4.2 internally, while Maya 2025 ships 5.4.2.1 — and 5.4.2.1 is exactly what every release is rendered and verified on. The preflight only reports the difference; it never blocks a render, and you do not need to install a newer Arnold.
The tool did not update.
Click Check for Updates (the refresh icon) in the tool header — it forces a fresh check of both the tool and the asset pack, even if an earlier check was skipped. On Nuke you can also re-run the install one-liner.
A button is greyed out and I cannot click it.
That is the step-gating doing its job. The grey steps are intentionally locked. Find the orange step — that is your current action. Completing it will unlock the next one.
Load Turntable Scene cannot find the file.
The asset pack is not installed. Open the Builder and click
Re-download Asset Pack under Preliminary › 1 Set Turntable Root
Folder. That is the quickest fix and it works even when an update check says you are
current. Re-dragging INSTALL.py into Maya and accepting the asset prompt does the
same job.
The tools installed, but there is no turntable scene, no HDRIs and no textures.
Check whether ~/Documents/PXLtools/TurnTable_ROOT exists and contains a
scenes folder with a .ma file of roughly 197 MB. If the folder is
missing or nearly empty, the tools installed but the asset pack did not. Click
Re-download Asset Pack in the Builder.
If the tool instead says “No downloadable asset pack found in recent releases”, or the installer finished with an INCOMPLETE dialog, then the release itself was published without the pack. That is our fault, not something you can fix from your side. It happened once, to releases v1.11.0 through v1.12.1 (fixed on 2026-09-04, and the release script now refuses to publish a release missing the pack). Email support@pxlmentor.com and I will re-cut it.