
PXLtools — Tool guide
Image Option Changer — batch colorspace
Select your Read and Write nodes, pick a colorspace, tick which node types to affect, and click Apply. Image Option Changer walks every selected node and sets the colorspace knob in one pass — pulling the available colorspace list live from the active OCIO config, with a curated ACES 1.2 fallback when PyOpenColorIO isn't available.
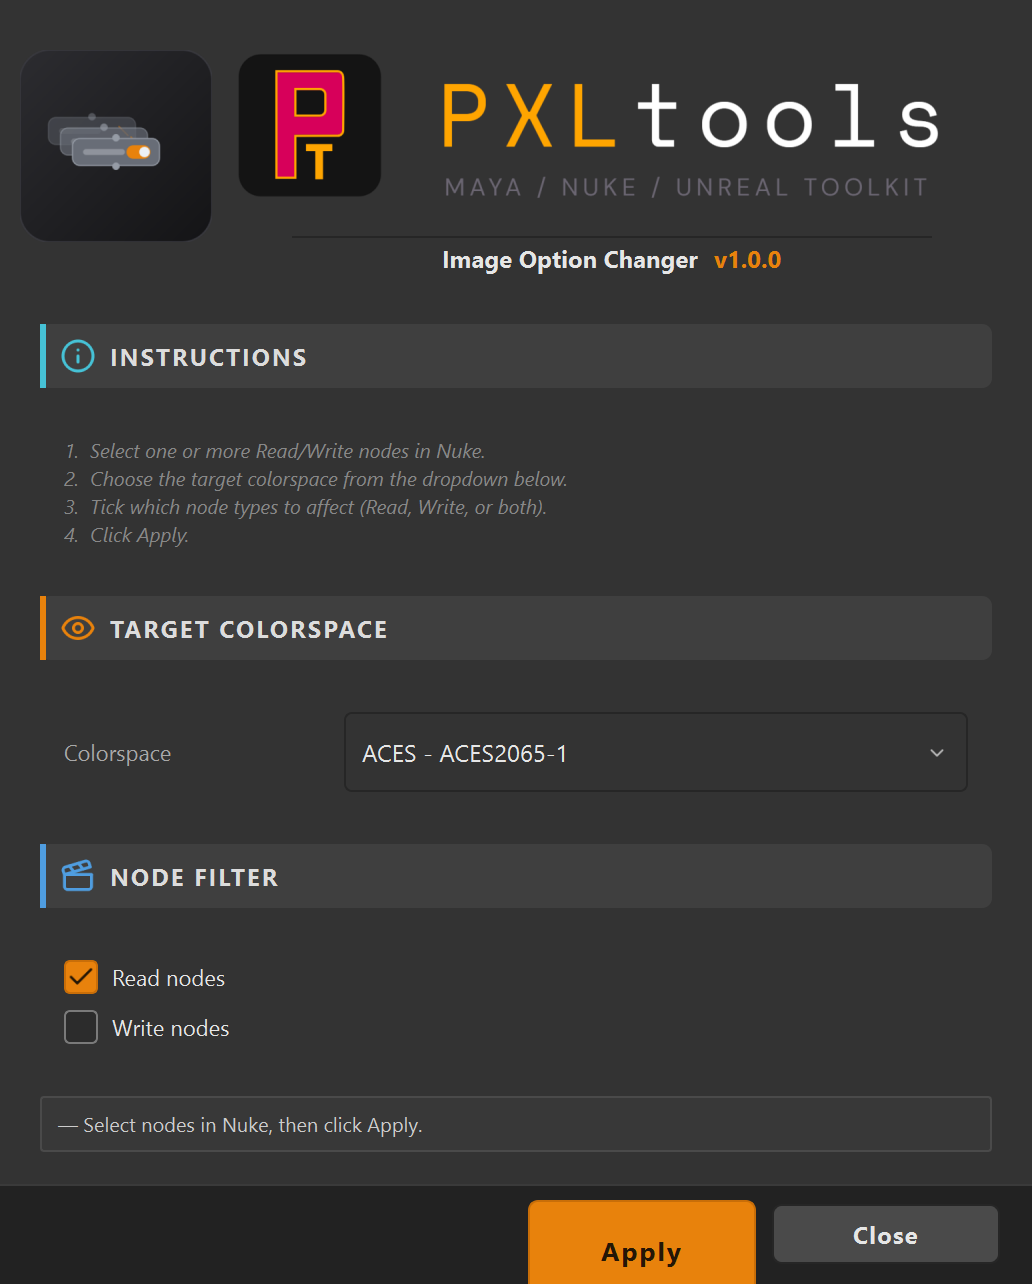
The interface
01
Overview
Image Option Changer batch-applies a target colorspace to the colorspace knob of selected Nuke Read and/or Write nodes. Pick the colorspace from the dropdown, tick which node types to affect, and hit Apply — the tool processes every selected node in one pass and reports exactly what changed and what was skipped.
The colorspace list is read live from the active OCIO config via PyOpenColorIO. If PyOpenColorIO isn't installed, the tool falls back to a curated ACES 1.2 list covering the most common camera and output spaces. It shares the same UI kit as the rest of PXLtools.
02
Requirements
- Foundry Nuke 15 (PySide2)
- Python 3
- PyOpenColorIO — optional; the tool falls back to a curated ACES 1.2 list if not installed
Tested on:
- Foundry Nuke 15
Newer releases generally work, but these are the versions every release is actually tested against. If something behaves oddly on a newer host, that is worth reporting.
Network access
PXLtools needs outbound HTTPS (TCP 443) to www.pxlmentor.com and
objects.githubusercontent.com for licensing and updates. On a studio or corporate
machine, check this before you install — see
Troubleshooting.
Nuke 15 already includes PySide2. You do not install it, you do not pip anything, you do not touch your Python environment. PyOpenColorIO is the only optional extra, and only if you want the list drawn directly from your project's OCIO config.
03
Availability
Image Option Changer is free on the PXLmentor store. Claim it there and you are emailed your licence key and a single INSTALL.py: drag that file into a Maya viewport (or paste the one line from the email into Nuke's Script Editor) and the toolkit installs itself, this tool included. Get it free on the store.
04
Using Image Option Changer
Select your nodes, configure the two sections, and apply.
INSTRUCTIONS
Shown at the top of the tool, always visible:
- Select one or more Read/Write nodes in Nuke.
- Choose the target colorspace from the dropdown below.
- Tick which node types to affect (Read, Write, or both).
- Click Apply.
TARGET COLORSPACE
The Colorspace dropdown lists every colorspace available in the active OCIO config. If PyOpenColorIO isn't installed, a curated ACES 1.2 list is used instead. Select the colorspace you want applied to the selected nodes.
NODE FILTER
Two checkboxes control which node types are processed:
- Read nodes — ticked by default. Processes all selected Read nodes.
- Write nodes — unticked by default. Enable to also process selected Write nodes.
Both can be ticked at the same time to process Read and Write nodes in one pass.
Tip: The status area at the bottom reports exactly which nodes were changed and which were skipped — including the reason (e.g. wrong node type, no colorspace knob, or an error setting the value).
05
Troubleshooting
The install fails, or the tool says it cannot reach pxlmentor.com.
This is a firewall almost every time, not a broken installer — and it is very common on studio and corporate machines. PXLtools needs outbound HTTPS on TCP 443 to two hosts:
Send this to your IT team
www.pxlmentor.com  (TCP 443) — licence checks, update checks, downloads
objects.githubusercontent.com  (TCP 443) — the actual file download
Both hosts, not just the first. The download is handed off to a signed link on
objects.githubusercontent.com, so a rule that allows pxlmentor.com but
blocks the second host lets the version check succeed and then fails the download.
A certificate error instead means your network is inspecting HTTPS traffic (Zscaler, Netskope, a corporate SSL appliance) — that needs an SSL-inspection exception for those hosts, not a port opening.
The installer writes full details to ~/Documents/PXLtools/install_failure.log. Email it to
support@pxlmentor.com
and I will tell you which case it is. If your IT will not budge, ask for the offline package.
"No nodes selected. Please select nodes in Nuke first."
The tool reads the active Nuke selection at the moment you press Apply. Select one or more Read or Write nodes in the DAG first, then click Apply.
The colorspace I need is not in the list.
The list is populated from the active OCIO config when the tool opens. If the config changes while the tool is open, close and relaunch. If PyOpenColorIO is not installed, only the fallback ACES 1.2 list is shown — install PyOpenColorIO to get the full list from your project's config.
"No nodes changed. Skipped N node(s)."
The NODE FILTER is excluding your selection. If you selected Write nodes but only Read nodes is ticked, tick Write nodes as well and apply again.
A node appears in the skipped list with "(no colorspace knob)".
The tool only processes nodes that have a colorspace knob. Other node types in a mixed selection are skipped automatically and reported.