
PXLtools — Tool guide
Contact Sheet Generator — Nuke node graph builder
Point it at a folder of image sequence sets, choose which sets to include, run a discrepancy check, configure resolution and colorspace, set up label overlays, and Build. Contact Sheet Generator constructs a full Nuke node graph — Read nodes, optional Text2 label overlays, ContactSheet compositors, and Write nodes — organised into per-set and per-page Backdrops, ready to render.
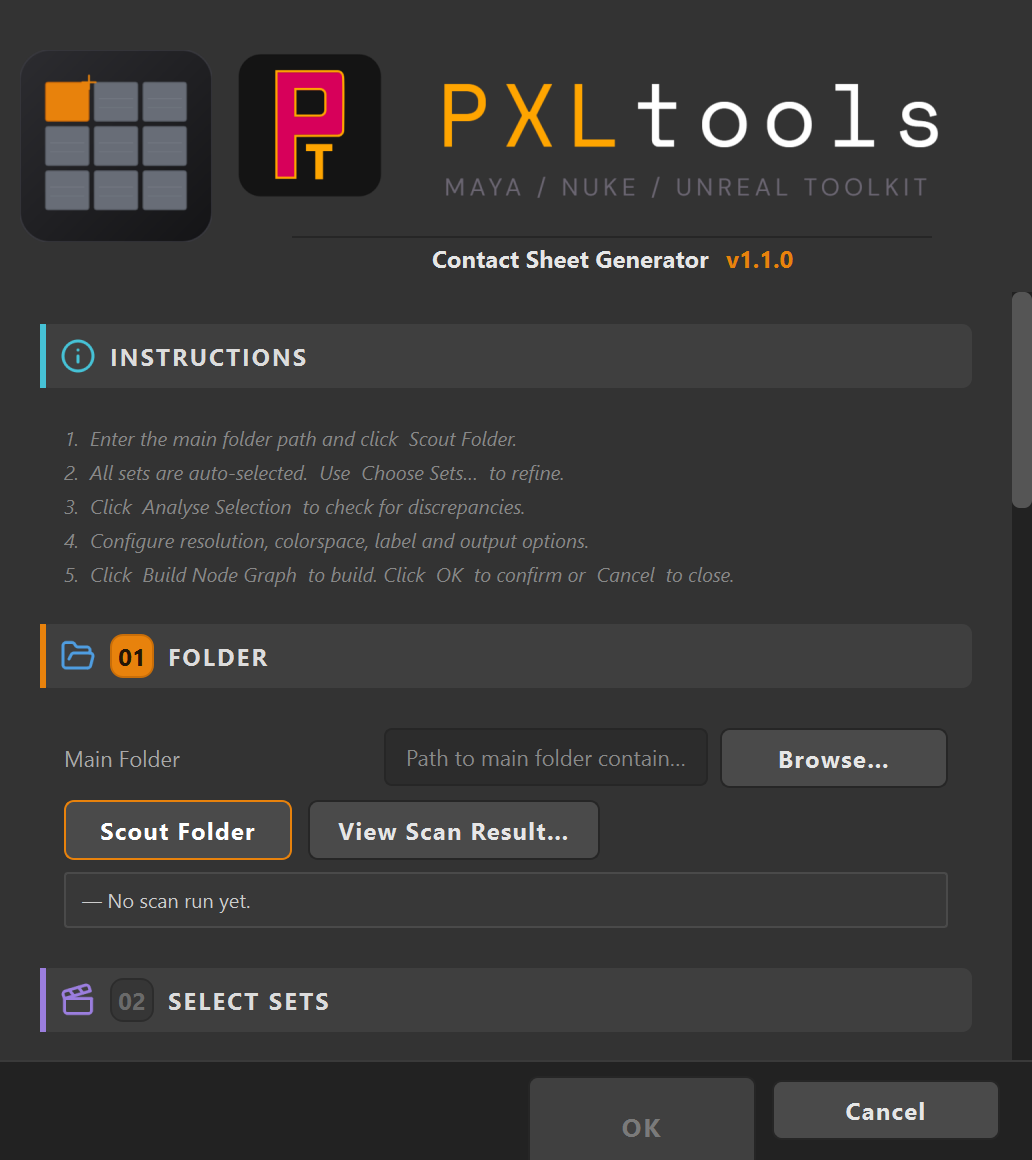
The interface
01
Overview
Contact Sheet Generator automates the build of a Nuke contact sheet node graph for turntable or multi-set render sequences. It expects a top-level folder containing one sub-folder per set, each of which contains one sub-folder per image sequence.
The tool scouts the folder structure, lets you pick which sets to include, runs a discrepancy analysis (missing sequences, mixed resolutions, missing frames), and then builds the full Nuke graph — Read nodes wired through optional Text2 label overlays into ContactSheet nodes and Write nodes, all grouped into labelled Backdrops by set and page. The six numbered sections walk you through every step in order.
02
Requirements
- Foundry Nuke 15 (PySide2)
- Python 3
- Read access to the image sequence folders being scanned
Tested on:
- Foundry Nuke 15
Newer releases generally work, but these are the versions every release is actually tested against. If something behaves oddly on a newer host, that is worth reporting.
Network access
PXLtools needs outbound HTTPS (TCP 443) to www.pxlmentor.com and
objects.githubusercontent.com for licensing and updates. On a studio or corporate
machine, check this before you install — see
Troubleshooting.
Nuke 15 already includes PySide2. You do not install it, you do not pip anything, you do not touch your Python environment.
03
Availability
Contact Sheet Generator is free on the PXLmentor store. Claim it there and you are emailed your licence key and a single INSTALL.py: drag that file into a Maya viewport (or paste the one line from the email into Nuke's Script Editor) and the toolkit installs itself, this tool included. Get it free on the store.
04
Using the Contact Sheet Generator
The tool has six numbered sections. Work through them top to bottom.
INSTRUCTIONS
Shown at the top of the tool, always visible:
- Enter the main folder path and click
Scout Folder. - All sets are auto-selected. Use
Choose Sets…to refine. - Click
Analyse Selectionto check for discrepancies. - Configure resolution, colorspace, label and output options.
- Click
Build Node Graphto build. ClickOKto confirm orCancelto close.
01 — FOLDER
Enter the path to the main folder that contains your sets, or press Browse… to pick it. Then press Scout Folder. The tool walks the hierarchy and reports how many sets and sequences were found. Press View Scan Result… to see the full inventory.
The expected folder structure is:
main_folder/
    Set_A/
        Item_001/  [image sequence]
        Item_002/  [image sequence]
    Set_B/
        ...
02 — SELECT SETS
After scouting, all discovered sets are selected by default. Press Choose Sets… to open the set selection dialog and deselect any sets you want to exclude. Select All and Select None are available for quick filtering. Press Clear Selection to deselect everything and start over.
03 — ANALYSE
Press Analyse Selection to run the discrepancy checker across the selected sets. It reports: mismatched sequence counts between sets, sequences present in one set but missing in another, mixed resolutions within a set, mixed frame counts, and missing frames within a sequence. Press View Discrepancy Report… for the full annotated report.
Discrepancies are warnings, not blockers — you can proceed to Build even if the report has issues.
04 — CONFIGURE
Set the output parameters for the node graph:
- Resolution —
HD 1920x1080,4K 3840x2160, orCustom(enter Width and Height in pixels). This is the total ContactSheet output resolution, not the per-cell size. - Items Per Page — maximum sequences per ContactSheet node. The tool auto-calculates the grid layout.
- Color Space — colorspace applied to Read and Write nodes, drawn from the active OCIO config. Defaults to
scene_linear. - Missing Frames — how Read nodes handle missing frames:
nearest,black,hold, ormirror. - Output Directory — where the rendered contact sheet images are written. Auto-populated from the main folder path.
- File Prefix / Page Suffix / File Extension — control the output filename pattern:
<prefix>_<SetName><suffix><page##>.####.<ext>.
05 — LABEL OVERLAY
Tick Show Layer Name to inject a Text2 node between each Read and the ContactSheet, burning a label into each cell. Configure the label with:
- Separator — the character used to split the filename into tokens (default
_). - Token From / To — the token range to extract from the filename as the label. For example, with separator
_and tokens 2–4, the filenamecs_DayLight_Head_SCAN_01_EyesUp.0001.exryieldsHead_SCAN_01.
06 — BUILD
Press Build Node Graph. The tool creates all Read nodes, optional Text2 label nodes, ContactSheet nodes, and Write nodes in the Nuke DAG, positions them on a grid, and wraps each set and page in a labelled Backdrop. The project frame range is set to span the longest sequence. When the build completes, press OK to close the tool.
Tip: Review the discrepancy report before building. Mixed resolutions in a set won't stop the build but will affect how cells look in the ContactSheet.
05
Troubleshooting
The install fails, or the tool says it cannot reach pxlmentor.com.
This is a firewall almost every time, not a broken installer — and it is very common on studio and corporate machines. PXLtools needs outbound HTTPS on TCP 443 to two hosts:
Send this to your IT team
www.pxlmentor.com  (TCP 443) — licence checks, update checks, downloads
objects.githubusercontent.com  (TCP 443) — the actual file download
Both hosts, not just the first. The download is handed off to a signed link on
objects.githubusercontent.com, so a rule that allows pxlmentor.com but
blocks the second host lets the version check succeed and then fails the download.
A certificate error instead means your network is inspecting HTTPS traffic (Zscaler, Netskope, a corporate SSL appliance) — that needs an SSL-inspection exception for those hosts, not a port opening.
The installer writes full details to ~/Documents/PXLtools/install_failure.log. Email it to
support@pxlmentor.com
and I will tell you which case it is. If your IT will not budge, ask for the offline package.
"No scan run yet." / Scout returns zero sets.
Make sure the folder path points to the top-level folder that contains the set sub-folders, not to a set folder itself. The tool expects exactly two levels of sub-folders below the main folder. Press Scout Folder (or Browse… then Scout) after correcting the path.
The set list doesn't update after I change the folder path.
Press Scout Folder again after changing the path. The scout result is not updated automatically when you edit the field.
The discrepancy report shows warnings but I still want to build.
Warnings do not block the build. Review the report so you know what to expect in the output, then proceed to CONFIGURE and BUILD.
The colorspace I need is not in the Color Space list.
The list is queried from the active OCIO config at launch. Close and relaunch the tool if you've switched configs since opening it.
Label overlays look wrong or are positioned at the wrong spot.
Adjust the Separator and Token From/To values in the LABEL OVERLAY section. The preview is not live — you need to rebuild to see the updated labels in Nuke.