
PXLbid — Tool Guide
PXLbid User Guide
For: experienced VFX producers and supervisors who are new to PXLbid
What this guide does: explains what PXLbid does, how to use it, and how to make the numbers match your studio
Using PXLbid under an NDA
Your key, your agreement. Loading a script uploads no script content. It does send a short usage note to PXLbid's beta log (that a script was loaded, with your email, name, app version, browser and screen size). Running a pass sends the script text to Anthropic under your own API key, so it is covered by your own agreement with Anthropic, not ours. The same request carries your notes for that run, your AI house rules for that stage and your saved corrections. Corrections you save as Global go with the passes of every project, not only the one where you made them.
Not stored, not logged. On the way, the script and your key pass through the PXLbid server in memory only. The server has no database and no code that writes to disk. An automated test in PXLbid's test suite (
proxy/test/smoke-no-log-leak.mjs) sends marked script text and credentials through the real server for a first pass on each processing option, including their error paths, plus deliberately malformed requests, and checks that none of the marked values appear in anything the server prints to its logs. It covers the requests it sends, not every possible one.Not used for AI training. On Anthropic direct (the default), API use falls under Anthropic's Commercial Terms: "Anthropic may not train models on Customer Content from Services." On your own Bedrock or Vertex account (below), the model call is made under your agreement with AWS or Google instead, so check what that agreement says.
If your policy rules out the public Anthropic API. PXLbid can run against Claude in your own AWS Bedrock or Google Vertex AI account instead (Settings, "Where your scripts are processed"). The script is then processed inside your own cloud contract. It still passes through the PXLbid server the same way, in memory only. Your cloud credentials are stored in your browser, like the Anthropic key, so use short-lived credentials that can only call Claude.
Your NDA still comes first. Before you run a pass on client material, tell your client you use AI-assisted script analysis and get their OK in writing. If the NDA forbids sharing with third parties or AI services, do not run a pass. A ready-to-send request and clause are in Where your script goes (NDA).
What PXLbid does (and does not)
PXLbid turns a script into a structured breakdown of sequences, shots, and assets — then prices it and produces a broad schedule.
The flow is: drop a script (PDF, DOCX, or TXT) → AI reads it and builds a first breakdown → you review and edit it → produce a bid (cost + man-days per discipline) and a first schedule (how long with N artists).
What it stops at: the bid and a broad schedule showing total calendar days by discipline and team size. Assigning work to named artists with their own rates, capabilities, and calendars is PXLflow's job, not PXLbid's — PXLbid is the pre-production estimate tool.
One breakdown, the whole production. Where PXLbid stops, PXLflow picks up. Export the breakdown (Export → Breakdown JSON) and PXLflow fills the production from it in a single import: every sequence, shot and asset, plus a task for each department Pass 2 tagged. Export the schedule (Schedule → Export → Schedule JSON) and the start and due dates land on the matching shots. Nobody re-types anything. PXLbid is built for PXLflow, and ftrack and ShotGrid export is on the roadmap.
What's not here: per-artist scheduling, rate-card matrices, retake discounts, overtime, or batching logic. It is deliberately simple — one blended day rate, one baseline per discipline, five complexity tiers, three seniority levels. Everything you tune lives in Rates & effort, not hidden in a dozen configuration tabs.
Before you start — prerequisites
- Access: Cris has placed your email on the allowlist. Sign in with that Google account. The first sign-in shows a warning screen — see Signing in, and the warning Google shows you below, because it looks alarming and it is not.
- Browser: use Chrome or Edge. PXLbid runs in any modern browser, but project folders — saving your breakdowns to a folder on your own disk — only work in Chrome or Edge. Firefox and Safari have not implemented the browser API that lets a page write to a folder you choose. Everything else works there; you just cannot pick a project folder, and the app says so in its header rather than failing quietly. If you only ever want breakdowns kept in the browser, any modern browser is fine. Your breakdowns live on your machine — nothing you produce is saved to a server.
- Your own Anthropic API key: the app needs one to run the VFX Supervisor and Producer agents. You pay Anthropic directly, on your own account. PXLbid holds no credits, no quota and no cap over you, and never sees your billing. Your key is saved in this browser's local storage, so you do not have to paste it again, and travels with each run to reach Anthropic. The PXLbid service never stores it, logs it or writes it to disk. See Where your script goes (NDA) for exactly what happens to it.
Signing in, and the warning Google shows you
The first time you sign in, Google will stop you with a full-page warning saying it hasn't verified this app, and offer you a blue Back to safety button. Most people press it. Do not — you would be pressing the button that takes you away from the tool you came to try.
Here is what it is. Google runs a formal verification review for apps that ask for access to a Google account, and PXLbid has not been through it yet. It is a paperwork queue, not a security finding: nobody has looked at PXLbid and concluded anything about it. Every app in a private beta looks exactly like this until its developer pays for and completes that review, which is not worth doing for a tool being handed to a handful of testers.
What PXLbid actually asks for is your basic Google profile: your email address, your name, and your profile picture. The email is checked against the allowlist; the name and picture are what you see in the top-right corner of the app once you are in. That is the whole list. It does not read your Gmail, your Drive, or your calendar, and it cannot — it never requests those permissions.
The warning itself says the app is requesting "sensitive info". That is Google's fixed wording on this screen, printed for every unverified app regardless of what it actually asked for; it is not a description of PXLbid's request. The screen that follows this one lists the real permissions, and you can read them there before approving.

To get through it:
- Click Advanced — the small blue text at the bottom left of the card. Not "Back to safety".
- The card expands and a link appears at the bottom: Go to PXLbid (unsafe). Click it.
- Google's normal permission screen follows, listing what the app is asking for. Approve it and you are signed in. If your address is not on the allowlist yet you will land on an Access pending card rather than in the app — that is the allowlist, not this warning, and it is fixed by asking Cris rather than by signing in again.

Google remembers the decision for your account, so later sign-ins normally go straight through. While the app is still unverified the grant can lapse after a while and put the screen in front of you a second time — same screen, same way past it.
If you would rather not click past a warning at all, that is a completely reasonable position — say so and you will get a straight answer about what the app touches, rather than a nudge.
Getting an Anthropic (Claude) API key
PXLbid runs on your Anthropic account, not mine. That is deliberate, and it is worth one paragraph before the steps.
If I gave you access on my key, I would be metering you: counting your runs, capping your usage, and sitting between you and the model. I do not want that, and you should not want it either. On your own key nobody holds credits or quotas over you — during the beta you can run as many breakdowns as you like, on whatever scripts you like, and the only person who can see your usage is you. You pay Anthropic directly, at cost, with no markup from me.
There are only two situations.
If you already have an Anthropic API key
Paste it into PXLbid and you are done — skip the rest of this section.
Click the gear icon in the top-right corner of the PXLbid header to open Settings, paste the key into the Anthropic API key field, and click Test connection. That sends one tiny request to confirm the key works and costs a fraction of a cent. Green means you are ready.
Any existing key works — there is nothing PXLbid-specific about it. If you would rather keep this tool's spending separate from your other work, make a second key named "PXLbid" so you can see its usage on its own line in Anthropic's dashboard, but that is a convenience, not a requirement.
If you do not have one yet
You need to create an Anthropic account, put credit on it, and generate a key. Anthropic's own documentation is the authority on all three, and it stays current in a way anything I copy here would not:
- How can I access the Claude API? — creating the account
- I created a Console organization — how do I start? — the walkthrough, with screenshots
- How do I pay for my Claude API usage? — credits and billing
The console itself is at platform.claude.com. If you have ever used Claude, the same login works.
The short version, and the three things worth knowing before you start:
- The API is prepaid, and it is separate from a Claude subscription. You buy credits up front and draw them down. There is no monthly fee and nothing recurs. A Claude Pro or Max subscription does not include API usage — it is billed separately, which surprises people.
- **Put credit on the account before you create the key. Open Billing and use Buy credits; credit is available immediately. $10 is a sensible start — roughly 5 to 20 breakdowns depending on script length, fewer in Deterministic Mode. This ordering matters: a key with no credit behind it will pass Test connection and then fail on your first real run, which looks like a broken app rather than an empty balance. There is also an auto-reload** option that tops up automatically when the balance drops below a limit you set — useful later, unnecessary for a trial.
- Then create the key at API Keys → Create Key. It starts with
sk-ant-and is shown once and never again, so copy it immediately. If you lose it nothing breaks — delete it and make another.
Then paste it into PXLbid as described above.
If any of that does not match what you see on screen, trust Anthropic's documentation over mine — they change their console, and these links follow it.
What it costs to run
A typical breakdown runs roughly $0.20 to $2, depending on how long the script is. Both passes default to Opus, the most capable model; dropping Pass 1 to Sonnet in Settings costs noticeably less and is a sensible choice while you are still calibrating Rates & effort. Deterministic Mode runs the pass three times and compares the results, so it costs about three times as much.
Before you spend anything, the script picker shows you an estimate of the size of the job, and no tokens are spent until you actually start a pass.
What happens to your key
Your key is stored in this browser's local storage, and it travels with each run: to reach Anthropic, the request goes through the PXLbid service, which forwards it under your key. The service never stores it, never logs it, and never writes it to disk. It exists on our side only while a run is in progress, which can be several minutes on a long script. Anyone who can use this browser profile can use the key, so clear it in Settings on a shared machine. The full explanation, including what happens to your script, is in Where your script goes (NDA).
Your first ten minutes — calibrate first
Every bid built on the shipped placeholder numbers is structurally right but financially fictional. Spend ten minutes now and your bids are credible.
Step 1: Set your day rate (2 minutes)
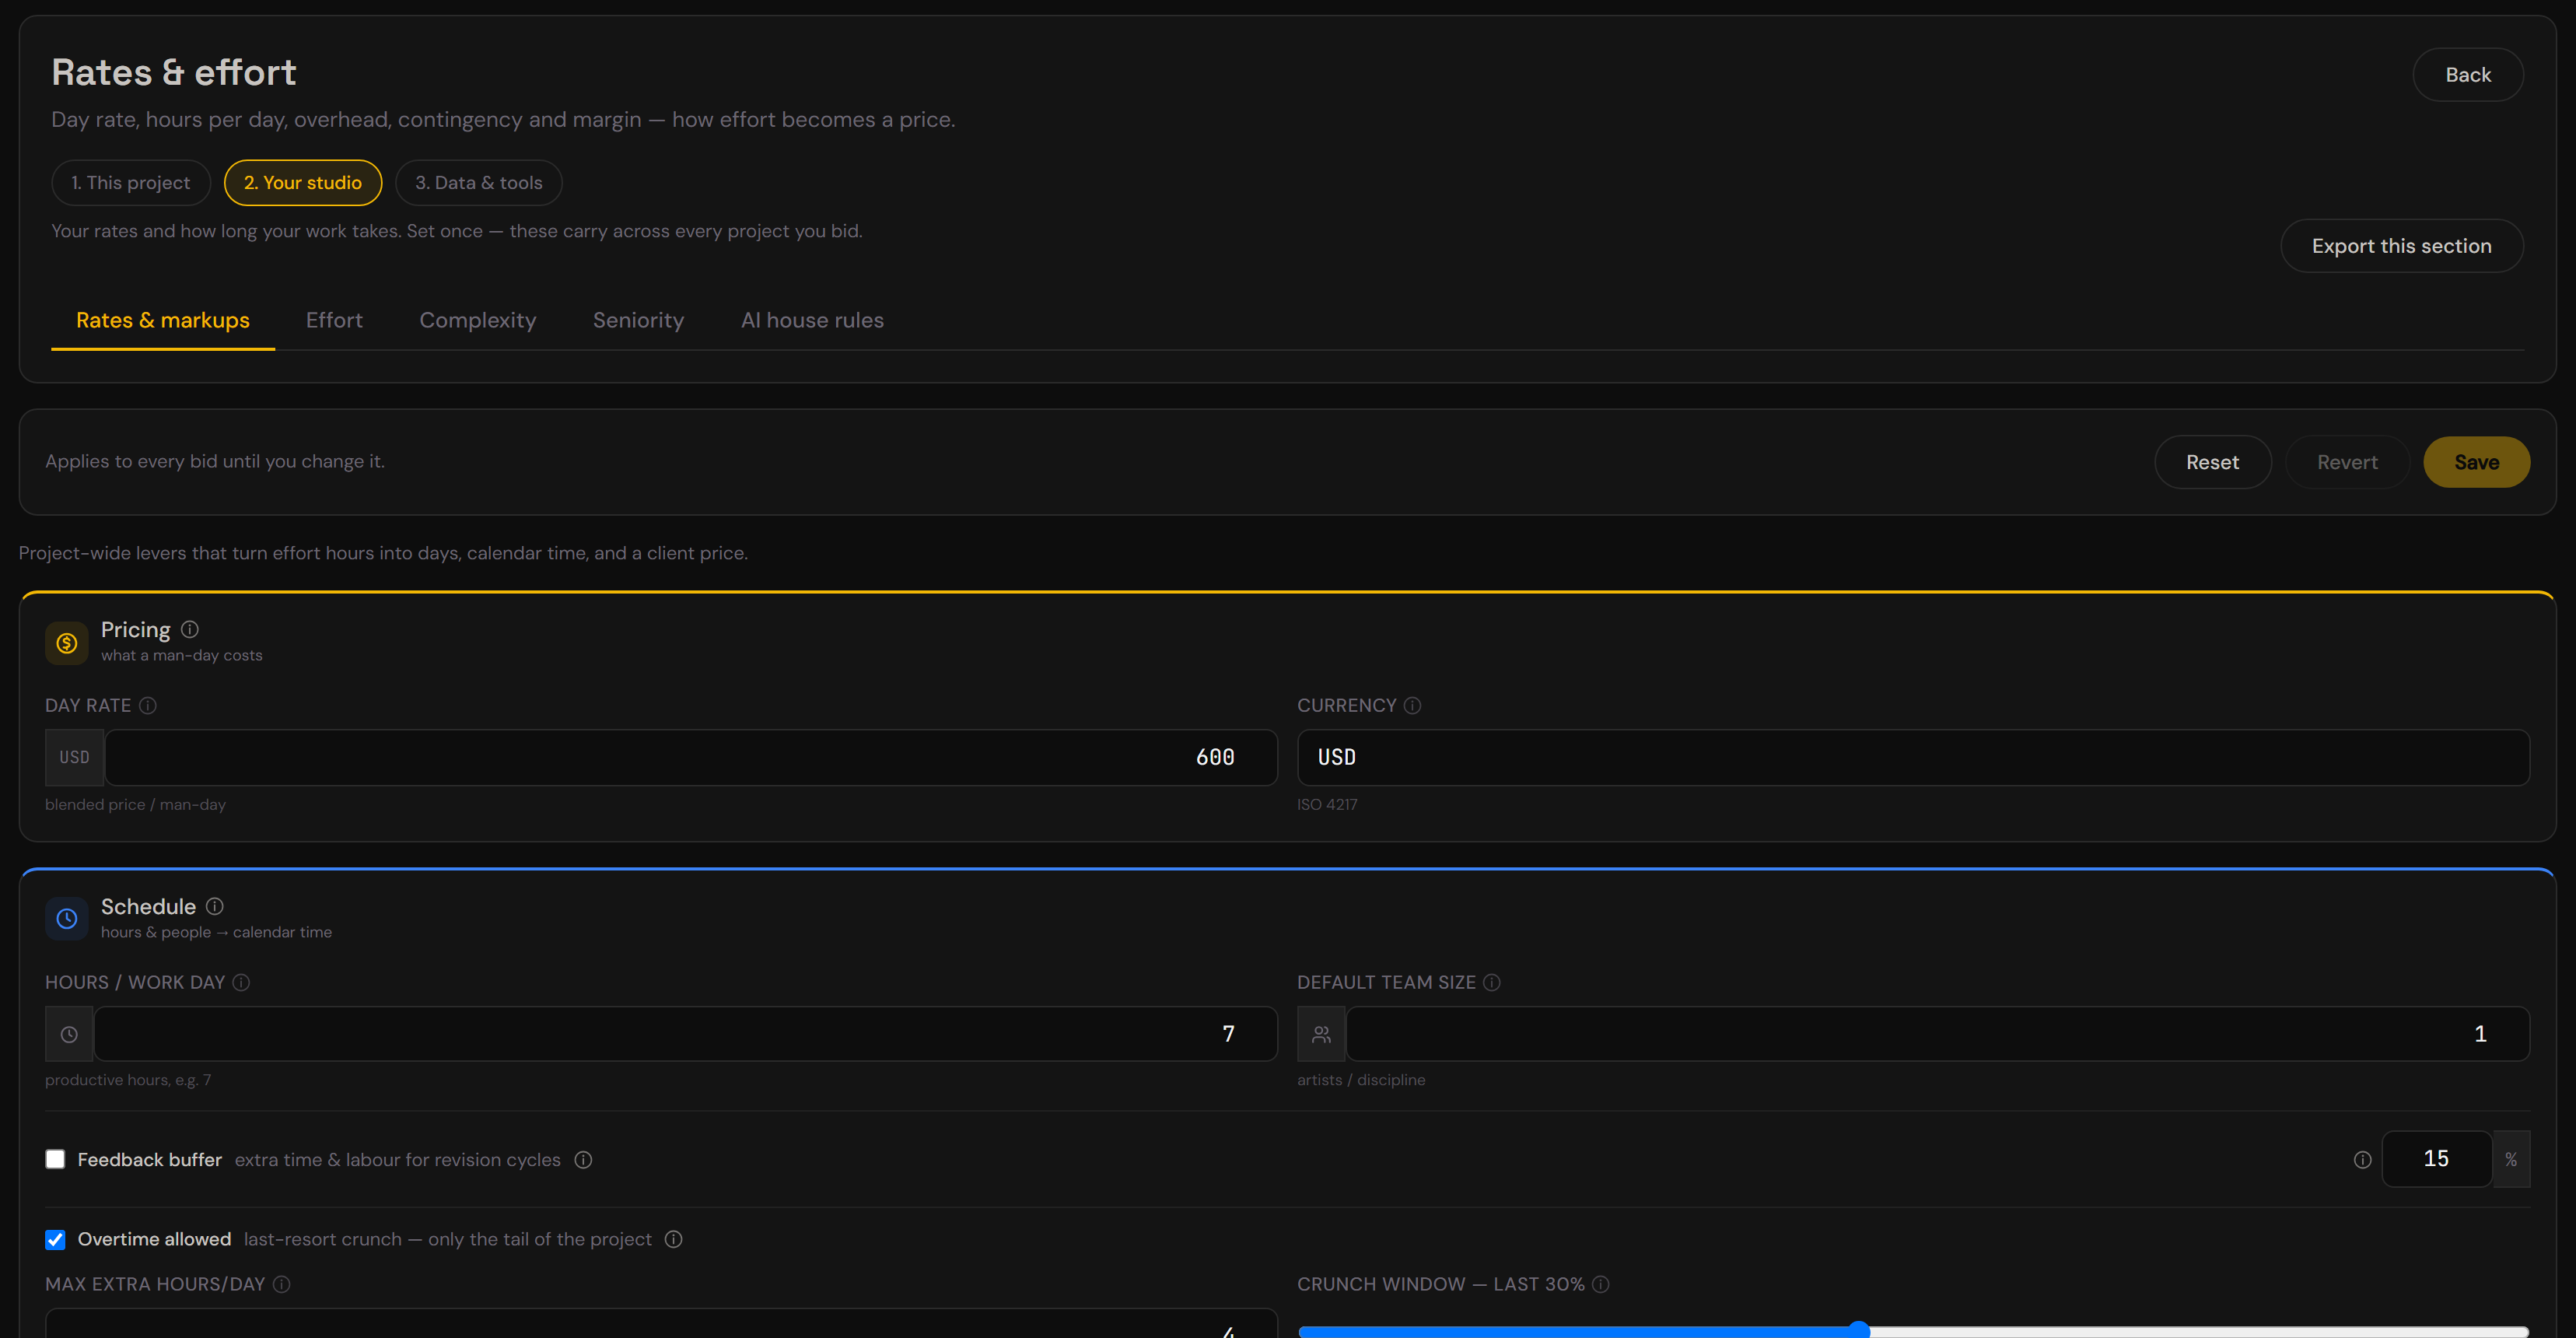
- Click Rates & effort (top bar).
- Rates & effort opens on 1. This project — pick your project type first, because it decides which departments exist.
- Go to 2. Your studio > Rates & markups.
- Enter your day rate — one blended $/man-day. This is the only number that directly affects bid cost.
- Use a realistic blended rate for your studio — don't guess. The shipped
- (Optional) tune overhead, contingency, and margin percentages. These are applied in the waterfall: subtotal → +overhead → +contingency → +margin → price. Shipped defaults: overhead 20%, contingency 10%, margin 25%, best/worst range ±10%, currency USD, default team size 1, feedback buffer off (15% when switched on). They compound, so they are not additive.
- Leave hours per day as-is unless you bid on a different number (default: 7 productive hours).
600 is a placeholder, not a recommendation.
Step 2: Tell it how long your work takes (5 minutes)
The single most important panel. Open Rates & effort > 2. Your studio > Effort.
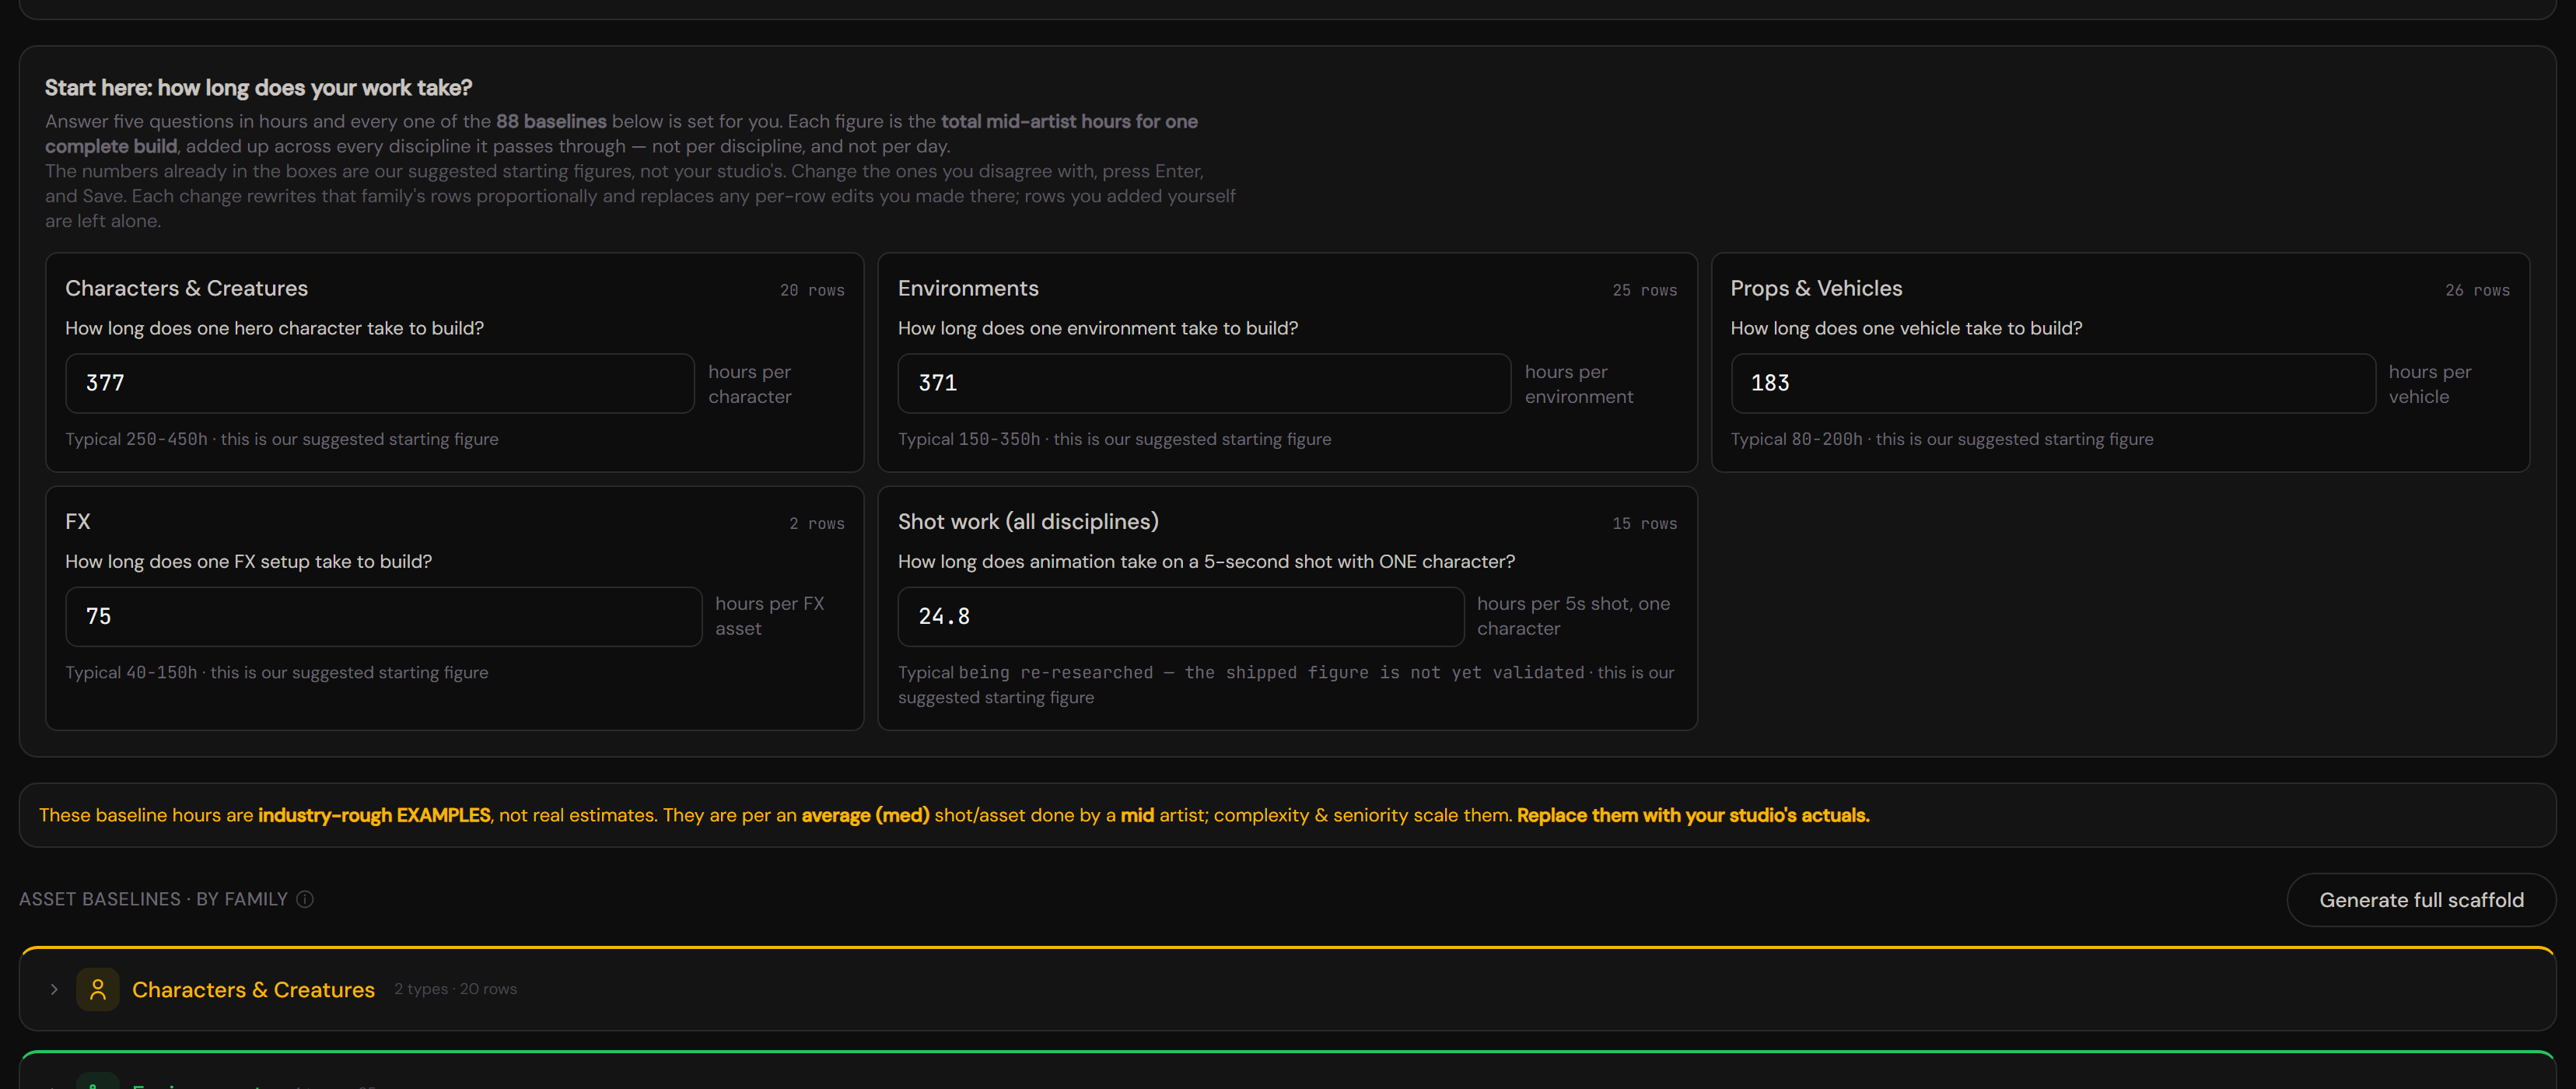
At the top is "Start here: how long does your work take?" — five questions, answered in hours:
| Question | You answer | Suggested |
|---|---|---|
| How long does one hero character take to build? | hours | 360 |
| How long does one environment take to build? | hours | 371 |
| How long does one vehicle take to build? | hours | 156 |
| How long does one FX setup take to build? | hours | 75 |
| How long does animation take on a 5-second shot with ONE character? | hours (per 5s shot, one character) | 25 |
Each figure is the total mid-artist hours for one complete build, added up across every discipline it passes through — modelling plus texturing plus rigging and so on. It is not per discipline, and not per day.
The numbers already in the boxes are our suggested starting figures, not yours. Change the ones you disagree with, press Enter, then click Save. Answering these five questions sets all 68 underlying baselines for you, in proportion.
If you want to override a single discipline — just rigging, say — scroll down to the per-family rows underneath and edit that row directly.
Do this once per studio. It carries across every project you bid.
Step 3: (Optional) review complexity and seniority
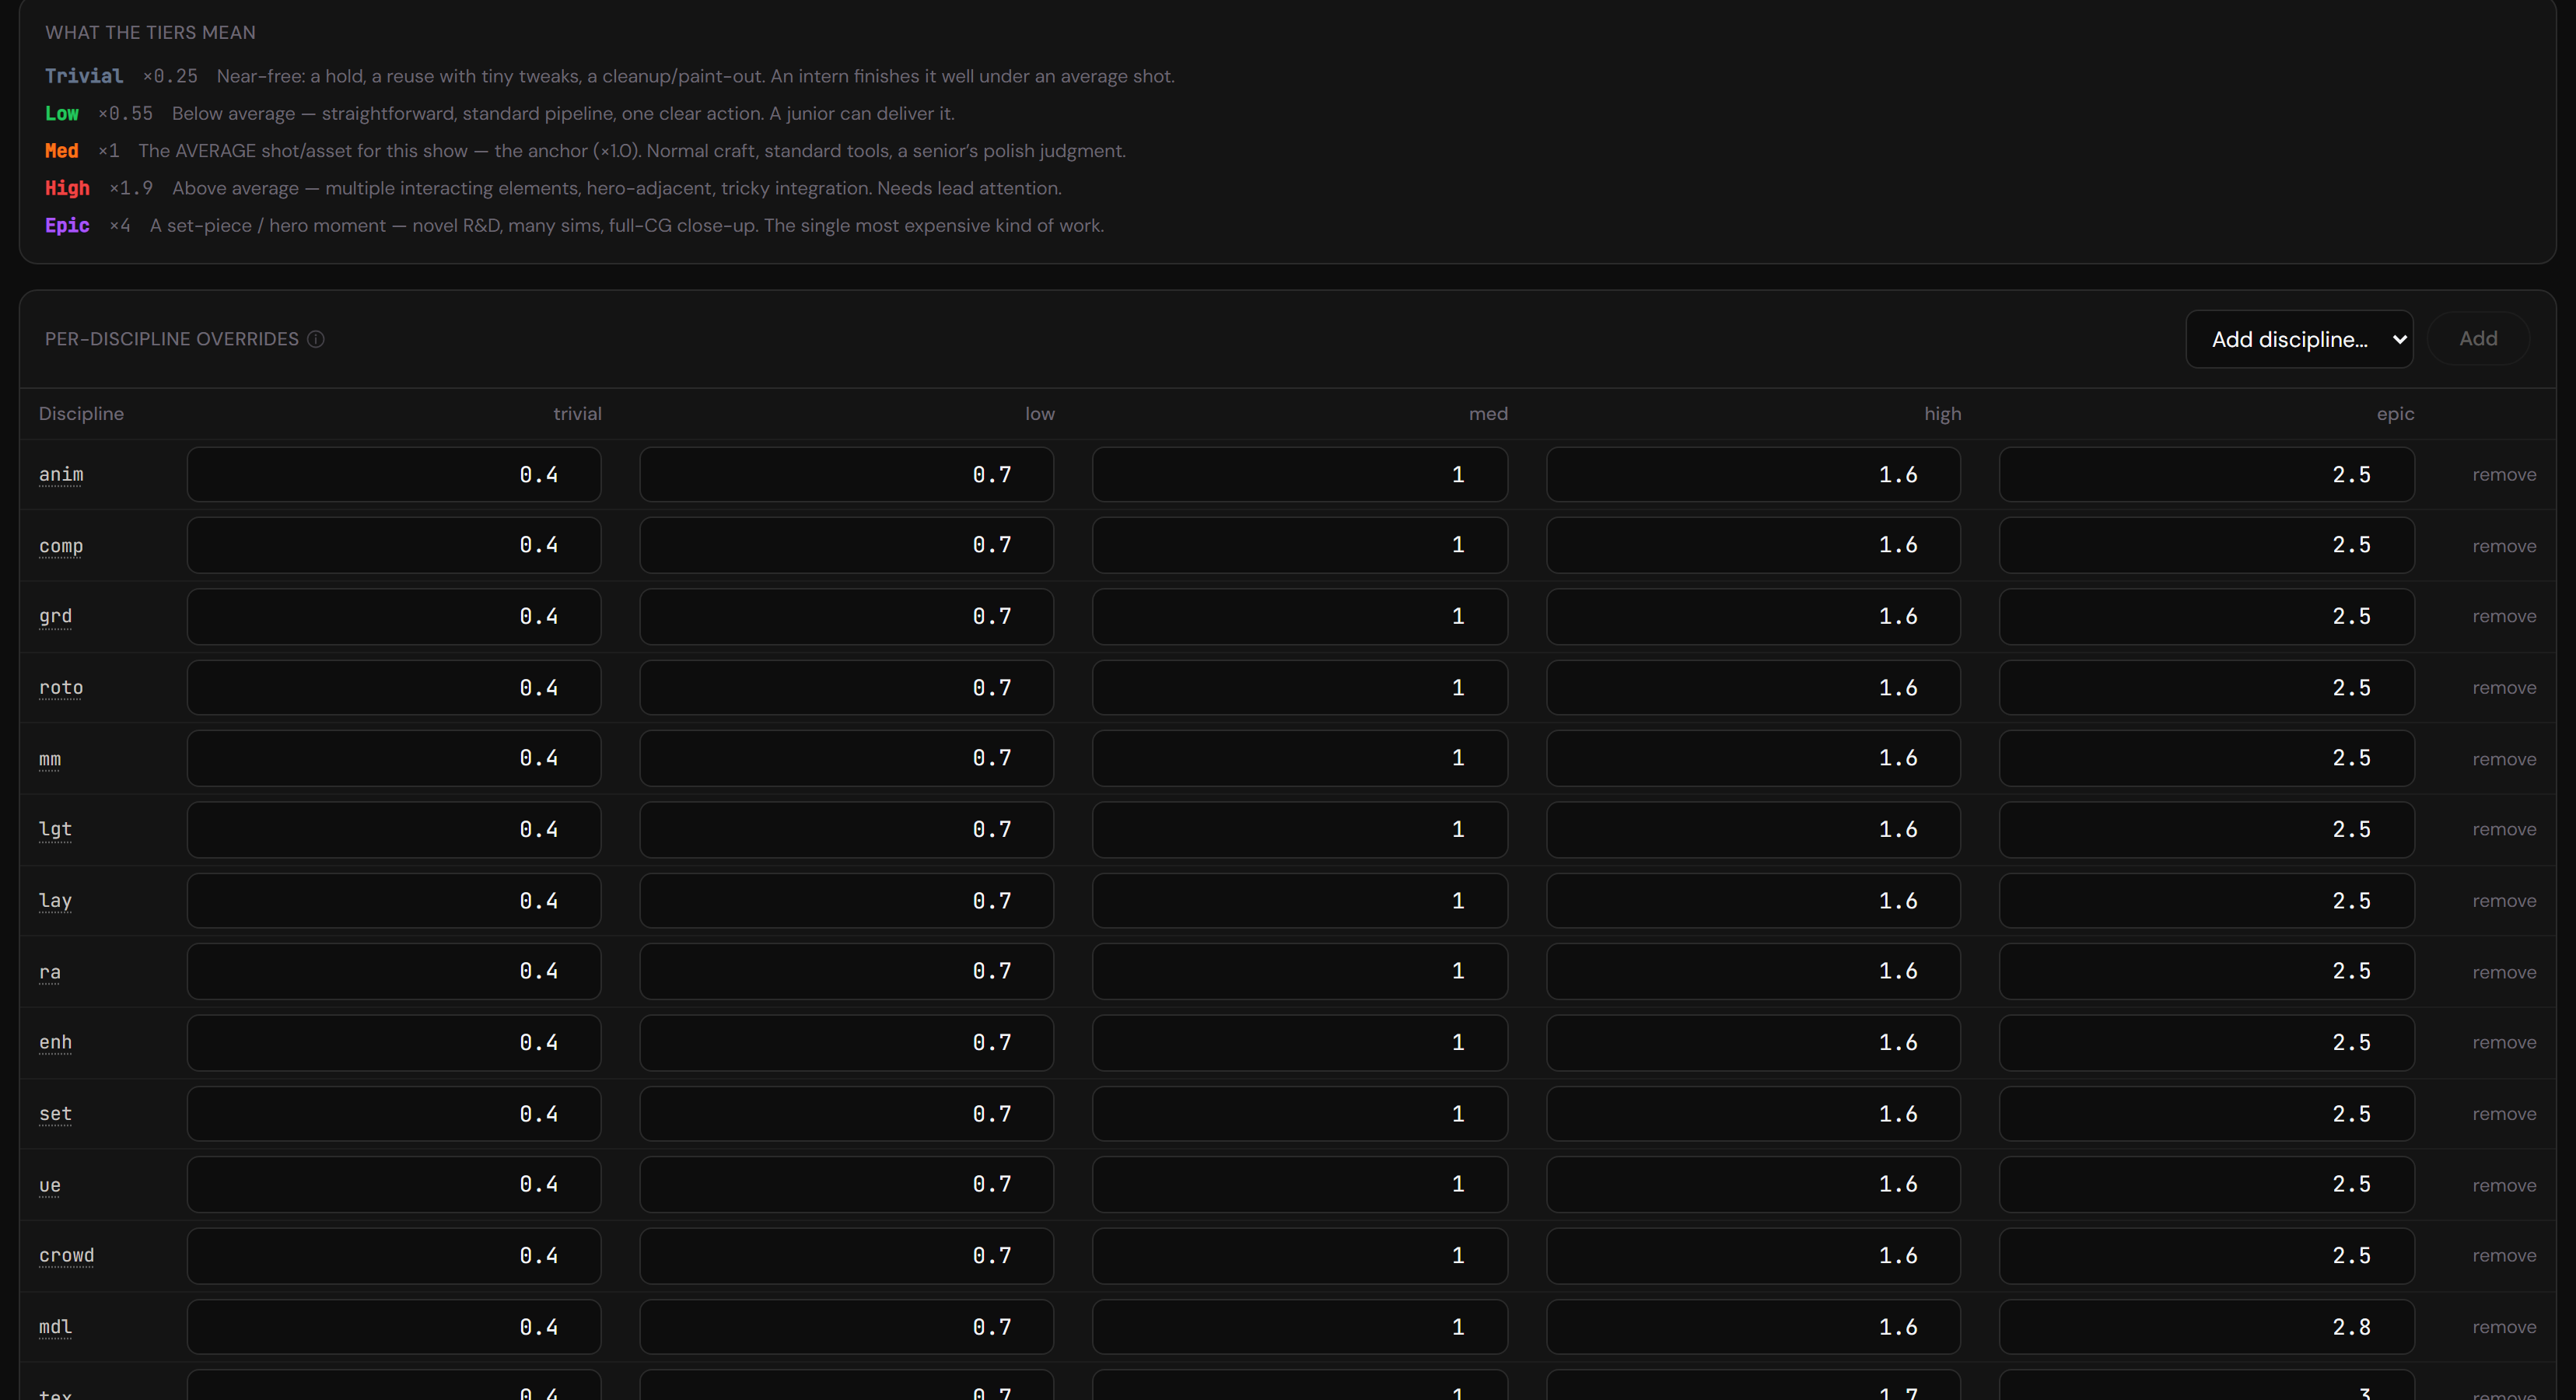
- Complexity tab — the 5 tier multipliers (trivial 0.4 … med 1.0 … epic 2.5). These are reasonable defaults; leave them unless your grades differ sharply.
- Seniority tab — junior 1.5 / mid 1.0 / senior 0.7. Same — reasonable defaults, but flag any discipline where a senior saves more or junior is slower.
Once both your rates and your effort baselines differ from the shipped values, the gold "not calibrated yet" banner on the Bid and Schedule screens disappears. It reappears if you ever reset a resource back to the defaults — that is deliberate, because reset numbers are placeholders again.
Running a breakdown — step by step
Pass 1: VFX Supervisor
- Click New script (or just drag a file onto the screen).
- Upload a script: PDF, DOCX, or TXT (
.doc, old binary Word, is not supported on the published site — it needs a local backend, so it only appears if you run PXLbid from source). - Plain text, screenplay format, or PDF — the AI adapts.
- On a long script, work sequence by sequence rather than feeding it the whole thing. There is no hard page limit, but a full feature in one pass runs longer, costs more, and gives the AI less attention per scene — so the breakdown gets shallower exactly where you wanted it deepest. Around 20 pages at a time is a comfortable working size.
- Bidding a sequence at a time also matches how you actually work: you can start with the sequence that worries you most, get that number right, and move on — rather than waiting for a whole-feature pass to finish before you learn anything.
- PXLbid can do this for you: choose Choose sections in step 1 of the setup page and Pass 1 reads only those pages. See Bidding part of a script.
- Script read opens by itself. One quick model call reads the whole script and tells you, in a minute, what the project is: the story in a few lines, the main characters, where and when it is set, and a few hints for the bid (where the VFX weight sits, work that recurs). Below that is the map of sequences with their VFX load and a rough shot count. You never have to wait for it: Set up the bid is live the whole time. See Script read.
- Click Set up the bid, then (optional) add notes for the VFX Supervisor — e.g., "Focus on creature decomposition. The hero's mech has 4 LODs." The AI learns these hints.
- Check the Deterministic mode checkbox if you want 3-run consensus for production breakdowns (roughly 3× API cost, but much lower variance). Leave it unchecked for quick first passes.
- Click the Run button at the end of the card (with the defaults it reads Run Full production on the whole script). Watch the agent stream as it reads the script and extracts sequences, shots, and assets with complexity grades.
What you get: a first-draft breakdown with one shot per scene, all assets, and a tier grade on each.
Bidding part of a script
A full feature in one pass runs long and gets shallower exactly where you wanted depth. Instead, bid the part you care about, and add more later.
The setup page (Set up the bid, after Script read) is two numbered steps and one button at the end. Back to the script read at the top takes you back to the story and the sequence map.
- Step 1: What to analyse. Choose Whole script (every page, in one run) or Choose sections. Choose sections shows the sequences PXLbid can find from the scene headings. That list is free and shows no VFX load.
- When Script read has finished, the list already shows each sequence with its page range, its VFX load (none, light, medium or heavy) and a rough shot count. Use it to skip the light sequences. If the read failed or you continued before it finished, Index script runs it from here.
- Tick the sequences you want, or type page ranges such as
5-10, 42-51. The two add up, and overlapping ranges merge. A typo (a backwards range, a page past the end) is shown in red and blocks the run until it is fixed. The line under the list shows the pages chosen and about how many tokens Pass 1 will read. - Step 2: How to bid. Pick Full production, Boutique or Guesstimate (see below).
- Click the button at the end. It names both choices: Run Boutique on pp. 25-66, Run Full production on the whole script, or Open Guesstimate. With Choose sections selected and nothing chosen yet, the button stays off until you pick something.
- The breakdown, the Bid screen and every export now say which pages they cover, for example
Scope: pp. 5-10, 42-51. Pass 2 also reads only those pages. - To add more, click Bid another range at the review step, choose the next pages and run again. The bid keeps its mode. The new range is merged into the current bid: shots add up, and an asset that appears in both ranges is counted once.
How a new range fits the bid. PXLbid tells the AI which sequence codes, shot codes and asset names the bid already has, so it carries on the numbering and reuses the name of a character or set it has already seen. If a code still clashes, the new sequence or shot is given the next free number and everything that points at it moves with it. You will see a MERGE warning on the review step naming each change. A sequence that really runs across the boundary between two ranges (same code, touching pages) is joined into one. An asset with the same name but a different type (a gate prop and a gate building) stays separate and the new one is renamed.
Page numbers. For a PDF they are the PDF's own pages. Word, text and pasted scripts have no page boundaries, so their page numbers are estimated from line counts and labelled that way. Script read is one quick model call on the whole script (a Sonnet, not an Opus); the sequences list without it costs nothing.
Boutique and AI bidding
Full production prices a show department by department, in man-days. That suits a studio bidding a short script. Boutique is for a small freelance team (generalists plus a few specialists) and for shows that lean on AI generation: every shot gets a price band instead of a department matrix, and the AI compute is priced as its own section. It sits beside Full production; nothing about the Full production bid changes.
Choosing the mode. On the ingested card, in Step 2: How to bid, pick Full production (the default), Boutique or Guesstimate (see the next section). Pass 1 runs the same either way. With Boutique, a second pass then reads each shot and sets its production tier, the capabilities the generation needs, a complexity and a duration. Adding a range to an existing bid keeps that bid's mode.
The four production tiers.
- AI full: a one-off environment or a shot with no continuity to hold. Fully generated, with touch-up compositing.
- AI hybrid: the camera or environment follows a 3D layout or previs, then a video-to-video pass dresses it.
- AI enhance: hero assets are developed and rendered in 3D, then an AI enhancement pass lifts the look.
- Traditional: generalist CG and compositing, no AI in the shot.
Continuity-critical shots and close interaction with a hero character go to Traditional or AI enhance. The AI suggests a tier for every shot; you can change any of them in the bid table.
Reading the Boutique bid. Open Bid. The top card shows the likely price and the low to high range, with the waterfall for each case: labour, overhead, AI generation, contingency, margin. Below it, the table lists each shot with its tier, complexity, duration, the AI model, and the labour band (low, likely, high) and AI cost. Change a tier, a complexity or a model and everything recomputes. Overhead, contingency and margin come from Rates & effort > Rates & markups, exactly as in Full production; the low to high bands are the range, so the best/worst percentage is not added on top. If you switch on render cost there, traditional shots are priced for the farm.
How a shot is priced. Labour is the shot's artist-days (from Boutique bands, by tier and complexity) times the blended day rate of that tier's role mix (from Boutique roles). AI cost is the shot's seconds times the takes per usable shot times the model's price per second, plus exploration on the cheapest draft model, keyframe images and, if you switch it on, an upscale line. The low, likely and high cases use 10, 15 and 20 takes per shot by default (the producer default: about 10 to 20 iterations per AI shot). For reference, the documented lean figure is far lower, about 3 to 4 generations per usable shot; the AI settings for this show panel has presets for Default (10 / 15 / 20), Lean, documented (3 / 4 / 8) and Commercial, an estimate (10 / 20 / 30), and you can type your own. The panel changes these for one show.
Which model. The AI only says what a shot needs (character consistency, a camera locked to a 3D layout, photoreal, HDR or EXR output and so on). PXLbid then picks the cheapest model in the catalog that covers those needs and can make the picture at your target resolution. Only final models are recommended; the cheap draft models (Veo Fast and Lite, LTX Fast) are used for exploration takes. AI is billed the way vendors bill it: whole clip lengths (a 7 s Luma shot is a 10 s clip, Veo at 1080p is 8 s only) and per-generation minimums (Runway Aleph 0.56, Seedance 2.5 0.80), and the bid shows the billed seconds when they differ from the shot. A clip longer than the model's limit is stitched from several clips: fewest clips first (every extra clip is a seam), then the cheapest combination of clip lengths the vendor sells that covers the shot. Where a model tops out below your target resolution, PXLbid adds an upscale step to the target and warns you; it prefers the highest-resolution model it can and the cheapest upscaler. A model you choose by hand is checked: one no longer in the catalog, of the wrong kind, or below your target resolution is flagged. The model column shows the recommendation; open it to choose another. The AI never quotes a price and never names a model.
Nothing is priced at zero. A shot with no tier, a role with no day rate, or an AI shot that no model can cover is listed under not priced and left out of the totals until you fix it. Exporting with items not priced asks you to confirm first.
Keeping the prices honest. Boutique roles, Boutique bands and AI models are tabs under Rates & effort > Your studio. The shipped day rates and bands are placeholders: replace them with your own. Every model row carries a source and a date, and is marked sourced or estimate. AI prices move monthly, so the catalog is dated, the bid prints the date, and it warns once the catalog is more than 60 days old. Use Prices checked today after you have re-checked them.
Exporting. The Bid view exports the Boutique bid to Excel (summary, shots, the bands used, role rates, the AI generation section) and to a printable PDF. Both state the mode, the low, likely and high totals, and the AI generation section. The breakdown JSON carries the mode and the tiers, and PXLflow imports it as any other breakdown.
Guesstimate: bidding without a final script
Small-budget shows often have no final script and no edit, and sometimes only a full script for a film that is not greenlit yet. Guesstimate prices that show from assumptions. It is clearly labelled as a guesstimate on screen and on every export: GUESSTIMATE: based on assumptions, not a shot breakdown. It uses the Boutique rates and the AI generation cost, so the numbers are in the same terms as a Boutique bid.
Starting one. Either choose Guesstimate in Step 2: How to bid on the ingested card (the sections you pick in step 1 still apply, so you can guesstimate pages 5-30 of a long script), or, with no script at all, use Guesstimate without a script... on the start screen. Give it any combination of:
- a draft, a treatment or a full script with no edit (paste it, or use the script you already loaded);
- the form: the lowest and highest shot count you expect, a budget cap in USD (optional), the runtime in minutes, the genre and look in a few words, how much of the work should be AI (none, some, most, max, or a percentage) and any notes.
The form alone is enough. Any one field, or a script, lets you build it.
What comes back is a distribution, not a shot list. The AI proposes groups (a sequence each, or one group for the whole show). Each group has a shot count range (low, likely, high), an average shot length, a mix of production tiers (AI full, AI hybrid, AI enhance, traditional), a mix of complexity, and the share of its AI shots that need character consistency, a camera locked to 3D, photoreal output or HDR. It never quotes a price and never names a model. The engine then turns each group into representative shots and prices them with the Boutique bands and the AI cost engine. The result is the same for the same input.
Reading the result. The top card shows the likely price, the range across your low to high shot count guess, the assumed shot counts, the AI generation subtotal and a confidence badge (low, medium or high) with its reason. Every shot count, low, likely and high, is priced on the likely bands and takes, so the range is not made of stacked extremes. Beneath it, a separate execution band shows the likely count on the low and on the high bands and takes: how much the same show could move with how hard it turns out to be. The group table shows each group's counts, mix bars and price at its low, likely and high count. Beside it are the assumptions the estimate rests on, the questions that would change it most, and the budget fit panel.
Editing it. Change any count, shot length or mix in the table (use edit the mixes on a group for the percentages) and the price follows straight away. A mix that does not add up to 100% is rescaled and says so. Reset to the model puts back what the AI proposed.
Budget fit. The cap stays in your browser: it is never sent to the AI, so the estimate is not bent to fit it. Each shot count, and the execution high on the likely count, says whether it fits or exceeds the cap by how much. When the likely count exceeds it, two levers are shown, both found by re-pricing the likely count on the likely bands, not by a rule of thumb: how many shots would have to go at the current mix to fit (the most you can keep), and the smallest whole percent of AI that would fit. If even the extreme does not fit, it says so.
When the AI cannot cover a shot. Some mixes of needs (for example character consistency with a photoreal look) are covered by no single AI model. Those assumed shots are priced one tier more manual, from AI full to AI hybrid to AI enhance to traditional labour, instead of quietly dropping the need. A note lists each affected mix, how many shots and what it adds to the likely price. A locked camera is never traded away.
Exporting. Excel and PDF carry the GUESSTIMATE banner and the assumptions block, the low, likely and high totals, the group table and the budget fit.
Projects: adding work to a bid
A show is a project. It keeps the bid you edited, every version you sent and the schedule, and it comes back when you reopen it from the start screen (Open project). Open the Project view from the top bar to see its deliveries, its bid versions and what each delivery added.
Marking a bid as sent. Click Mark as sent on the Bid. The bid is stored exactly as it stands: the priced lines, the totals, your edits, the rates and the catalog date. It becomes read-only, and an export of it reproduces it even after your rates change. Edit as new version starts a draft from it.
Adding a delivery. When the client sends more script, or you bid another part of it, click Add a delivery on the Project view.
- Load the script. A new script, or the same script again. If it is the same one, the pages an earlier delivery covered are skipped and you choose the other pages.
- Set up the run. The same two steps as always. The mode is the project's and cannot change. Pass 1 is told the sequence codes, shot codes and asset names the bid already has, so numbering continues and a character it has seen keeps its name.
- Check the assets. Nothing is priced until you confirm this screen. Each asset that looks like one the bid already paid for is listed with where it was built. For each one choose Reuse (no build cost), Needs more work (priced as an upgrade: a share of the build, 30% to start, and you can change it) or Different asset (it only shares a name: give it a new name and it is priced in full). Assets that were never bid are listed as new. The shots that use a reused asset are still priced; only the build is not charged again. Boutique prices per shot and has no separate asset build, so there the choices are recorded but change no price.
- Review the new shots. The Bid, the checkpoints and Pass 2 now work on the new delivery on its own. Pass 2 is sent only the new shots; the earlier deliveries keep their Pass 2 data.
- Price it. Click Price delivery. You choose, every time:
- Addendum. The bid you sent stays exactly as sent. Addendum 1 prices only the new shots, the new assets and the upgrades, and the Bid shows Original + Addendum = Combined total, to the cent. Addendum quote (PDF) and (Excel) export it as its own quote, "Addendum 1 to Bid v1 dated ...", and Combined summary lists every quote and the total.
- Merged bid. One bid over every delivery, priced again with today's rates and settings. Each asset is counted once, and your edits on earlier shots are kept. It is saved as a new version; the earlier ones stay as they were sent. The screen shows the change against what you last sent, per sequence.
- Choose the schedule. If the project has a schedule you are asked again each time. Keep existing dates locks what is already scheduled and puts the new work in the capacity the crew has left; you see the new end date, and any department that runs past your target end date with the man-days that do not fit. Re-plan everything recomputes the whole schedule and lists which sequences moved, with their start and end before and after.
- See what it added. The Project view lists, for every delivery, the new sequences, shots and assets, the assets that were reused, and any upgrades.
If no bid has been sent yet there is nothing to choose: the delivery is added to the draft bid, and the screen says so. If a draft is open next to a sent bid, only Merged is offered, because an addendum needs the draft closed first.
Exporting to PXLflow. Export to PXLflow on the Project view offers Whole project or Delivery N only. Codes are unique across the show, so PXLflow's additive import never sees a collision.
Guesstimate projects. A delivery is a new guesstimate: its own form and result. An addendum prices that guesstimate on its own and adds it to the one you sent. A merged bid puts the assumed shots of every delivery together in one guesstimate and prices it again.
One editor per project. A project is edited in one tab or window at a time. If you open it in a second one, that tab is view only: a banner says "Open for editing in another tab or window. View only." and it changes and saves nothing. Take over asks the other tab to save and let go, then this tab shows the latest copy. It waits for the other tab to finish saving, however long a slow folder takes, and says so; after five seconds you can take over anyway, which cuts the other tab off and may lose its last changes (it offers to keep them as a copy). Everything on a view-only screen is switched off: you cannot edit, add a delivery, price or mark a bid as sent from it.
Where a project is saved. In this version a project is saved in this browser. Saving a project into a project folder is switched off while it is made safe for two computers writing to one folder; breakdown files are still written to a project folder as before (see Project folders). Export project on the Project view saves the whole project as a file, which is the backup to keep: store it with the show. Load JSON from disk on the start screen opens it again, on this machine or another; if this browser already has that project, the file opens as a separate copy and nothing is overwritten. PXLbid never removes a project to make room: when the browser is full, saving is refused and says so, and you remove an old project from Open project or export this one. Clearing this browser's site data removes the projects saved in it.
Nothing sent is lost. A bid is marked as sent, and a delivery is added, only once the browser holds a safe copy. If it cannot (it is out of space, for example), you see "Can't mark as sent: this project can't be saved in this browser. Export it first." and nothing changes. If you try to leave a project whose last changes are not saved, a dialog lists exactly what would be lost. Switch anyway is switched off while a sent version or a delivery is on that list; Export project makes them safe.
When two copies disagree. If two copies of a project each hold changes the other has never seen, PXLbid saves nothing over either and shows "The project folder and this browser have different changes." Choose Keep folder copy (the other copy becomes the project), Keep mine as a separate copy (your work opens as a new project marked as a copy, and the original becomes the other copy), or Export both as files. Keeping the other copy is not offered while yours holds a sent version or a delivery the other lacks.
Review & edit
- The breakdown appears in the Review phase. Read through it. You'll see tabs for Sequences, Shots, Assets, Warnings, and Clarifications.
- Edit anything: click any shot/asset row to open a detail drawer. Change the name, sequence, complexity tier, seniority, or mark it "skip" (×) to drop it.
- When you're happy, click Approve & continue (bottom of the screen).
- You're offered a save button (download JSON) before moving on — use it to back up your work.
Pass 2: Granular breakdown (optional)
After Checkpoint 1, you can optionally run Pass 2 to subdivide shots and tag asset departments more precisely. This step needs the original script re-attached: the breakdown holds only short quotes from the script, not the full text Pass 2 reads.
- If the script is already attached, click Pass 2 at the bottom. A panel opens asking for scope — Whole script, One sequence, One shot, One asset, or All of one asset type — and intensity: Light, Medium or Deep. Narrow the scope when you only want to refine part of a breakdown; it is faster and cheaper than re-running everything.
- If the script is not attached, upload it again first.
- Run Pass 2. The agent refines the breakdown — typically splitting wide shots into multiple workable shots, adding department tags, and re-grading based on new detail.
- Review the Pass 2 changes summary and the updated breakdown. Re-grade anything that looks off.
- Click Bid or Schedule to move on.
Skip Pass 2 if: you're happy with the Pass 1 breakdown (one shot per scene is often enough for a bid), or you're in a hurry. You can always run it later if you reload the breakdown.
Bid
- Click Bid (or skip straight there from Checkpoint 1).
- You see:
- Totals card: total cost, man-days, contingency range (best–worst %), calendar days.
- Schedule by discipline: costs and calendar days per department (assuming the team sizes you set in Rates & effort → Rates & markups).
- Line items: every shot/asset × discipline with the full calculation: base hours → × complexity → × seniority → hours → days → rate → cost.
- Re-grade any line: click a row's complexity tier or seniority badge and change it. The entire bid recomputes live. This is how you adjust the bid after review.
- Drop a line: click the × to remove it entirely (e.g., "this shot fell out of scope").
- Export: click the export button (top right) to download a CSV or a client quote deck.
Schedule
- Click Schedule (from Checkpoint 1 or Checkpoint 2).
- You see a Gantt chart showing calendar timeline by discipline.
- Dependencies (who hands off to whom) drive the order.
- Team sizes (set in Rates & effort → Rates & markups) compress calendar time (2 artists on one lane halves the duration).
- Any change to complexity or seniority in the breakdown updates the schedule live.
- Export the schedule as needed.
Scheduling assistant (preview)
Preview. The scheduling assistant is switched off by default and most testers will not see it. It is described here so that anyone asked to try it knows how to switch it on and what it does. It may change before it ships.
The assistant reads the schedule on the Schedule tab (numbers only: no script, no shot or asset names, no prices) and proposes changes to three things: the crew for one discipline, the client target date, or overtime. It also flags departments that are over-allocated or bottlenecked, and, if you give it a what-if date, explains what moving the deadline would cost.
- Nothing changes until you click. Each suggestion shows what changes (from and to), why, and its impact: the finish date and each affected department's crew, busy days and peak demand, before and after. The numbers come from the same schedule engine as the tab, not from the AI.
- Apply takes one suggestion; Apply all takes every suggestion that still fits. Undo last change reverts the last apply in one step. Undo refuses if you have edited the schedule by hand since, so it never throws your own edits away.
- Out of date. If you change the schedule after asking (a crew, the target, overtime, the calendar), any suggestion that no longer fits is marked out of date and cannot be applied. Press Ask again for fresh advice.
- Partial answers. If part of the answer cannot be used, the panel shows what could be and lists why the rest was left out.
- It runs through the same processing location as every pass (Anthropic direct, your AWS Bedrock or your Google Vertex AI, chosen in Settings), on the same key or credentials.
Switching it on. Two switches, both needed:
- On the PXLbid service (the administrator does this once): add
PXLBID_ENABLE_SCHEDULE_ASSIST=trueto the service configuration and redeploy. Until then the service refuses the assistant with "Scheduling assistant is switched off on this service." - In your browser: open the browser's developer console on the PXLbid page, run
localStorage.setItem('pxlbid:flag:scheduleAssist', 'true'), and reload. To switch it off again, runlocalStorage.removeItem('pxlbid:flag:scheduleAssist')and reload.
The assistant then appears on the Schedule tab, between the plan summary and the timeline.
The screens, one by one
Idle (start)
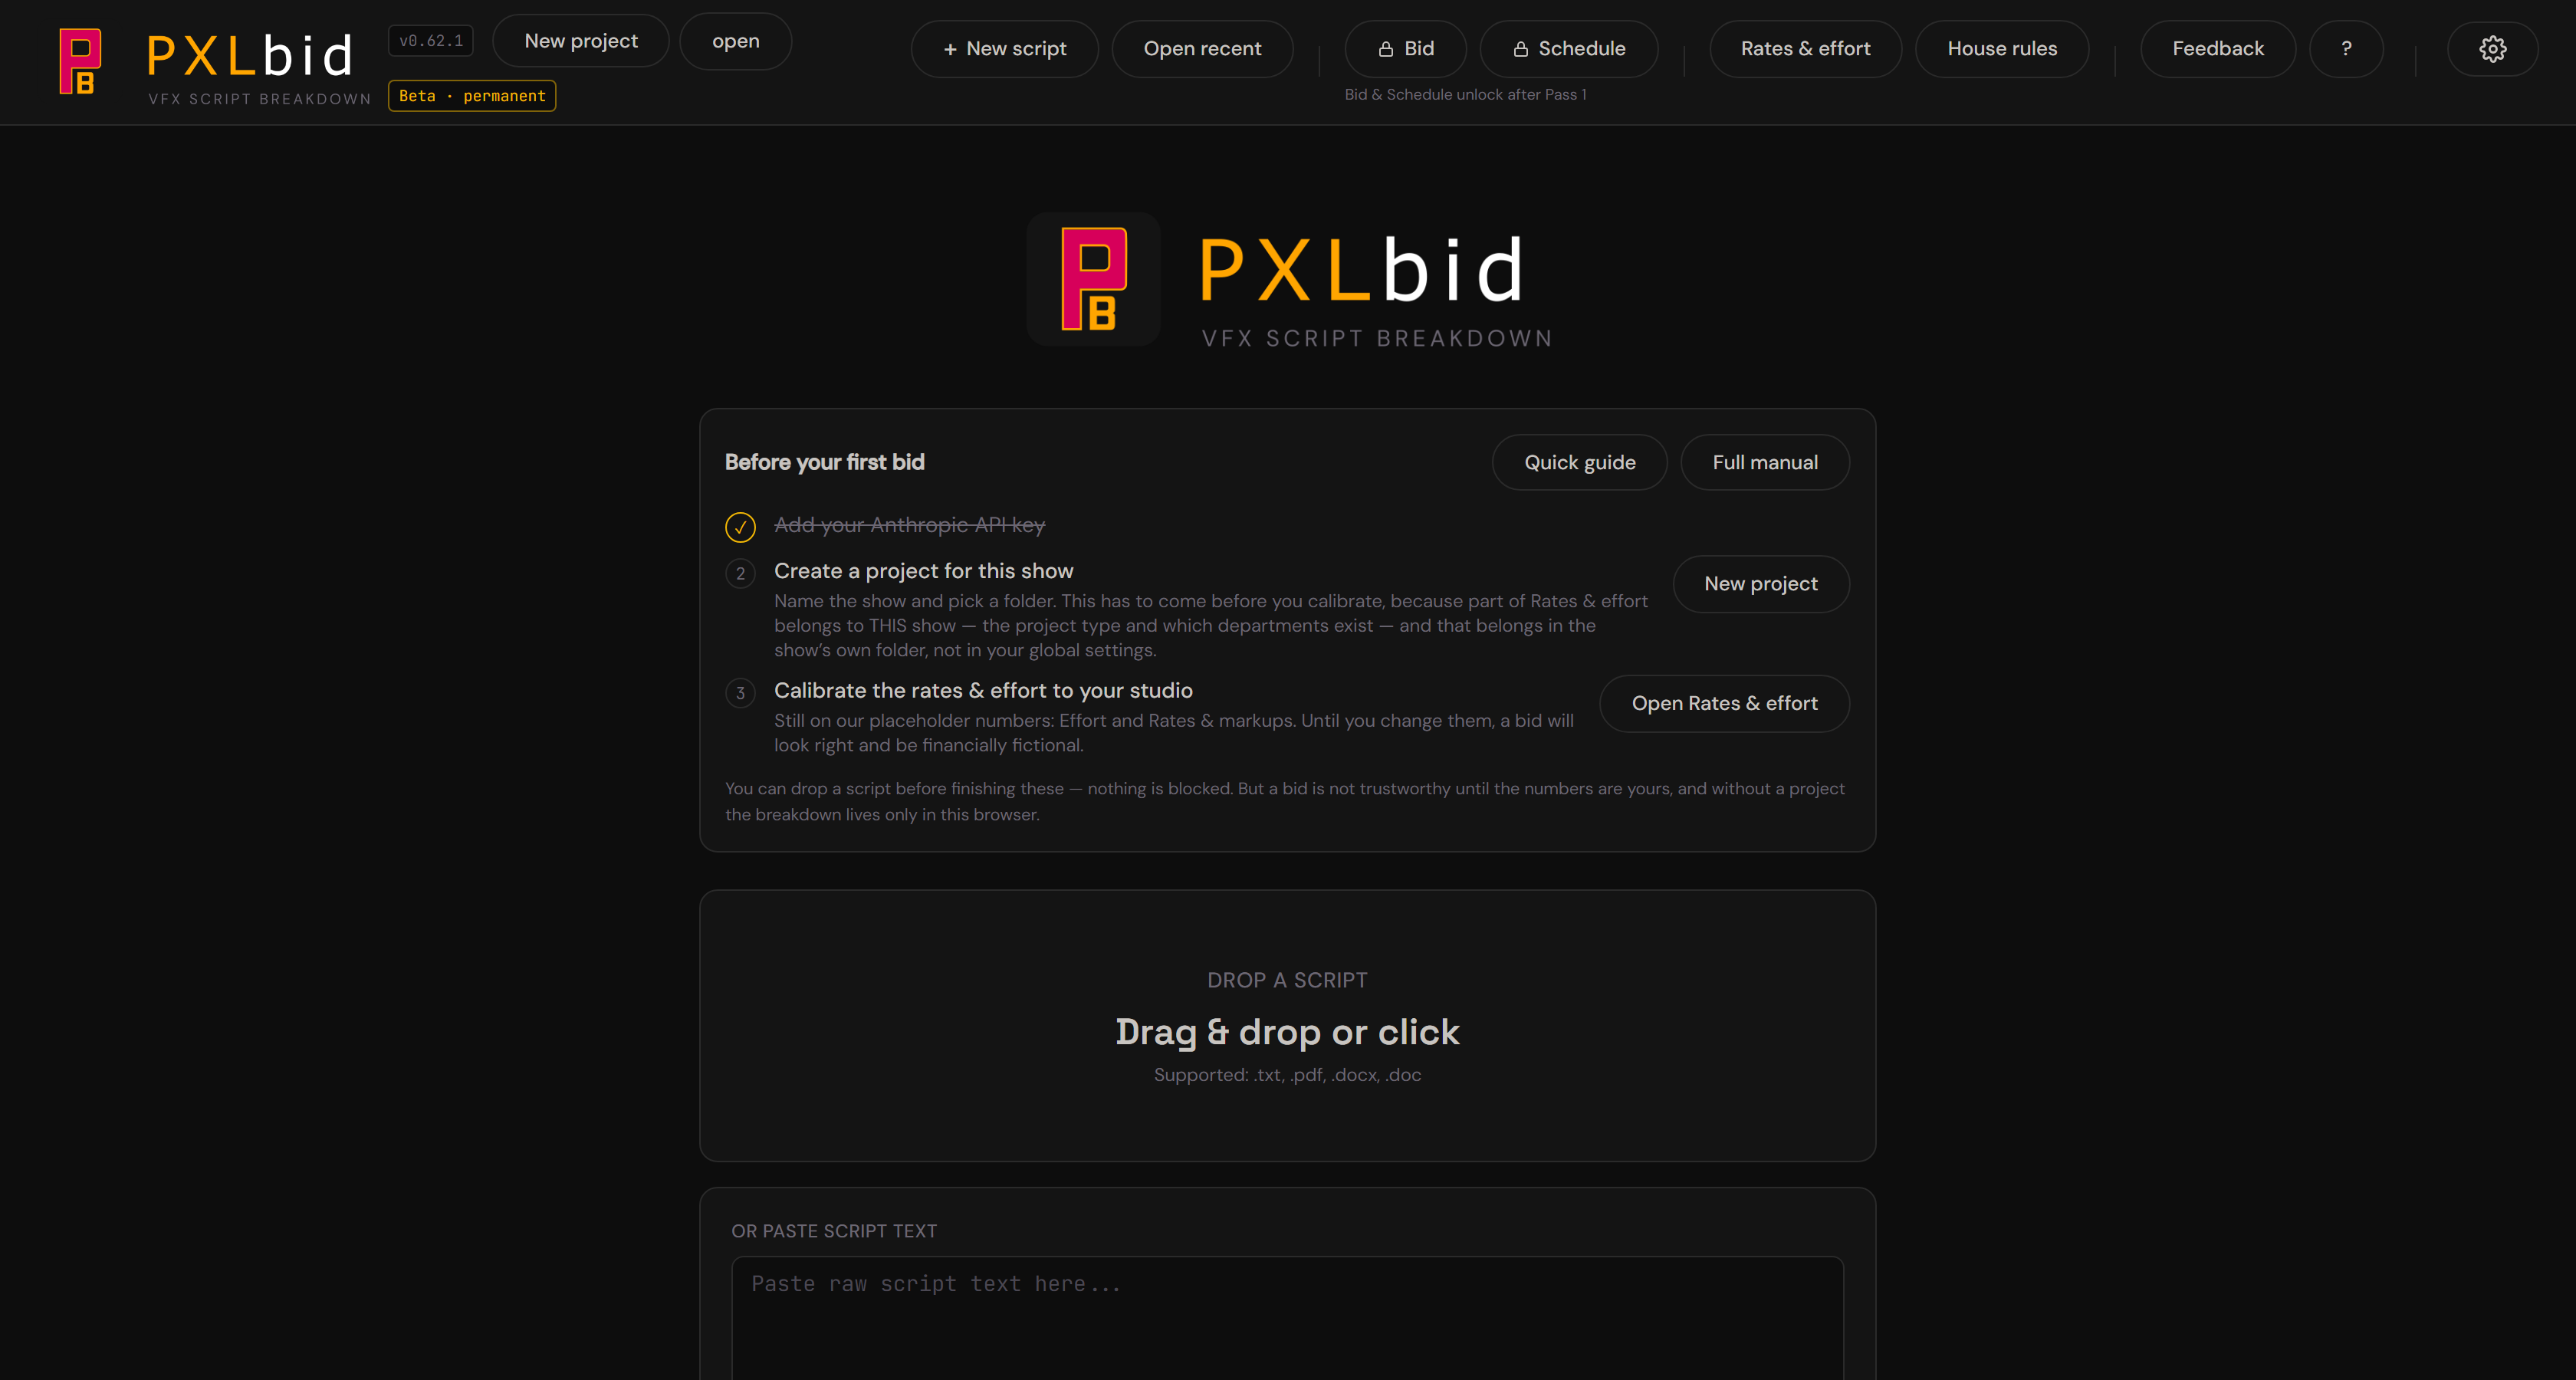
The blank slate. Drag a script onto the screen, or use buttons to open recent, load a JSON, or compare versions.
Script read
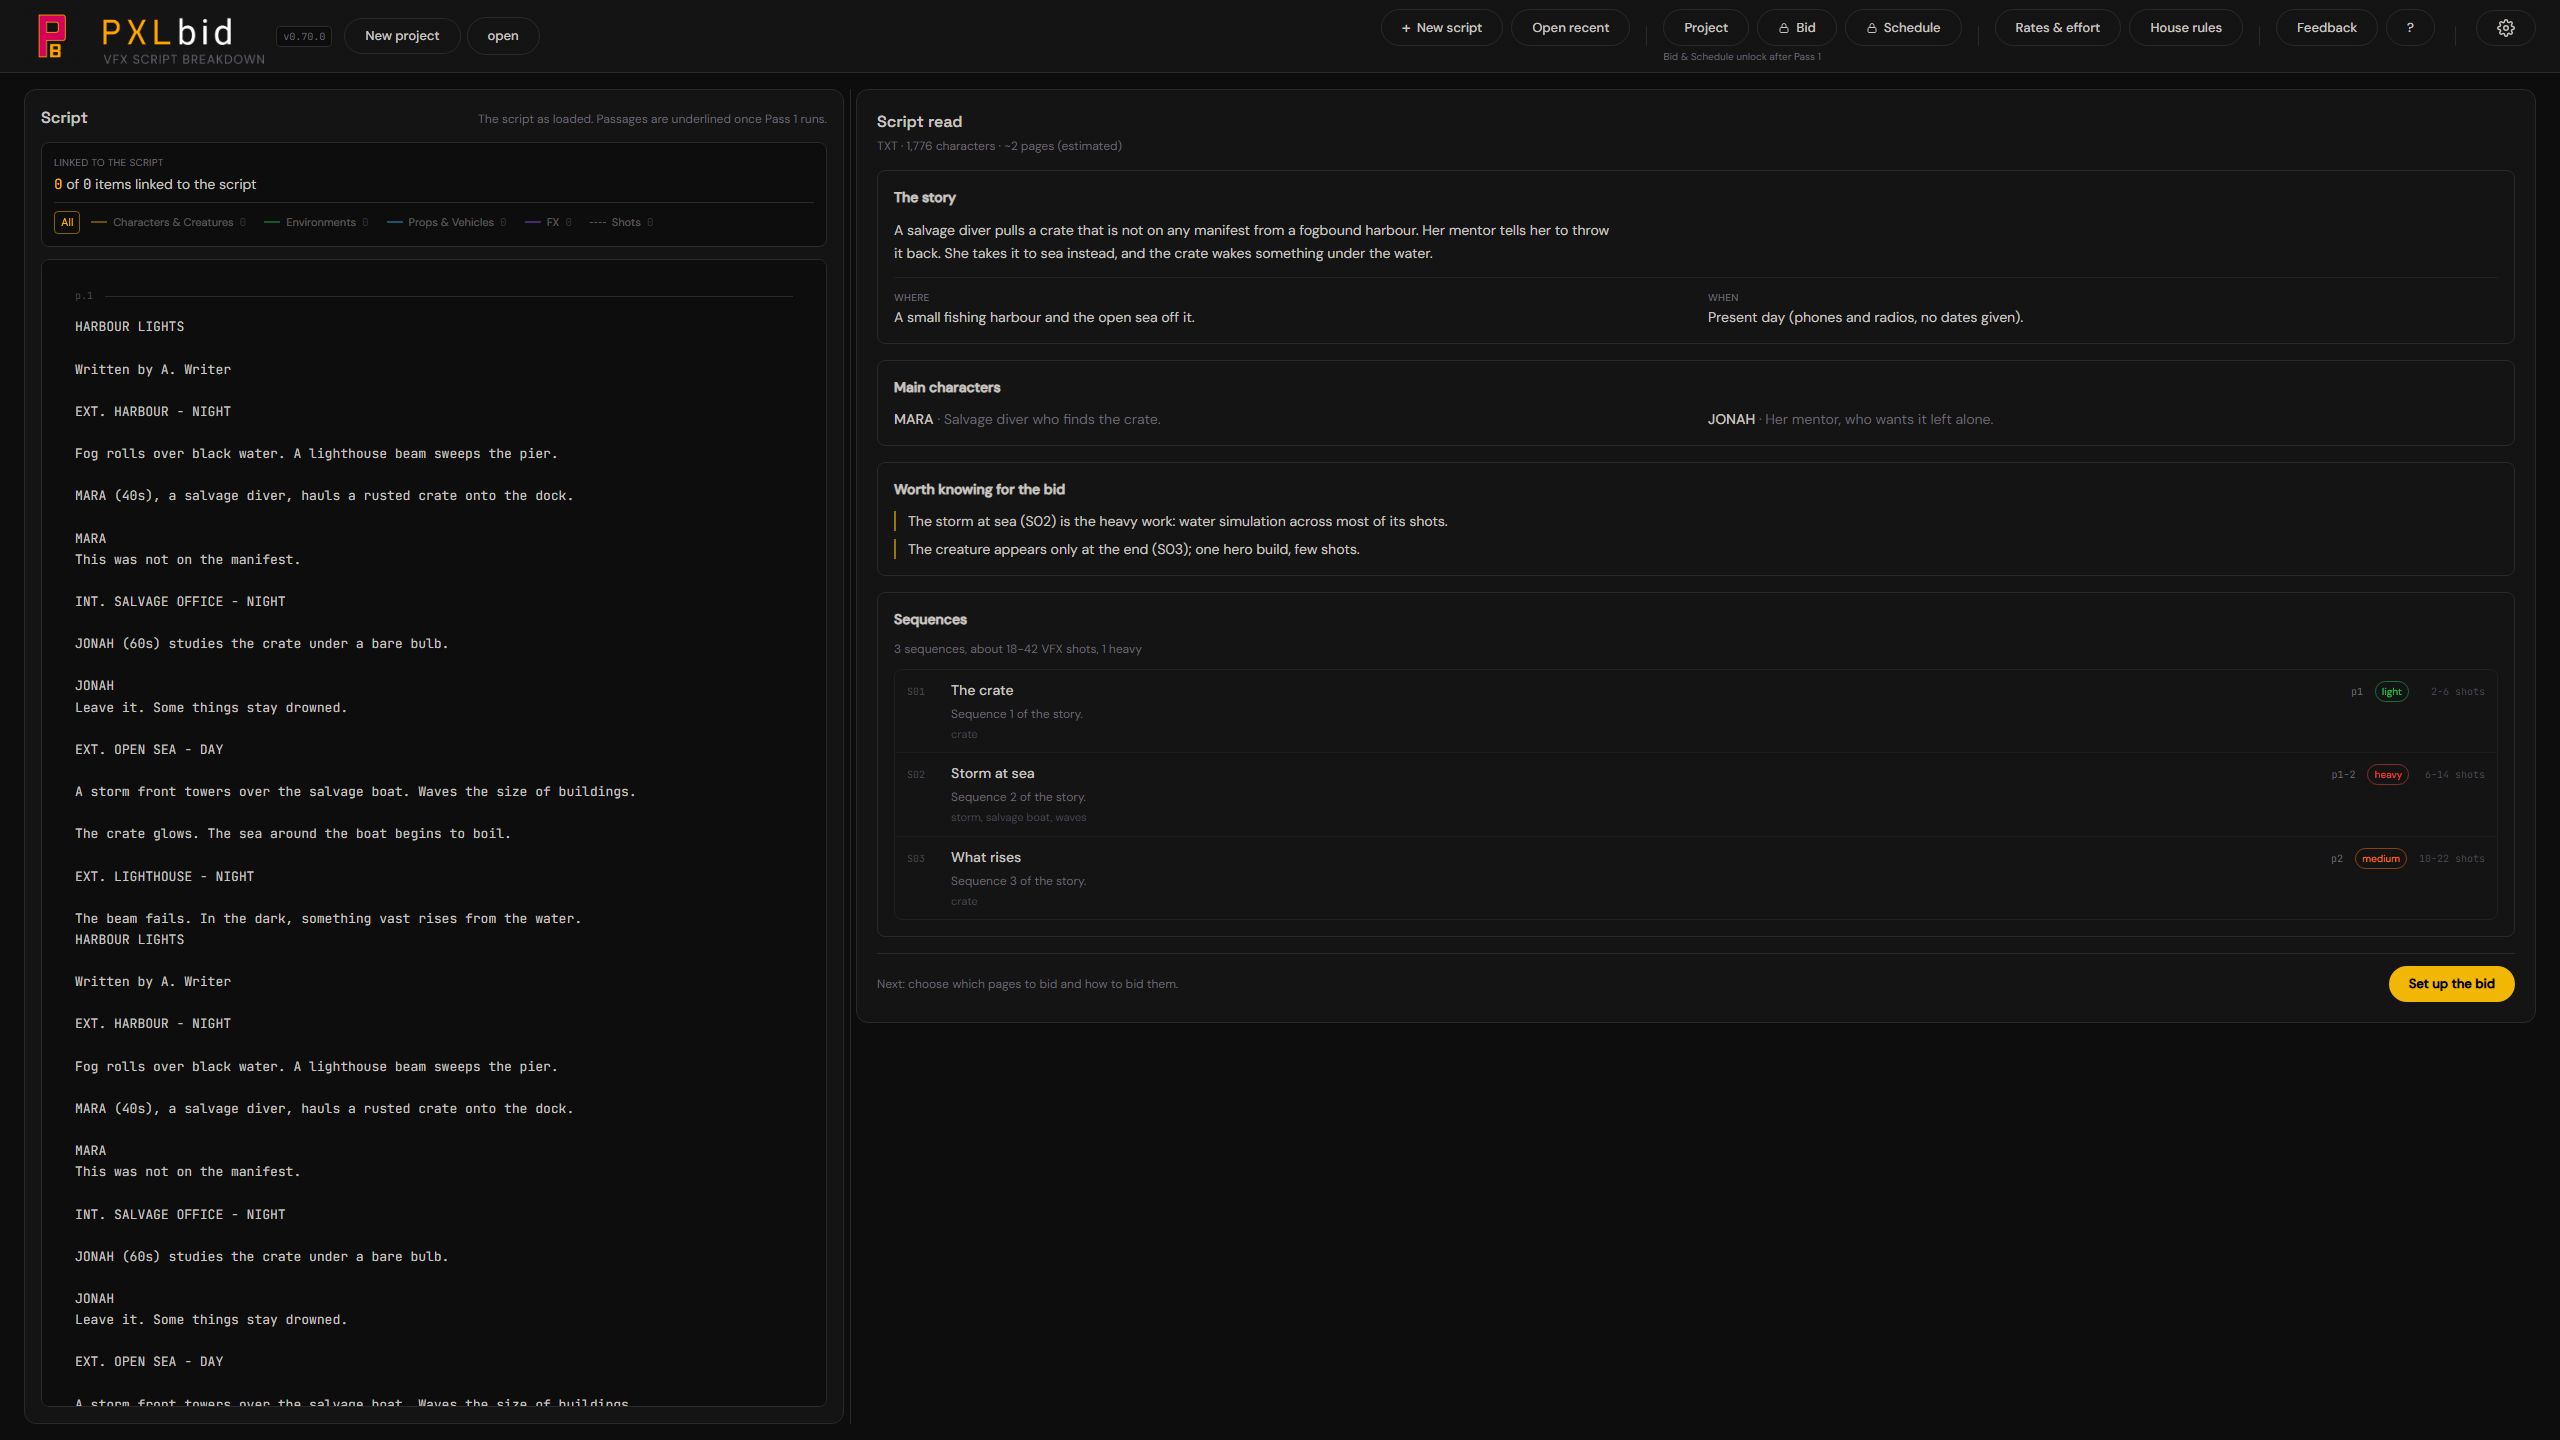
A new script, or the script of a new delivery, opens here. The read starts by itself and runs once; coming back to it from setup does not run it again. It is written for someone who has not read the script yet: the story in a few plain sentences (the ending included), the main characters, where and when it is set (anything inferred rather than written is marked as a guess), and two to four hints a producer can act on before any breakdown. Under that, the sequences with their page ranges, VFX load and a rough shot count. If the read fails, Retry or Continue without it. It is one quick model call and goes through the same path as Pass 1 (see Where your script goes). The read is not saved in the project; the breakdown is. The header says how long the read took.
How long each run took. Every analysis is timed. The Script read shows its time in the header, the review step after Pass 1 and Pass 2 shows how long each pass took (saved with the breakdown), and the Project view lists your recent runs in this browser: the run, when, how long it took, the pages it read, the time per page and the model. A run that failed is listed too, with how long it ran.
Set up the bid
You see the file format, character count, and page count (real for a PDF, marked "estimated" for Word and text files). Step 1 chooses what to analyse (the whole script, or chosen sequences and pages), step 2 how to bid. Optional: write notes for the VFX Supervisor. Toggle Deterministic mode if you want consensus (3-run, slower, ~3× cost). Then run Pass 1.
Pass 1 running
The agent streams — watch logs as it extracts sequences, shots, and assets. If it fails, the error is shown; click Retry to run again.
Checkpoint 1 (after Pass 1)
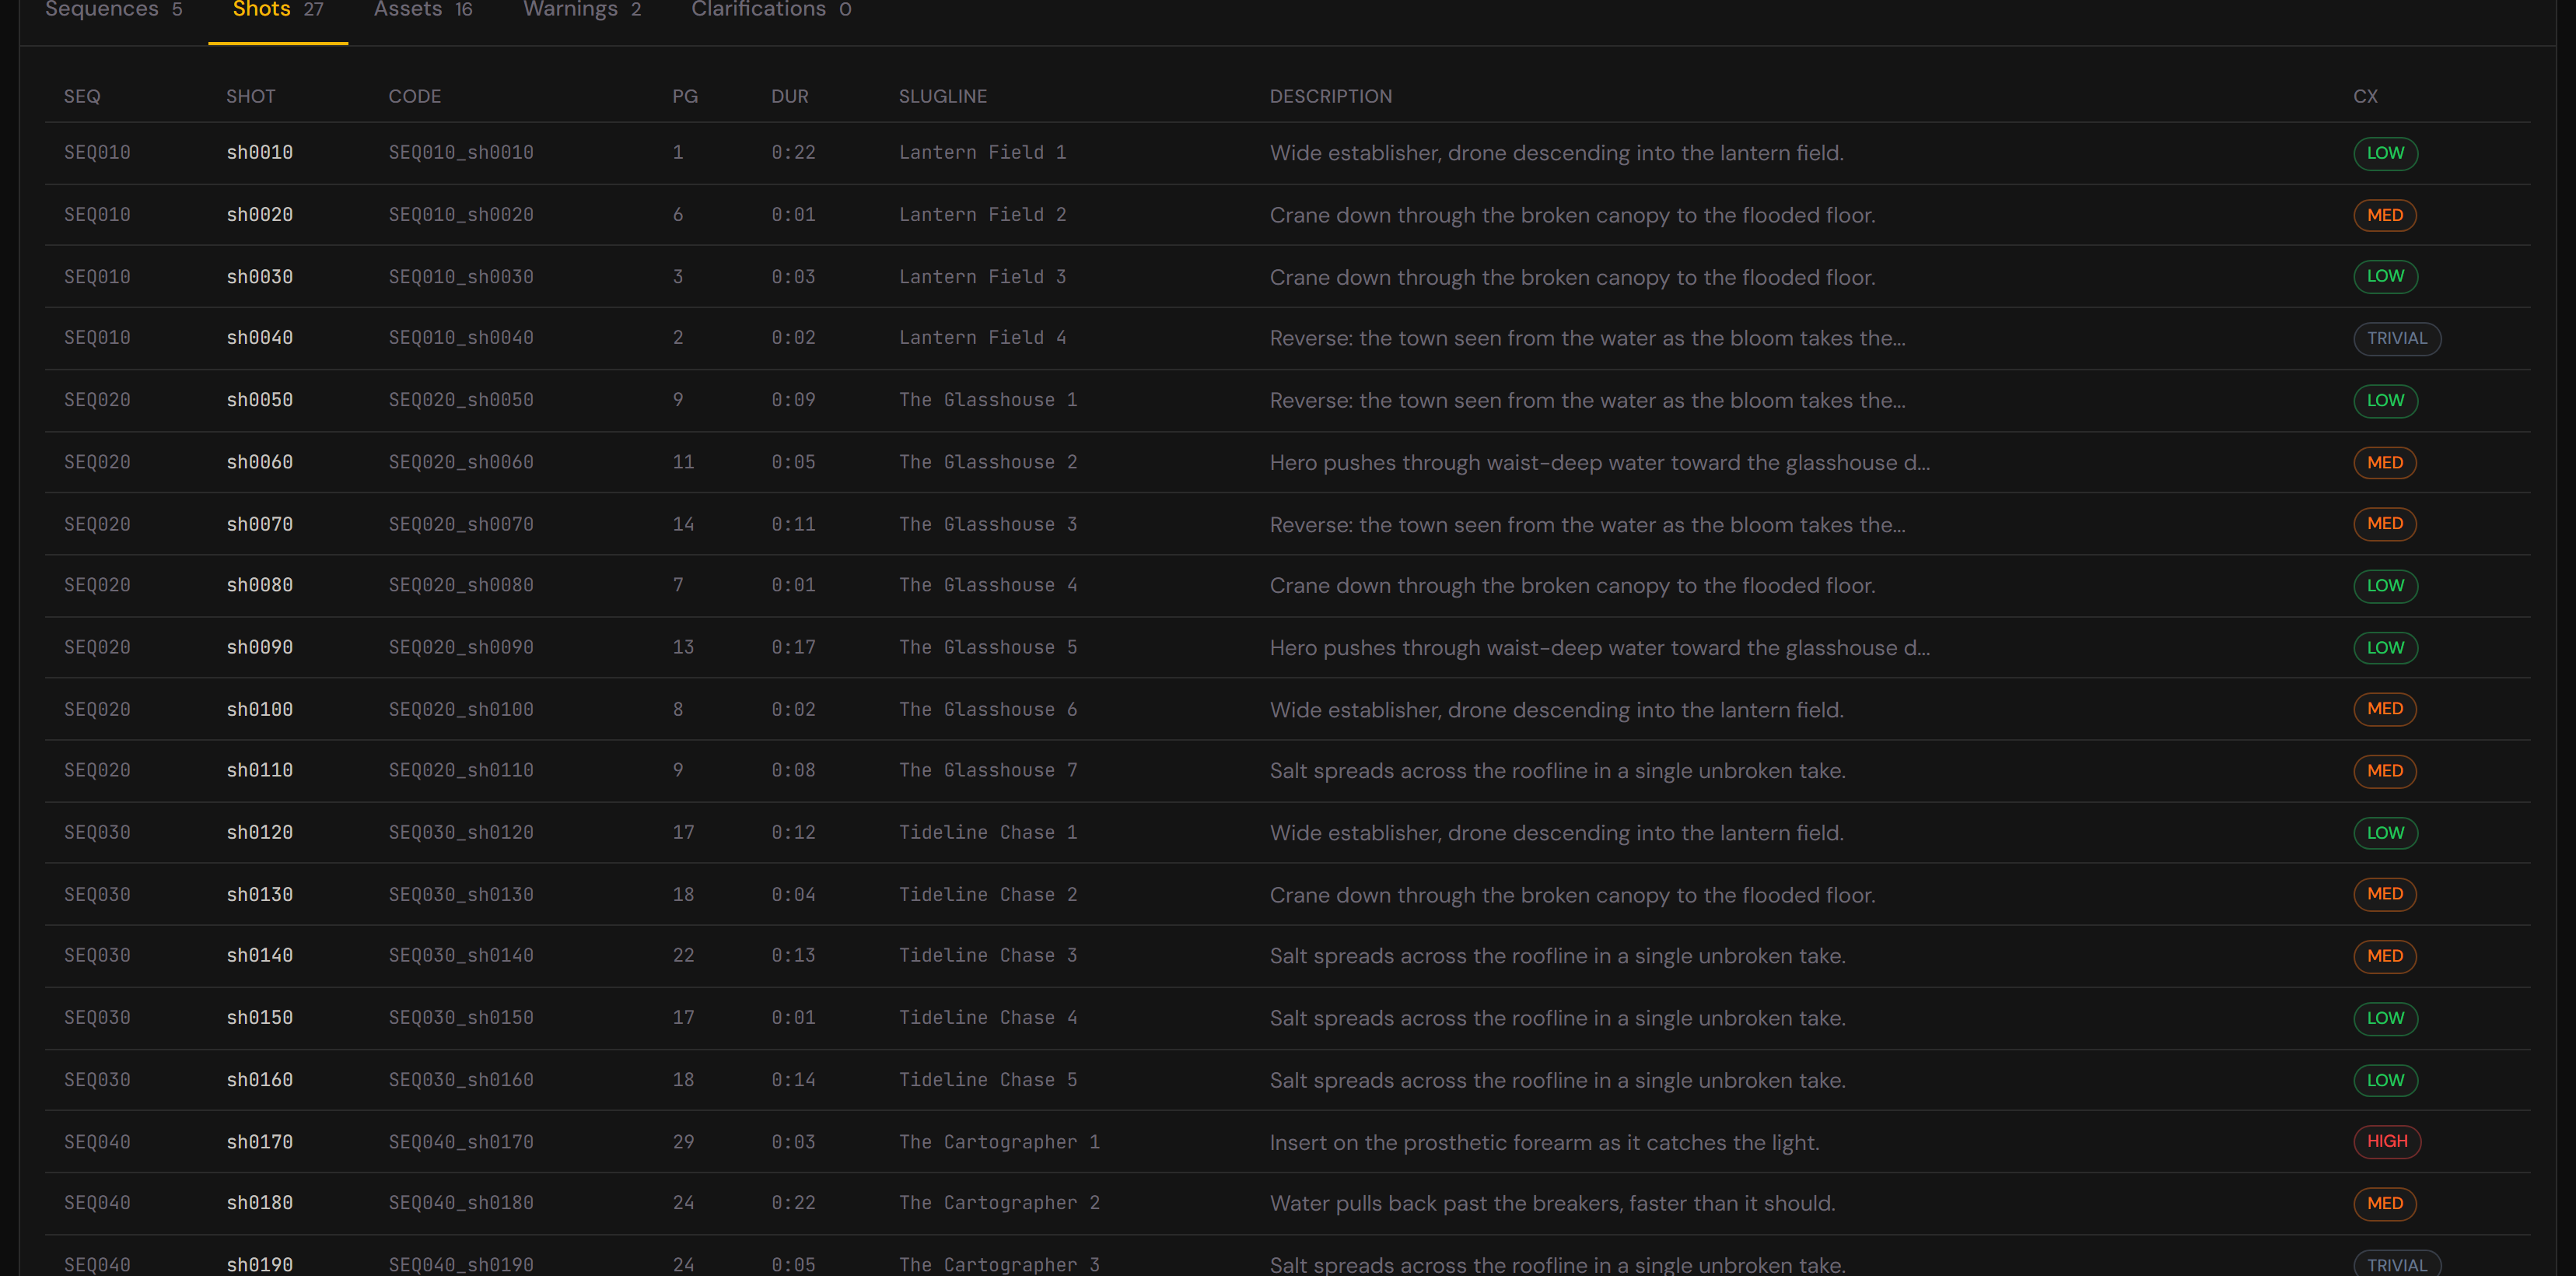
The VFX Supervisor breakdown is ready. You see tabs: Sequences, Shots, Assets, Warnings, Clarifications. Click any row to edit in a drawer. When happy, click Approve & continue to offer a backup download, then move on.
From here you can:
- Run Pass 2 (if the script is attached) for granular subdivision.
- Jump straight to Bid (skip Pass 2).
Pass 2 launcher (if you choose Pass 2)
Dialog box asking scope ("how deep should I split shots?") and intensity ("how much subdivision?"). Attach the script if needed.
Checkpoint 2 (after Pass 2)
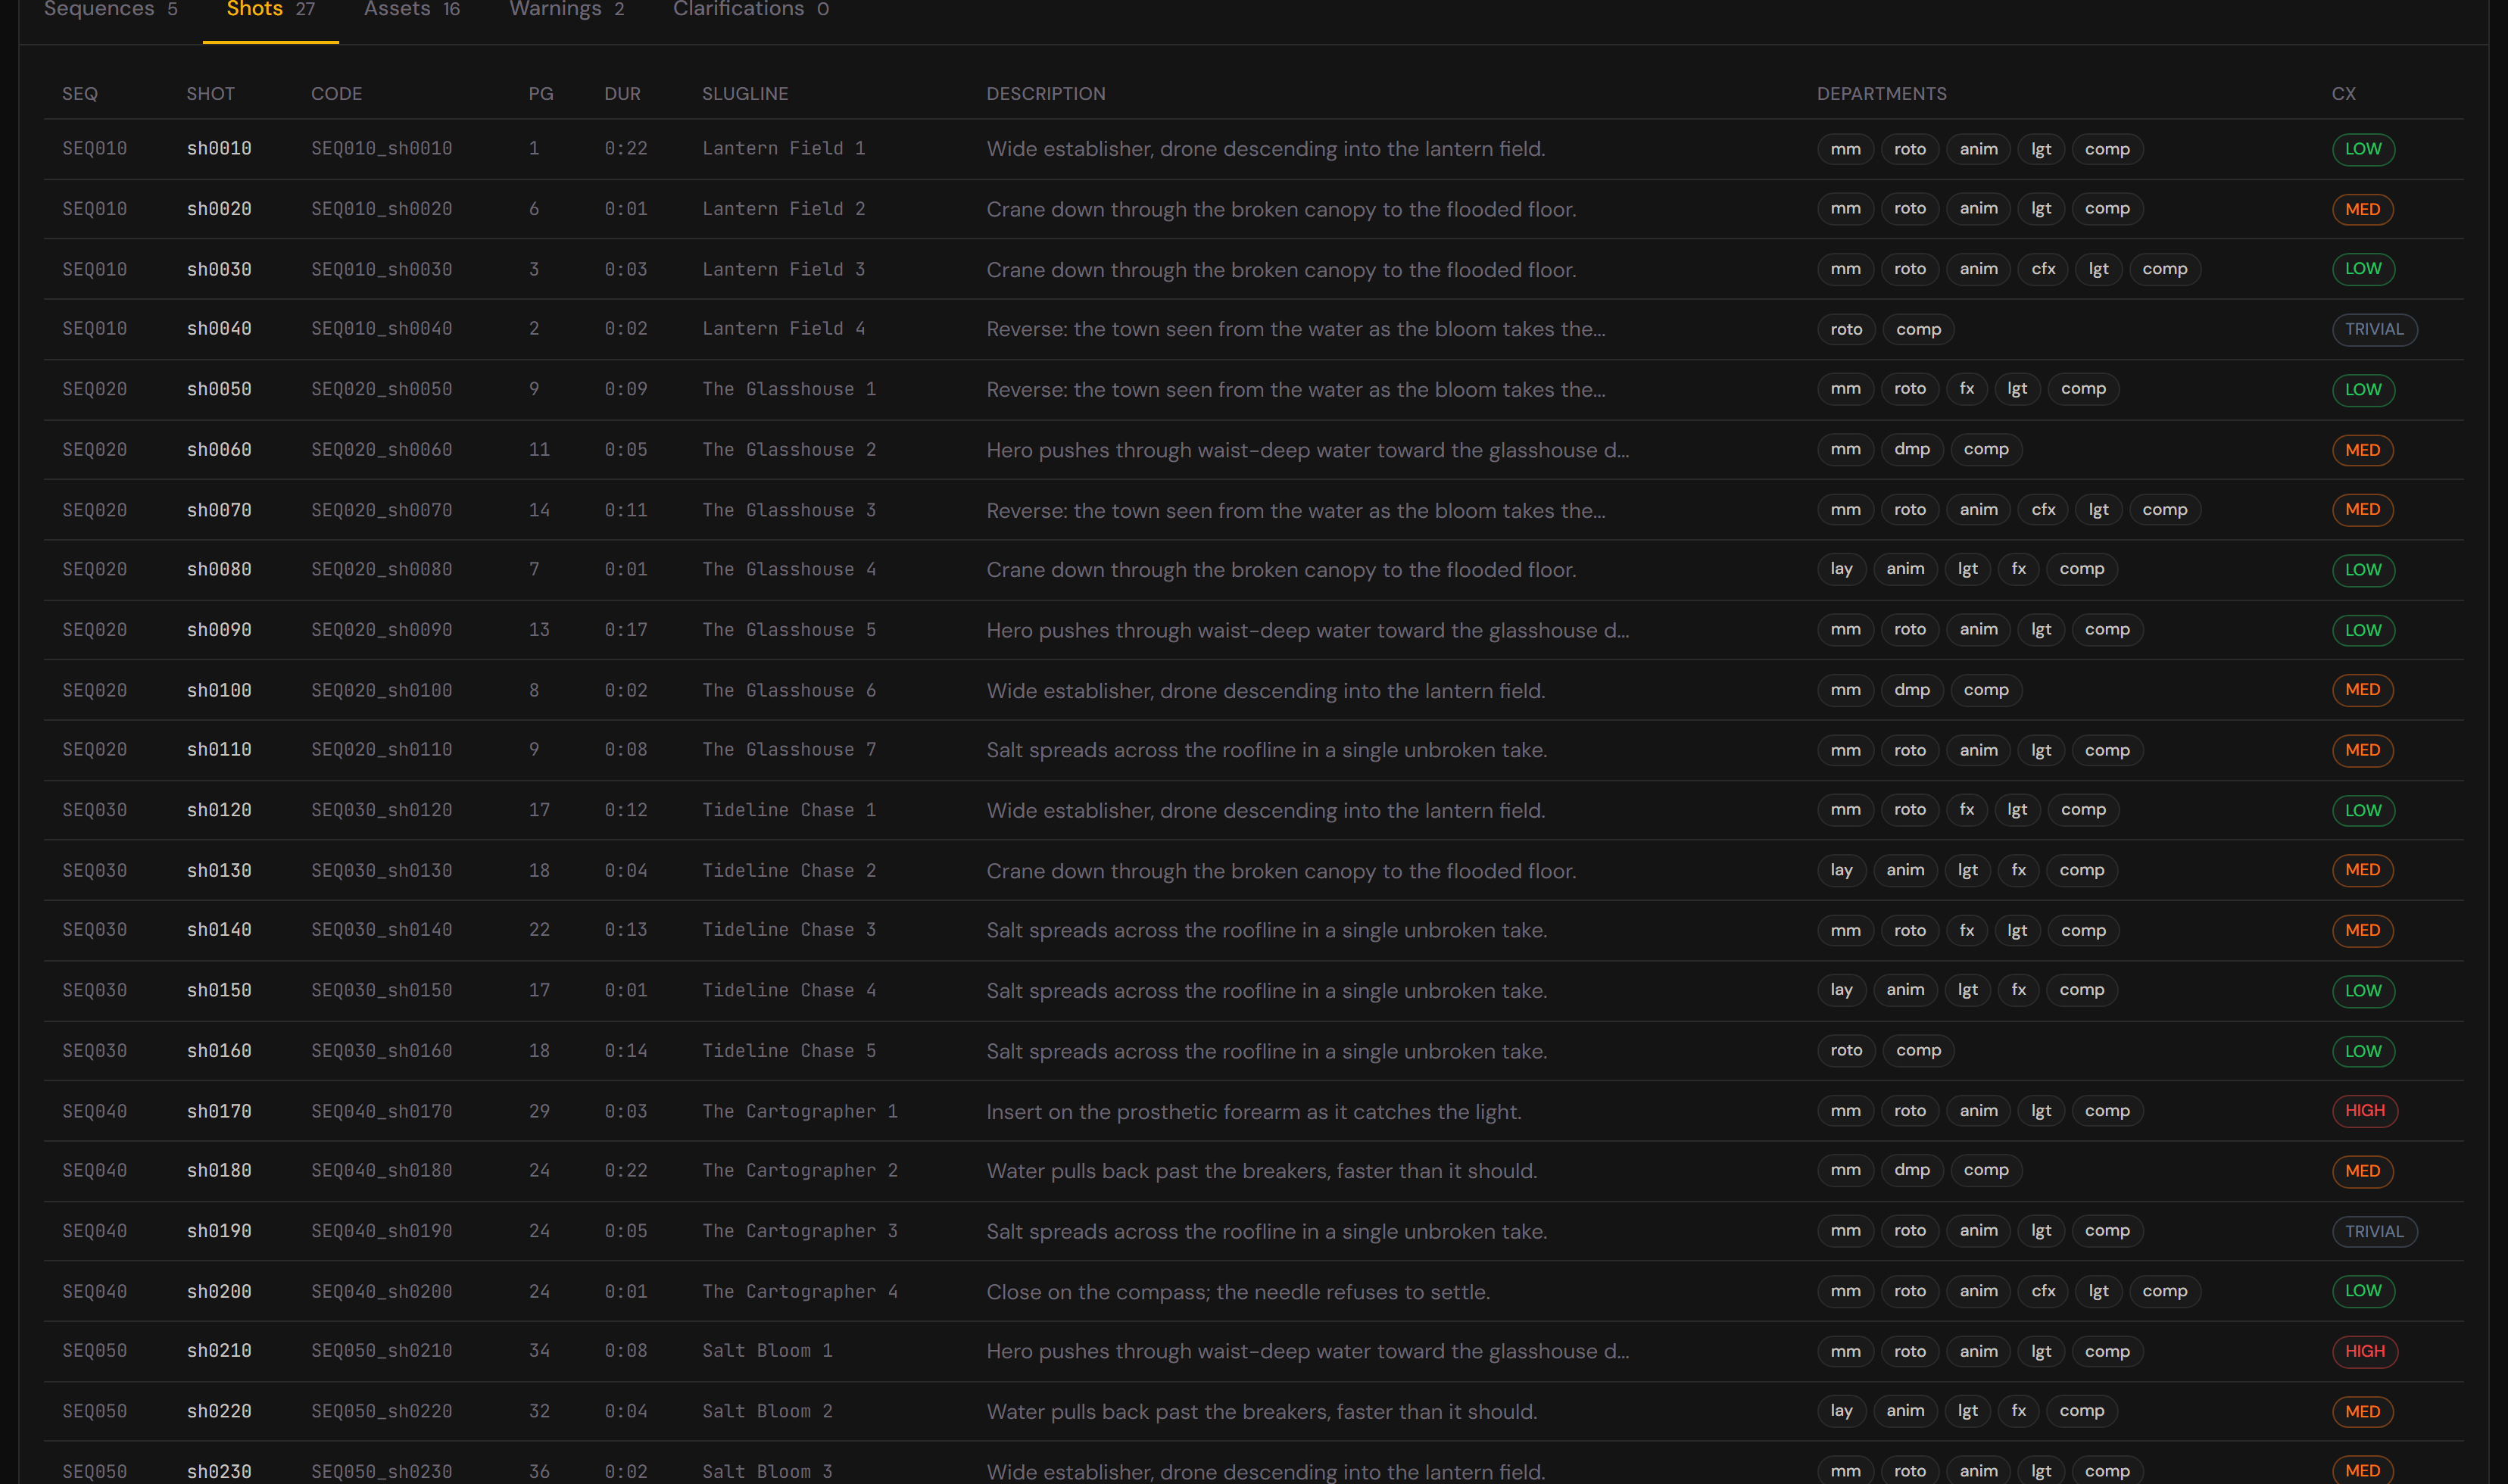
Similar to Checkpoint 1, but the breakdown is more granular. You see a Pass 2 changes summary card at the top. Same edit workflow.
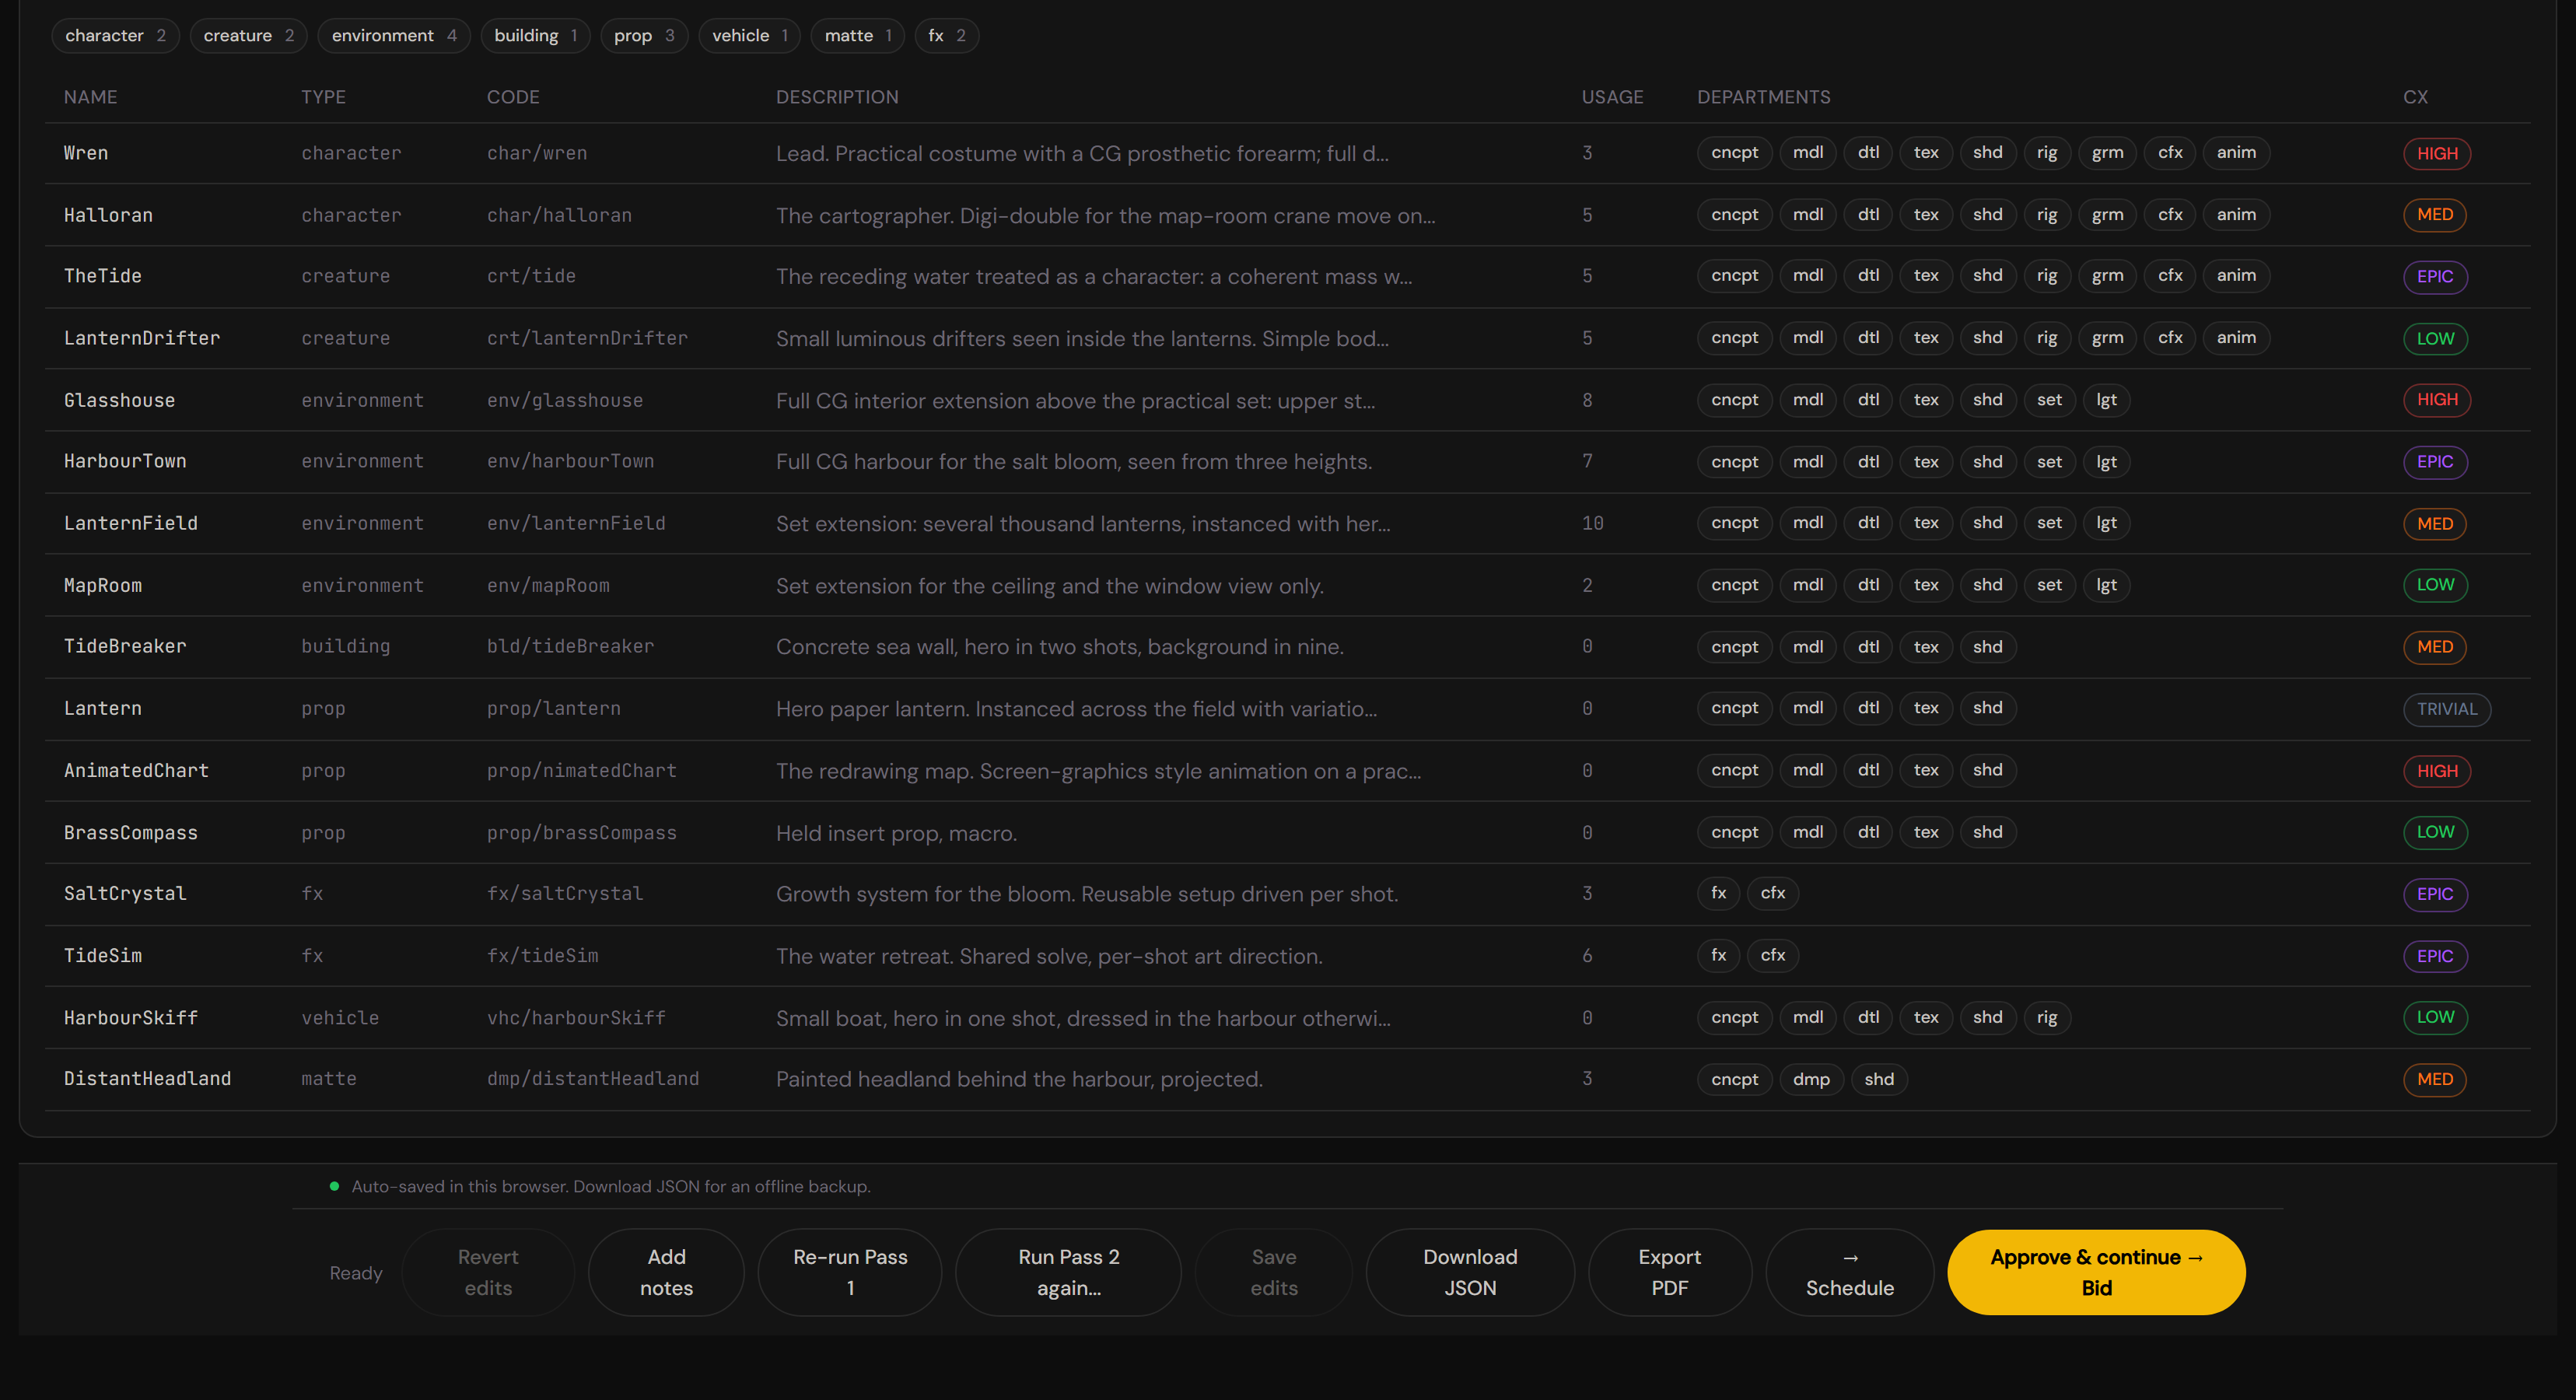
The other tabs hold the rest of the bid. Assets is every build the script needs, each with its own departments — this is where a character build or a full CG environment gets priced:
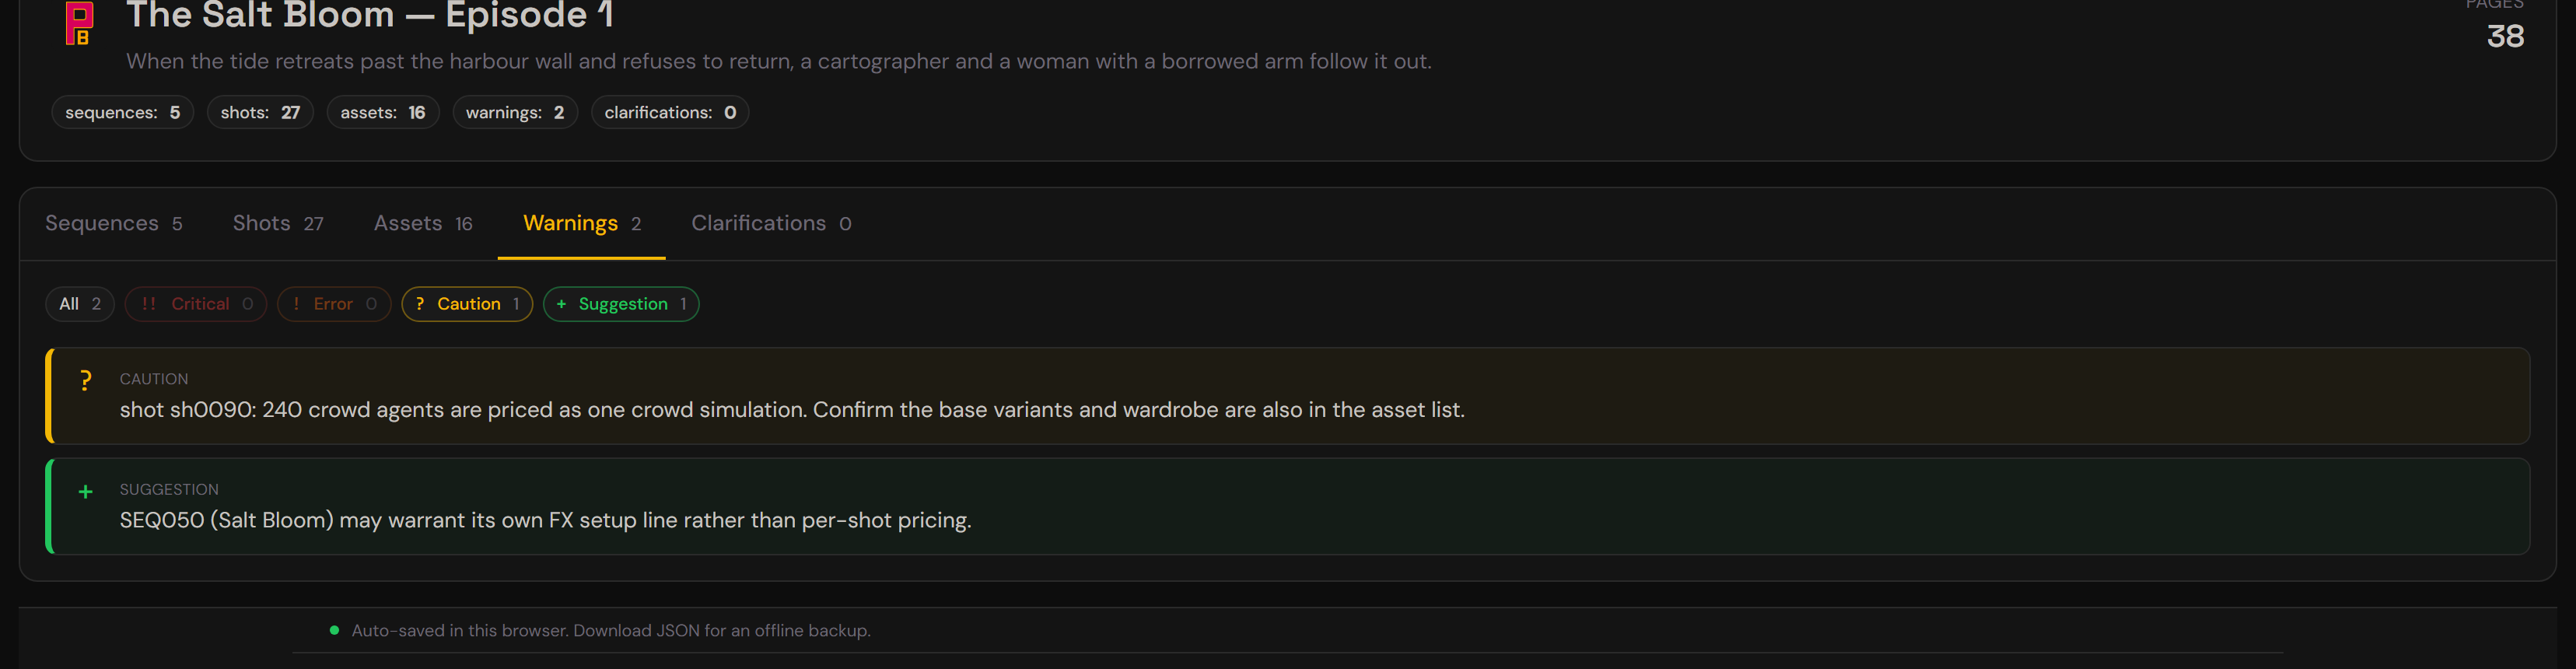
Warnings is the tab worth reading before you send anything. It is where PXLbid tells you what it was unsure about, and where a number may not mean what it looks like — a large crowd priced as one simulation, a sequence that probably wants its own FX setup line:
From here:
- Run Pass 2 again (refine further).
- Go to Bid or Schedule.
Bid
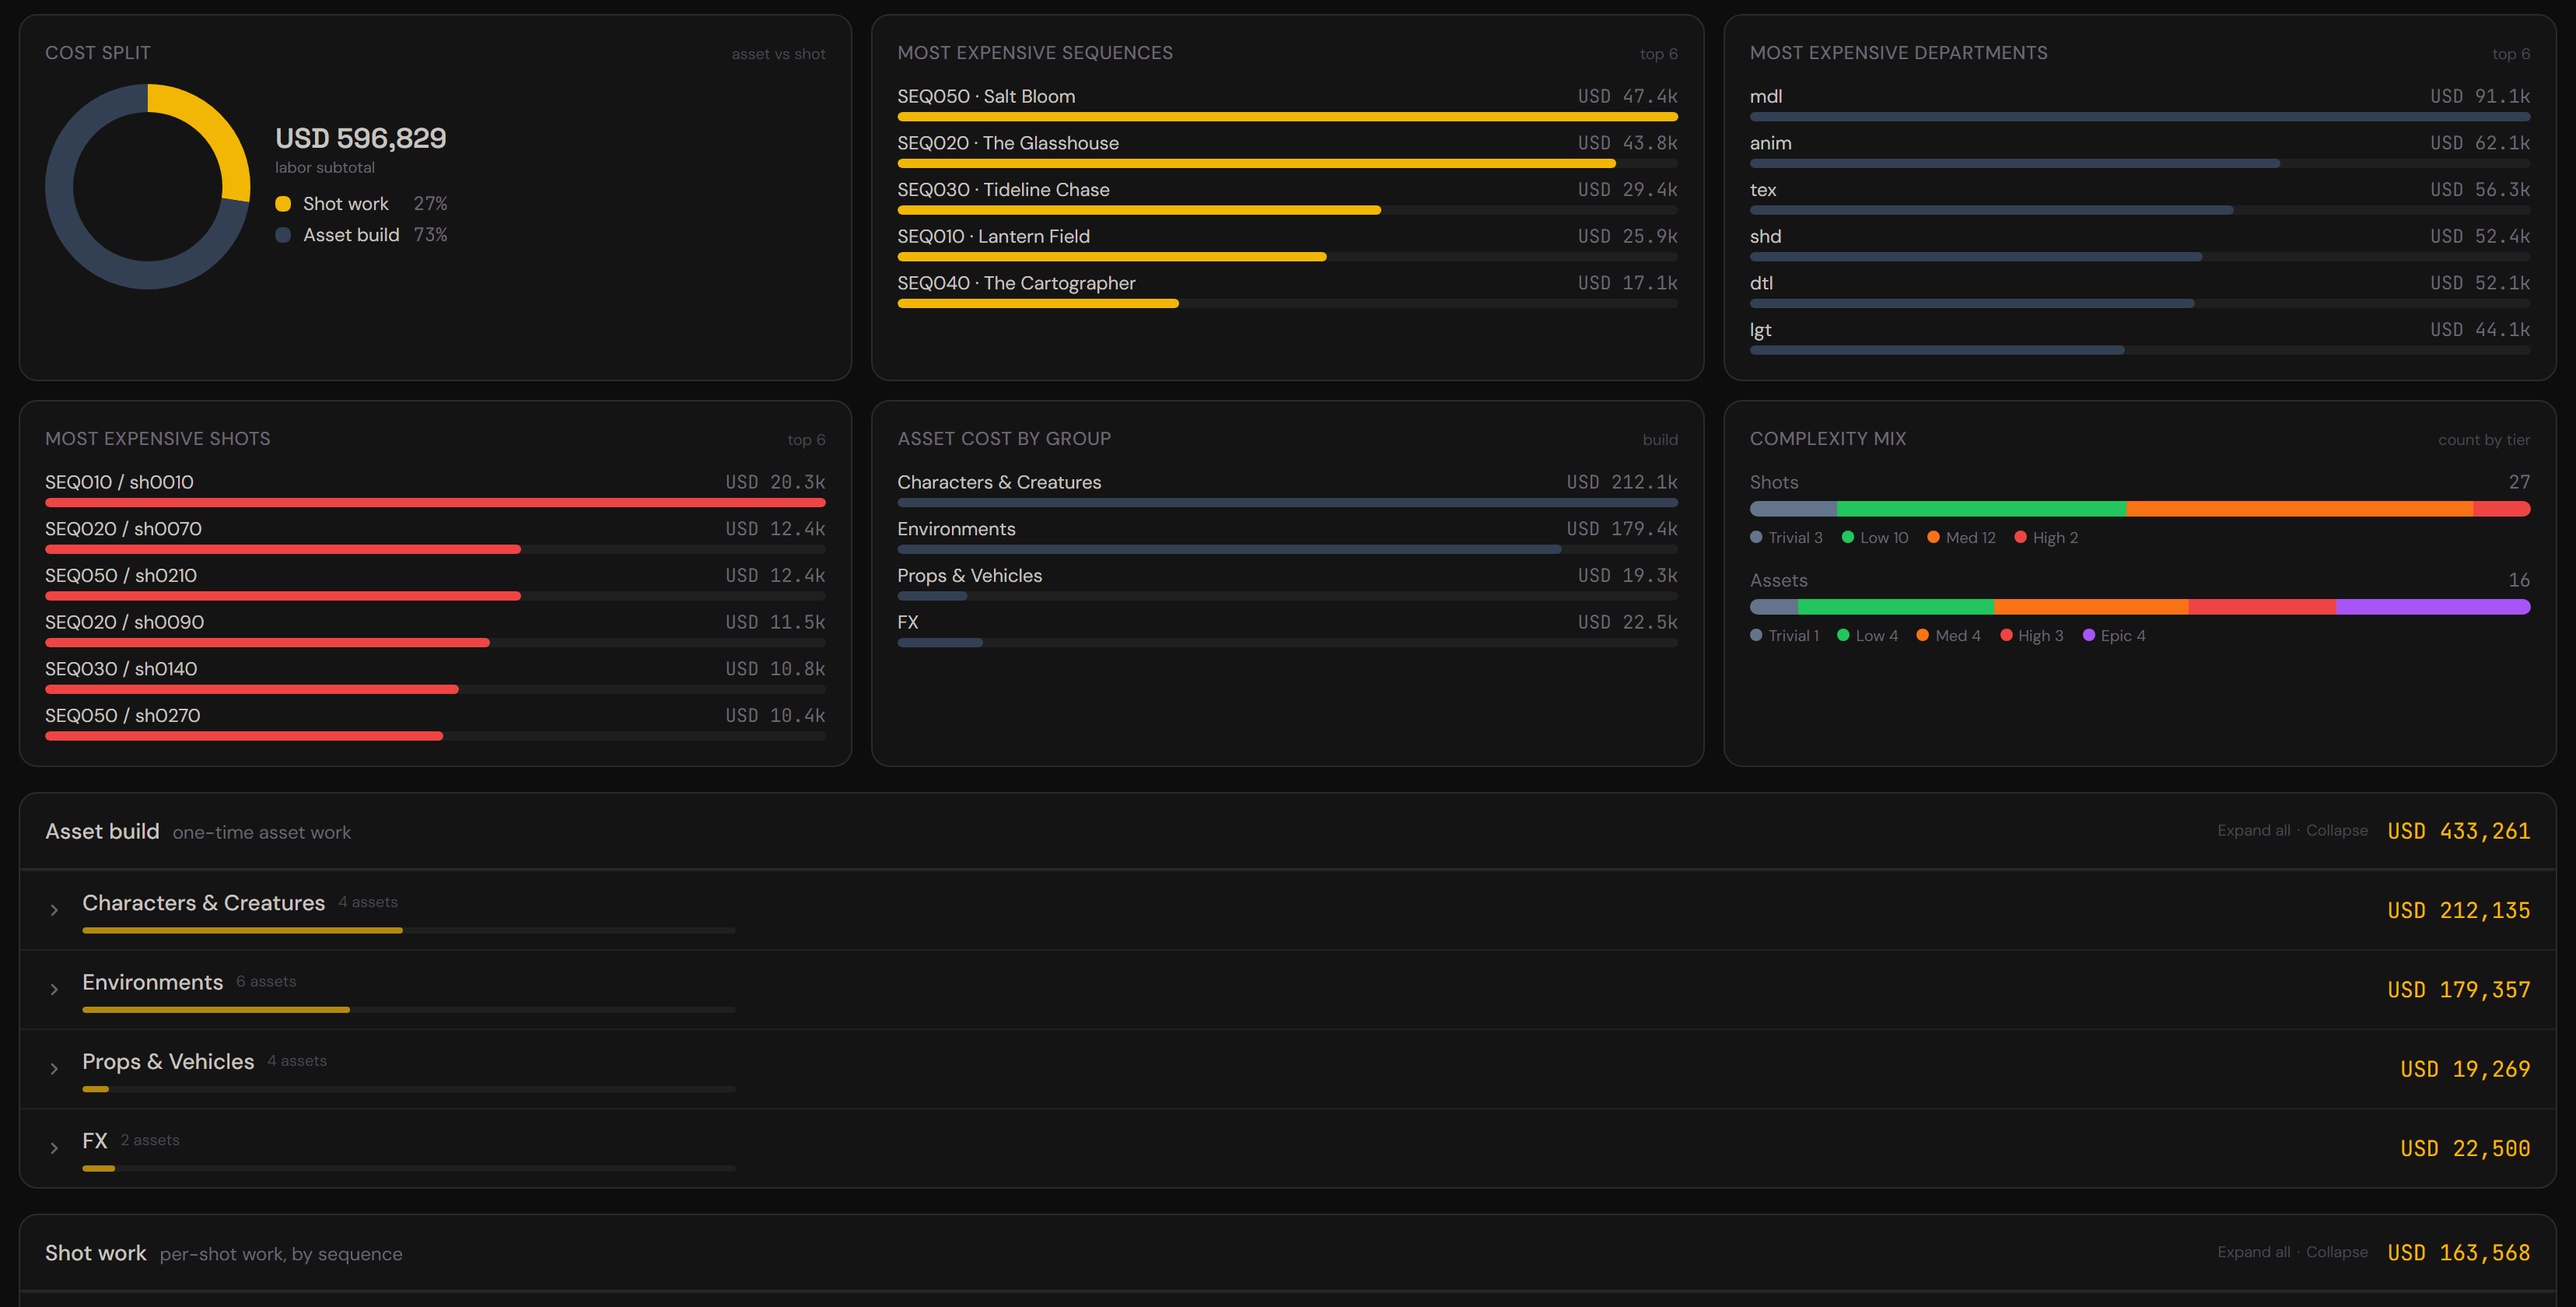
Cost breakdown and line-item detail. Re-grade lines by clicking complexity or seniority badges. Export via top-right menu.
Schedule
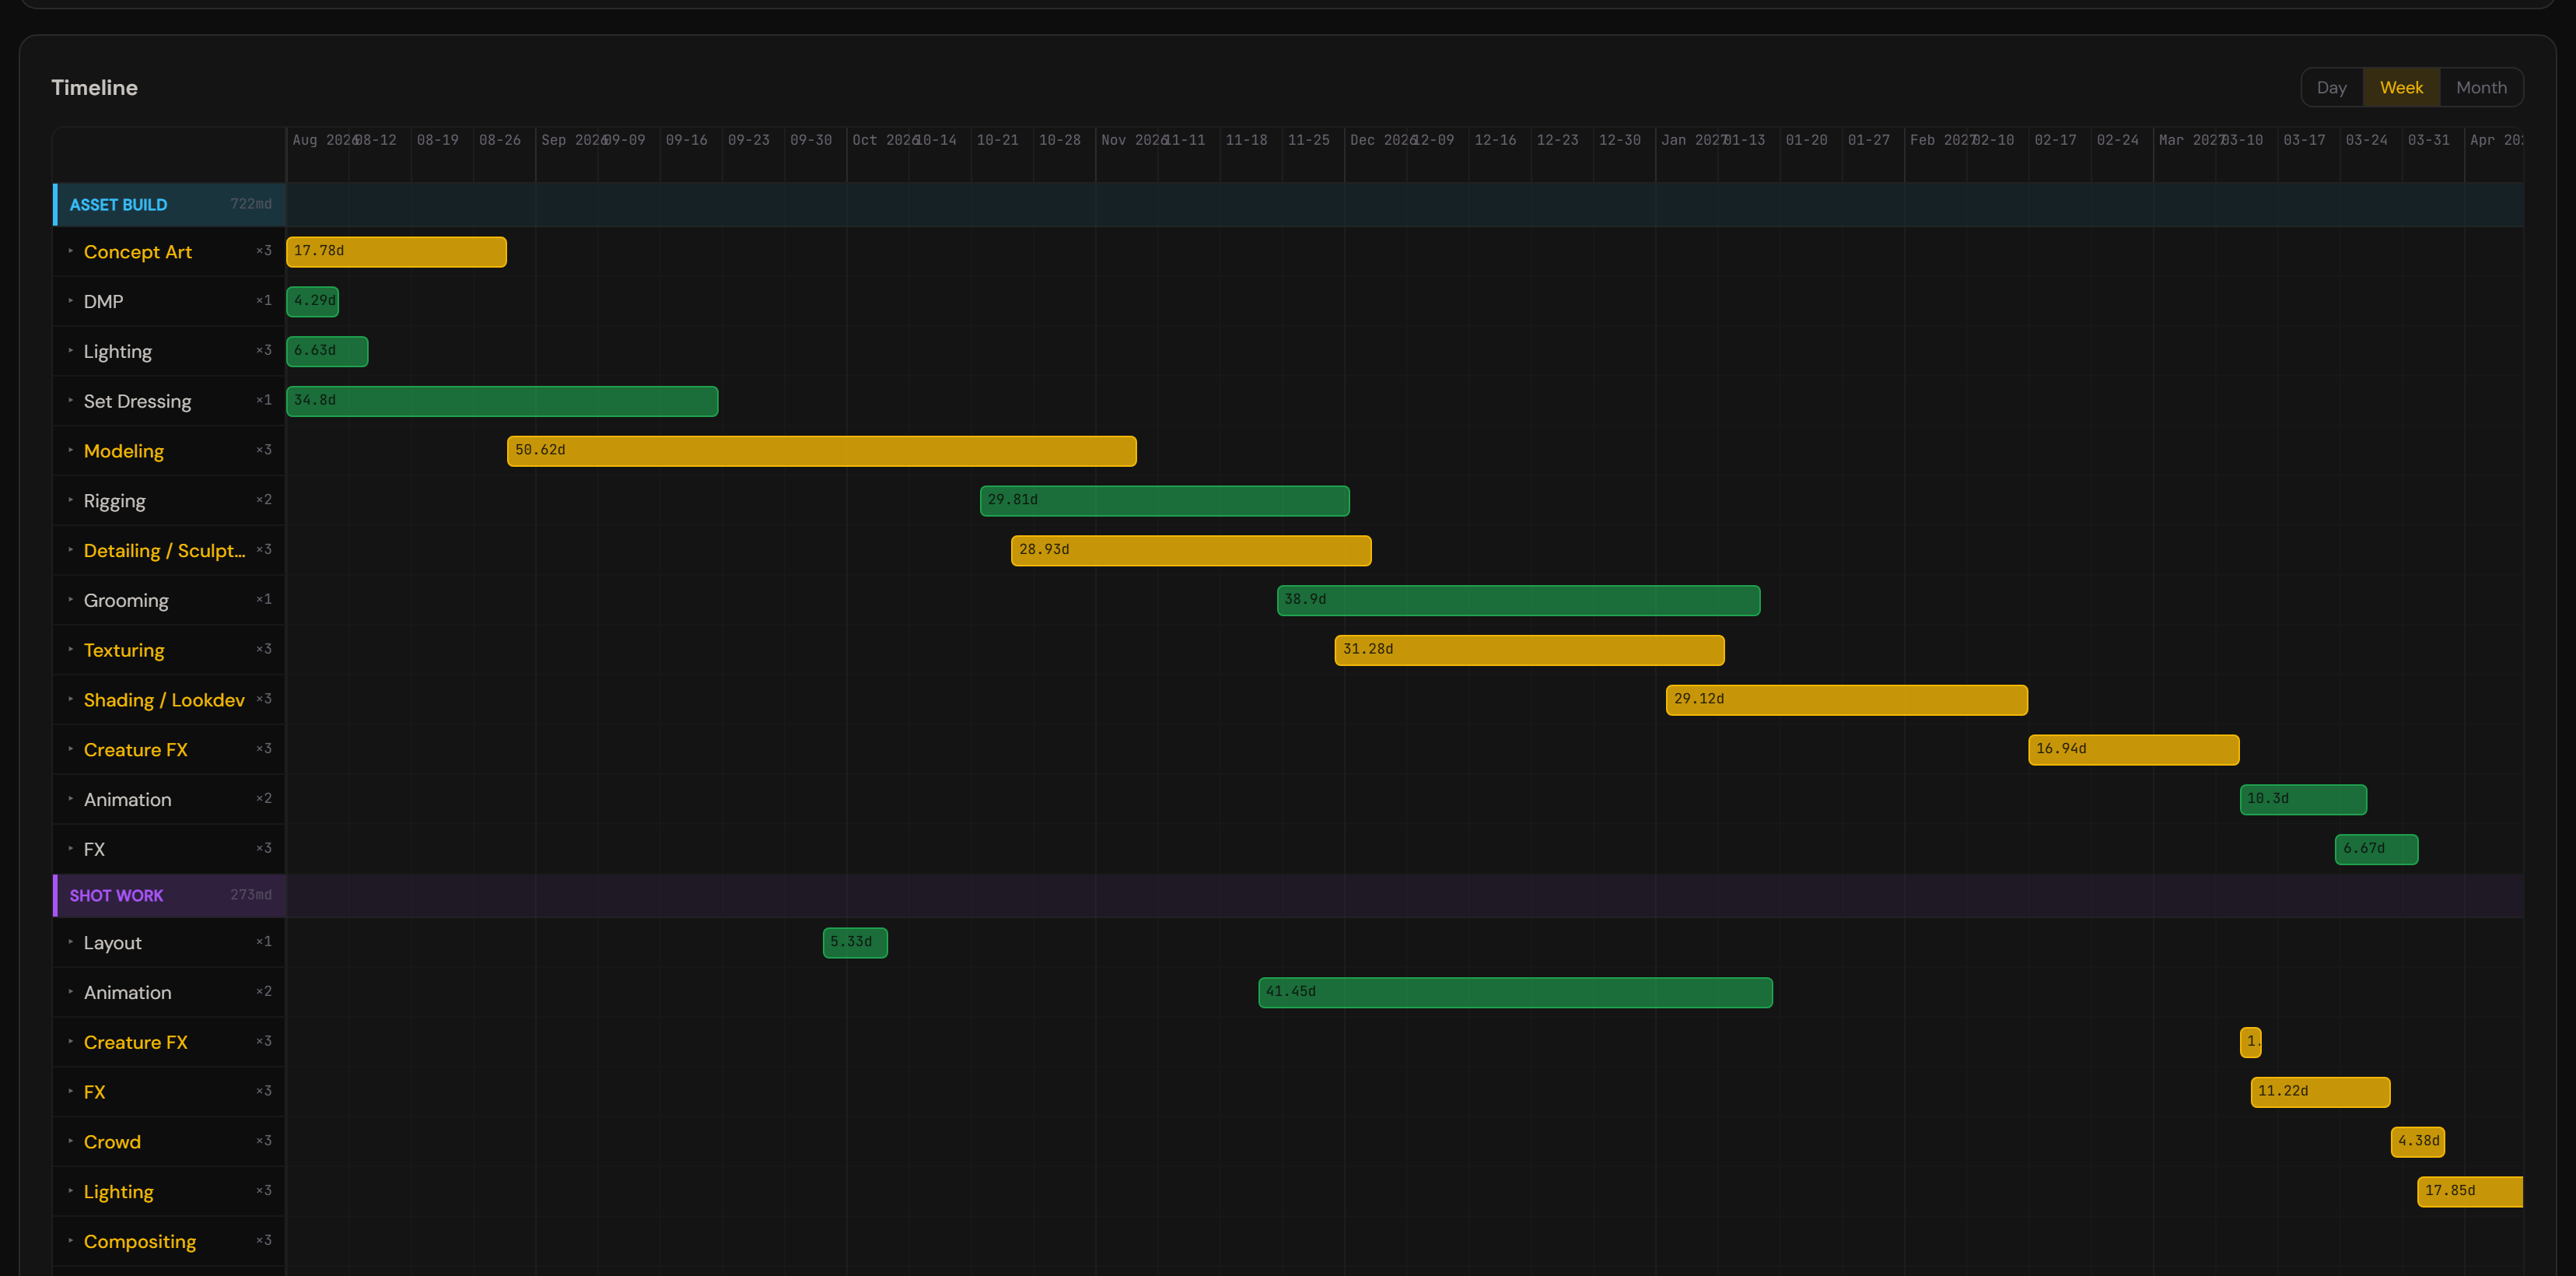
Gantt chart of calendar timeline. Dependencies and team sizes drive the layout.
Rates & effort
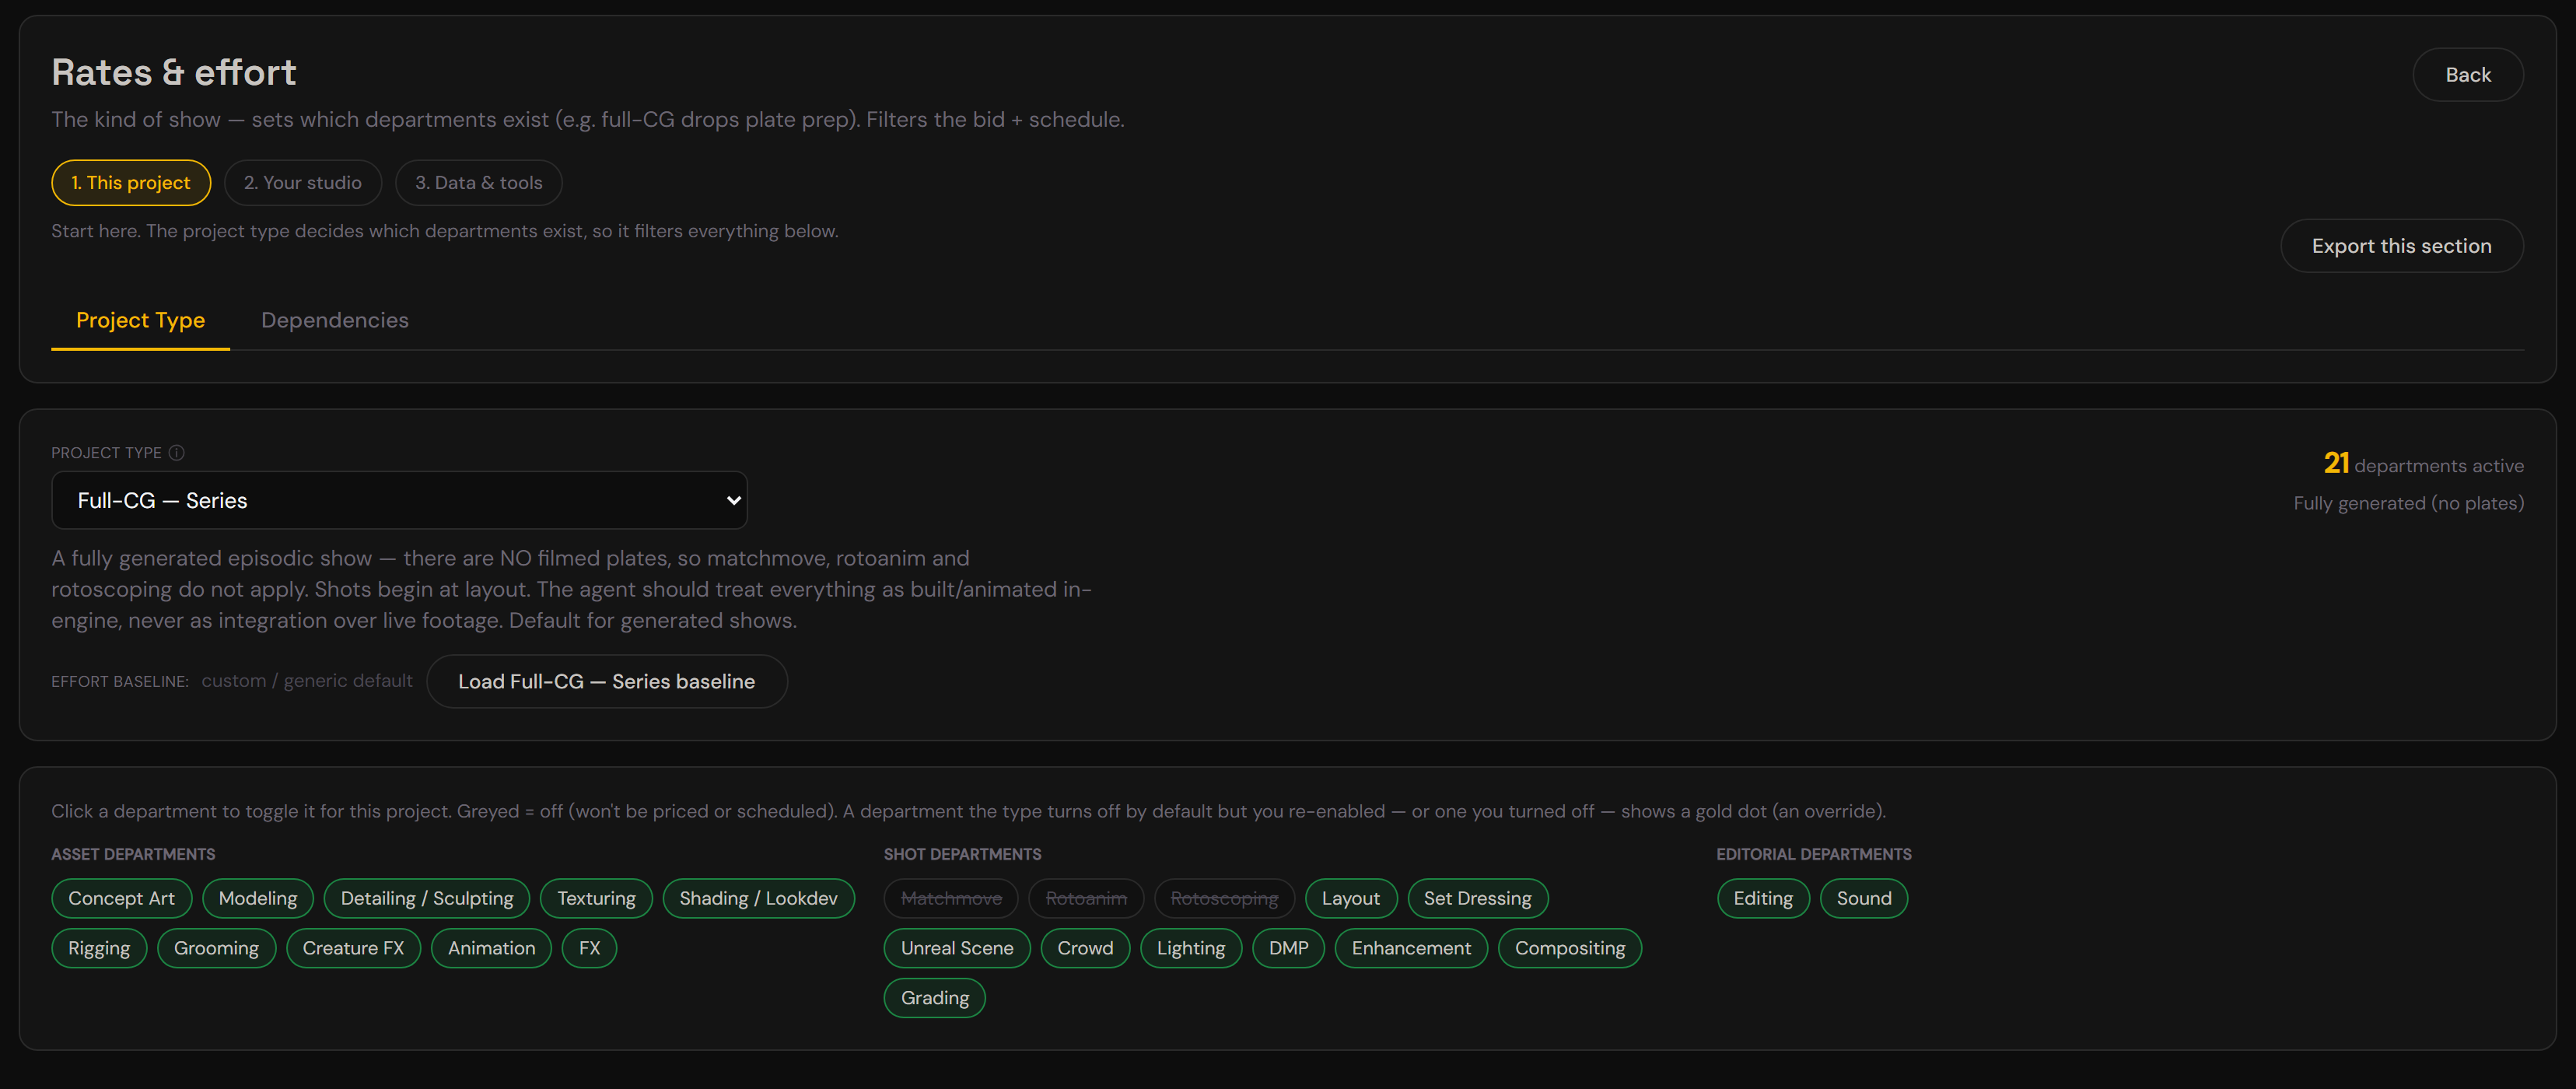
Your studio constants. Three zones (progressive disclosure):
Every section and every parameter in Rates & effort is explained in place. Hover the small info dot next to any heading, row or field and a panel opens with what that lever actually does, a worked example using your own current values, and a warning where one applies. If you are unsure what a number means, hover it before you change it — the explanations are generated from the same engines that do the maths, not written separately.
- This project — change per show. This zone comes first because project type decides which departments exist at all:
- Project Type — kind of show (full CG drops plate prep, commercial is lighter, etc.). Filters which departments appear in the bid.
- Dependencies — production order (who hands off to whom). Used by the schedule.
- Your studio — set these once:
- Rates & markups — day rate, overhead %, contingency %, margin %.
- Effort — one mid-artist baseline per discipline. Use Quick Tune (5 hour figures) or the per-row editor (68 rows).
- Complexity — the 5 tier multipliers. Global + per-discipline overrides.
- Seniority — junior/mid/senior multipliers. Global + per-discipline overrides.
- AI house rules — your own instructions appended to the agent prompts (see "Teaching the AI your house rules" below).
- Data & tools:
- Download template — blank config workbook to fill in offline.
- Export current config — your live config as an editable XLSX (round-trip via Google Sheets). To export only one section, use the Export this section button on that section instead.
- Import workbook — load an edited XLSX (each tab overwrites that resource).
- Reset all to defaults — restore the shipped baselines (use if your config got corrupted).
- Prompt Lab (admin only) — edit the agent prompts and model assignments.
Quick Tune (recommended for first-time setup):
- Five cards, one per family (Characters, Environments, Props, FX, Shot work).
- Each has one multiplier (1.0 = shipped). Change it to adjust all baselines in that family at once.
- Press Enter or click away to apply. Shows consequence ("a character build is now 430 hours").
Help
This in-app guide (mirrors the Complexity Tier Rubric, the bidding model, and the five tiers). Always available.
Recent
Breakdowns auto-saved in this browser. Click one to reload it. Replaces the old server/breakdowns folder.
Compare
Compare two breakdowns side by side (useful for sanity-checking Pass 2 changes or reverting edits).
Corrections log (House rules)
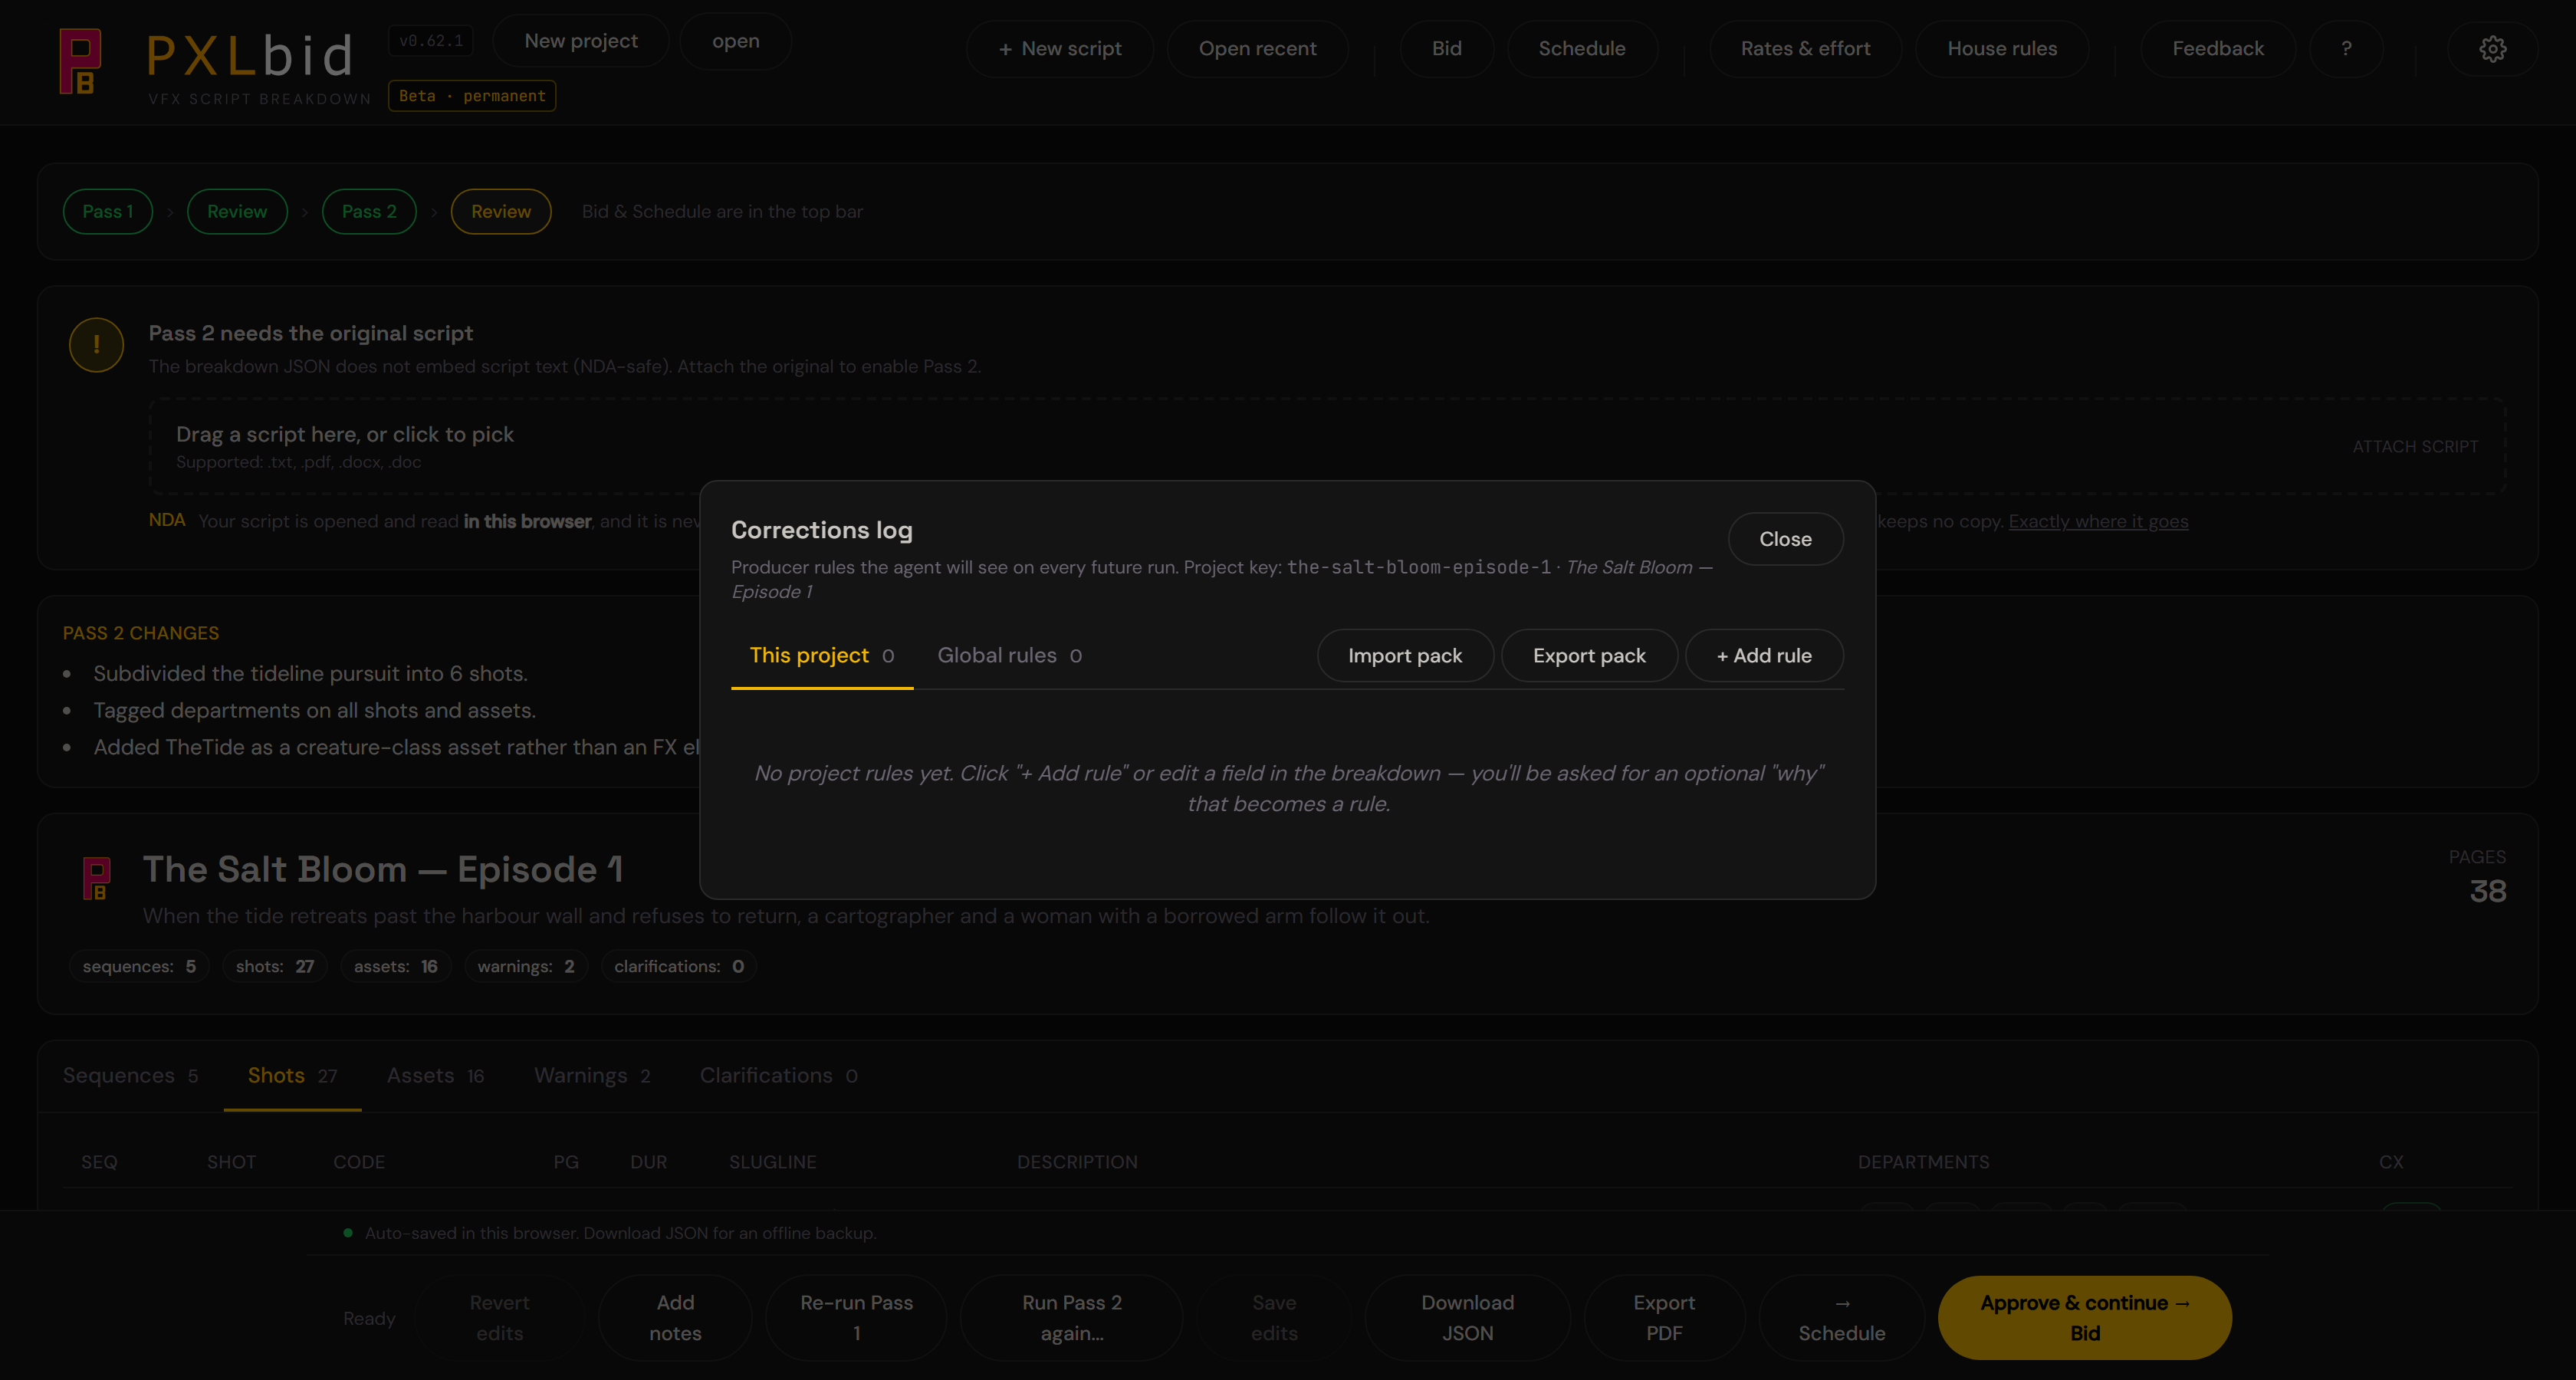
Shows edits you've made to breakdowns over time. The AI learns from these patterns: if you always re-grade a certain type of shot lower, the agent picks up the habit.
Each rule is saved for This project (the default) or as Global. Project rules go only with that project's later passes. Global rules go with the passes of every project, including the first pass on a new script, so the item names and reasons in a global rule travel with other shows' scripts. Keep anything specific to one production as a project rule.
Settings
Same panel as Step 1 above: Rates & effort > 2. Your studio > Rates & markups.
- Account row — Google sign-in. Sign out here.
- Anthropic API key — paste your key, test connection, clear if needed.
- Models per stage — choose which Claude model to use for Pass 1 and Pass 2. Both passes default to Opus. If you want a cheaper, faster first pass, switch Pass 1 to Sonnet here — Pass 1 quality is usually fine on Sonnet, and it is the pass you re-run most while calibrating. Can override per stage.
- Max output tokens — raise this if you see TRUNCATED warnings (very long scripts). Default is fine for most cases.
Making it yours — Rates & effort in depth
Effort matrix (Quick Tune vs. detailed)
The Quick Tune panel is the entry point. Five multipliers, one per family, applied against the shipped baselines.
If you want more control, scroll down to the per-row editor:
- 53 asset baselines (characters, creatures, environments, props, FX, etc.) + 15 shot baselines (one per discipline).
- Edit
base_hoursdirectly for a single row. That value is for a mid artist on an average shot/asset. default_seniority— who usually does this (defaults to mid). Can be overridden per line in the bid.
Pro tip: use Quick Tune to set the family multiplier, then the per-row editor to fine-tune a single discipline. Both work on top of the shipped defaults, so changes are idempotent.
Complexity multipliers
The 5 tiers and their multipliers:
- trivial (0.4) — near-free: hold, freeze-frame, direct reuse, cleanup. An intern could finish it.
- low (0.7) — straightforward, standard pipeline. A junior can deliver it.
- med (1.0) — the average shot — the anchor everything else scales from.
- high (1.6) — complex, hero-adjacent, tricky integration, heavy cleanup. Needs lead attention.
- epic (2.5) — set-piece, novel R&D, hero moment.
Global multipliers: set at the top. Applied to all disciplines.
Per-discipline overrides: add a row for a discipline (anim, comp, fx, etc.) and set overrides. Leave a cell blank to inherit the global.
Rubric: the plain-English definitions the AI grades by. Read and tune these if the AI is consistently mis-grading shots.
Seniority multipliers
- junior (1.5) — +50% time (still learning).
- mid (1.0) — the baseline.
- senior (0.7) — −30% time (faster).
Same structure: global + per-discipline overrides. If a rigging senior saves more than a comp senior, add a rigging row.
Settings
- day_rate — one blended $/man-day. This number alone determines bid cost. Leave blank for schedule-only, no dollars.
- currency — display currency for export.
- overhead_pct — percentage of subtotal to add for overhead (e.g., 0.2 for 20%).
- contingency_pct — percentage for contingency.
- margin_pct — markup on top.
- hours_per_day — productive hours per work day (default: 7, not 8).
- default_team_size — how many artists you put on a discipline by default. Per-discipline overrides below.
The bid calculates: subtotal → +overhead → +contingency → +margin → price. These add in sequence, and the bid shows a best–worst range (±%).
No rate-card matrix. There is one day rate. Per-artist rates with their own multipliers are handled in PXLflow, not here.
Project Type
Selects which disciplines appear in the bid and schedule. Different show types have different departments:
- Full CG — drops plate prep, match-move, roto (no plates).
- VFX heavy — includes FX, comp, lighting.
- Commercial — lighter crew.
- etc.
Leave as default if you're unsure. You can also just mark shots/assets as "skip" (×) in the bid to drop individual lines.
Dependencies
Production order: who hands off to whom. Affects the schedule Gantt chart (model → rig → layout → anim → lighting → comp, for example). Safe to leave as-is for a first pass.
Project folders
By default your work lives in this browser, and exports go to your Downloads folder. That works, but a breakdown dies with a cleared cache and cannot follow you to another machine.
Instead, give the show a folder. Click New project in the header, name it ("Thresholds", "Mickey Mouse"), and pick where it goes. PXLbid creates:
Thresholds/
  project.json      what this folder is
  breakdowns/       every completed pass, saved automatically
  bids/             for bid exports you save here
  schedules/        for schedule exports
  config/           this show's Rates & effort workbook
From then on, every completed Pass 1 and Pass 2 is written into breakdowns/ as well as staying in the browser. The chip in the header shows the project name, and the path of the last file saved. The project itself (bid edits, sent versions, deliveries, schedule) is saved in the browser in this version, not in the folder; see Where a project is saved.
Choose the folder yourself — a NAS share, a Dropbox folder, the show's existing folder. Nothing is assumed about where it lives, so this works the same on Windows and macOS.
Things worth knowing
- Chrome or Edge only. Safari and Firefox do not support choosing a folder yet. On those, PXLbid behaves exactly as it did before and says so in the header — nothing is lost.
- You will be asked for permission once per session. Browsers drop write access when you close the tab. The header shows Reconnect — one click and it is back. Nothing on disk changes in the meantime.
- If the folder moves, the chip turns red and says "not found", and saving pauses rather than failing silently. Use locate to point at its new home, or forget to stop tracking it.
- Closing a project never deletes anything. It only stops PXLbid saving there.
- PXLbid will not overwrite a
project.jsonit did not write, and will not create a second show inside an existing project's folder — it refuses and tells you. bids/,schedules/andconfig/are not yet written automatically. They are there for exports you save into them yourself.- Privacy: the folder is local and PXLbid never syncs or uploads it. Producing a breakdown does send the script text through the PXLbid service to Anthropic, or to your own Bedrock or Vertex account (see Where your script goes (NDA)). The folder holds the results, and the results include short verbatim quotes from the script (see below).
Templates & Data
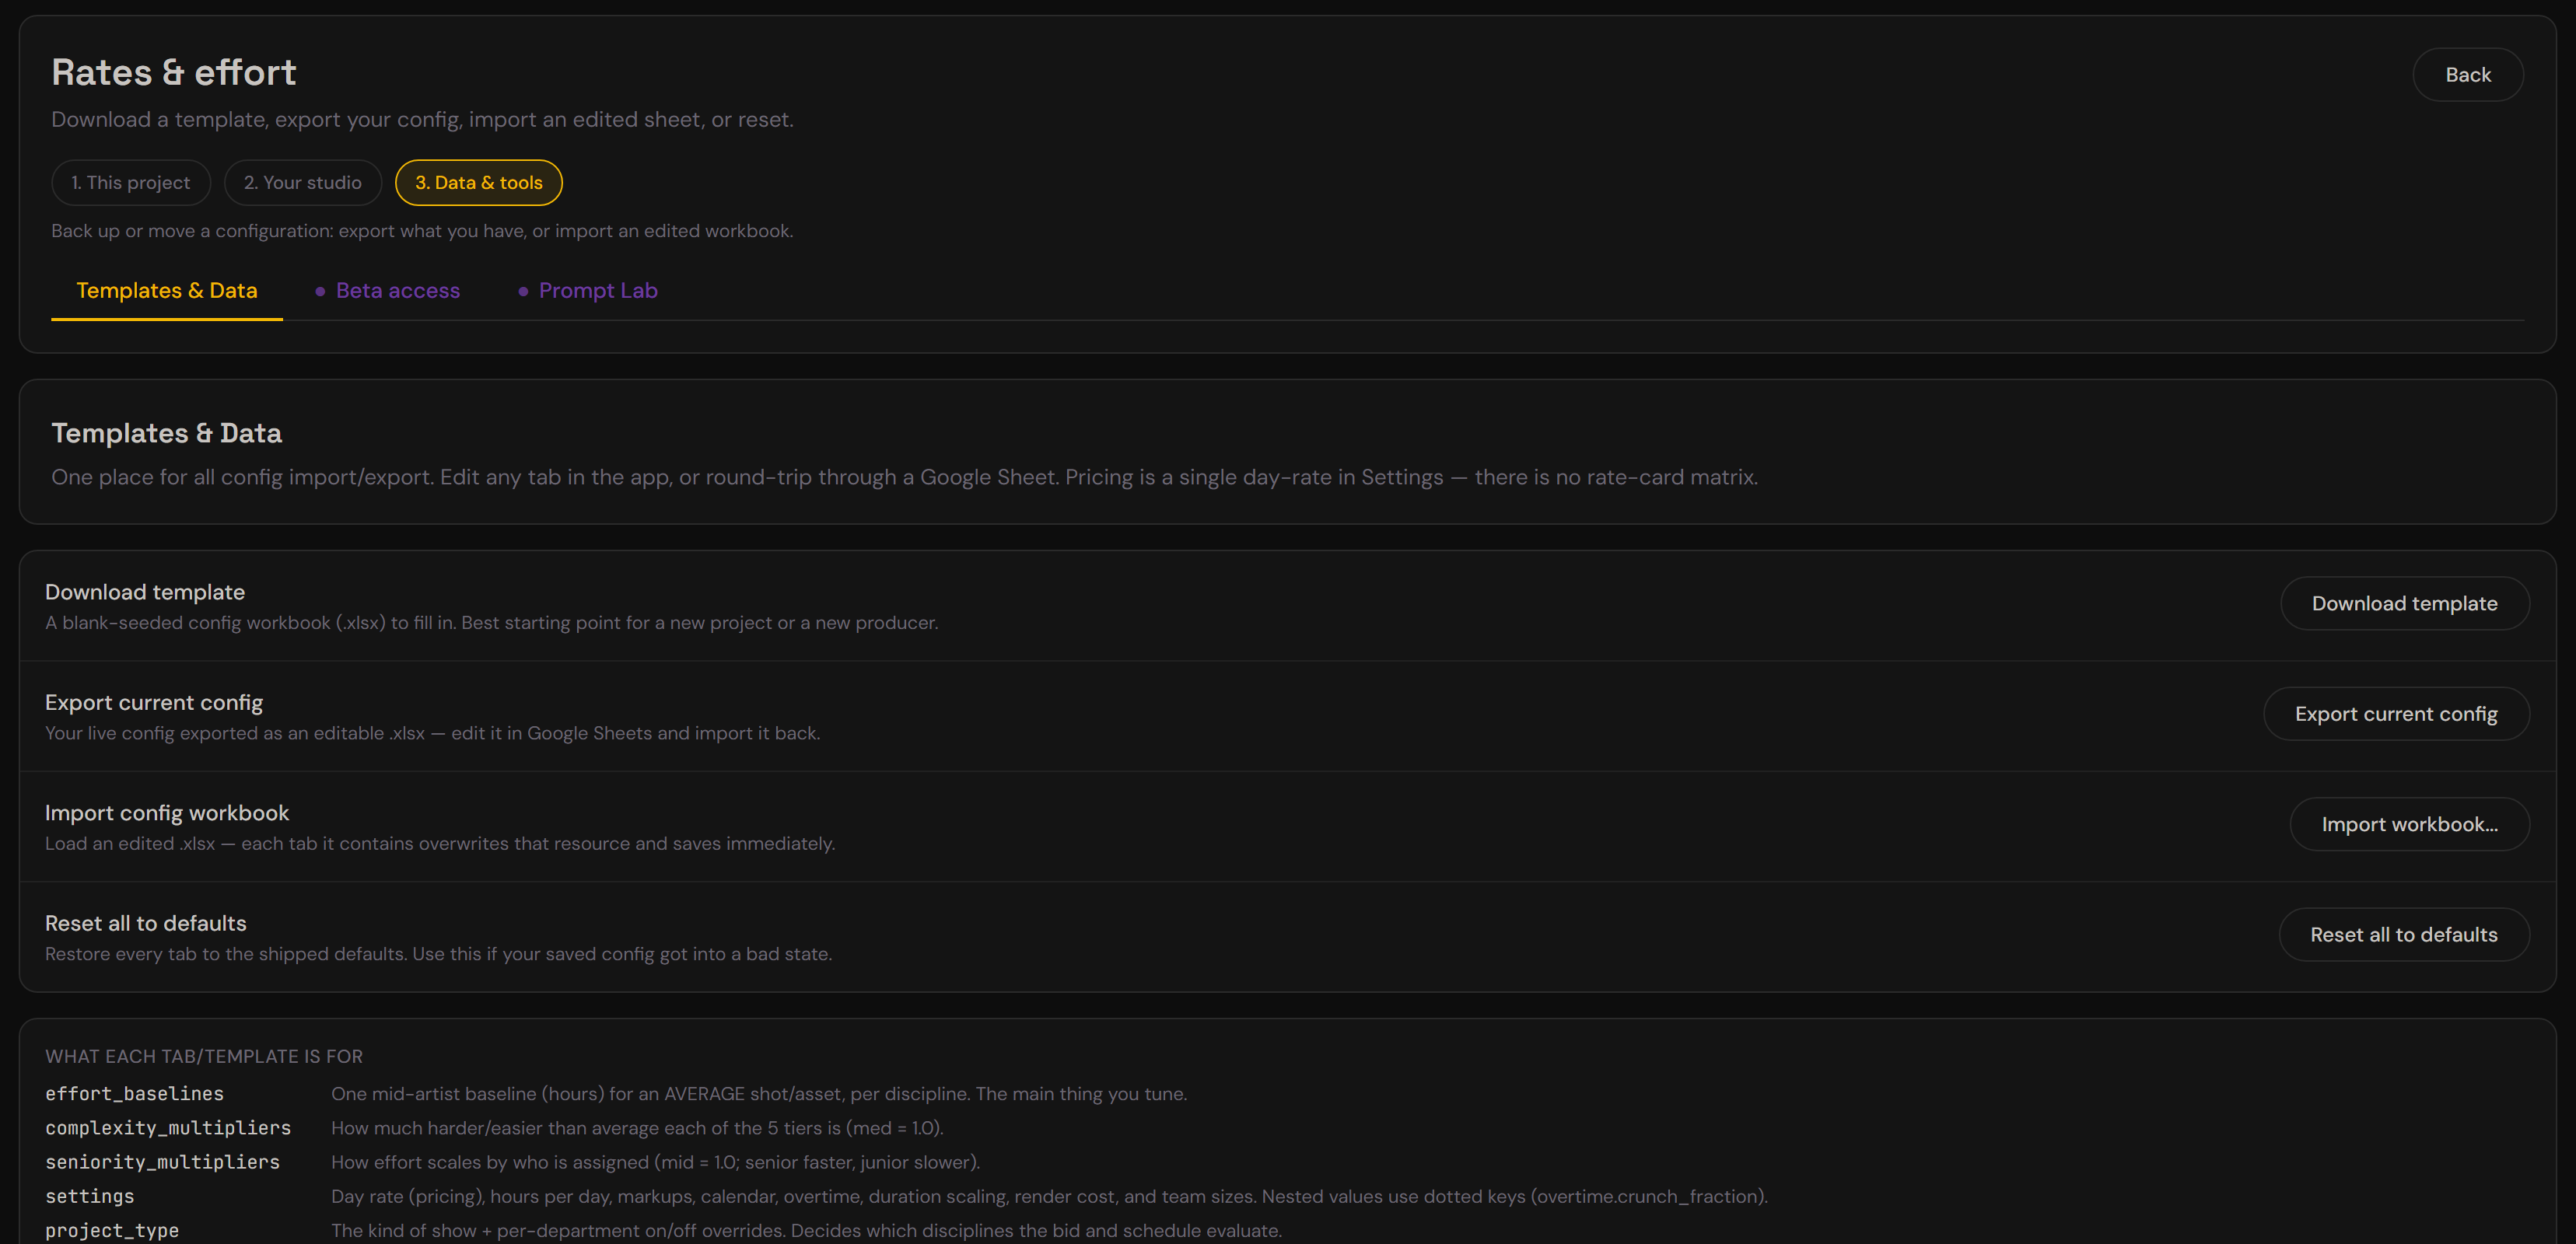
- Download template — empty XLSX with the same tabs as your live config. Fill it in offline and import it back.
- Export current config — download your live settings as XLSX. Edit in Google Sheets, download, import back.
- Import workbook — load an XLSX. Only the tabs the file actually contains are read; anything it does not mention is left exactly as it is.
- Reset all to defaults — one-click restore. Useful if your config got corrupted.
Export just one section
Every Rates & effort section has its own Export this section button, next to the section description:
- 1. This project →
project_type+dependencies— this show's setup. - 2. Your studio →
settings,effort_baselines,complexity_multipliers,seniority_multipliers— your studio constants.
Use it to hand your studio numbers to someone without also handing over the current show, or to move one show's setup between machines. Both import back through the same Import workbook button.
The config workbook is editable in Google Sheets. Tabs:
effort_baselines— kind, asset_type, discipline, base_hours, default_seniority.complexity_multipliers— global row + per-discipline overrides.seniority_multipliers— global + overrides.settings— every project-wide lever: day_rate, currency, the markups, hours_per_day, team sizes, plus the calendar, overtime, duration-scaling and render-cost blocks.project_type— the kind of show, plus any per-department on/off overrides.dependencies— production order (who hands off to whom).complexity_rubric— the 5-tier definitions (reference only; shown to the AI).
No other sheets. The workbook is config only — script, breakdown, and bid data never live in it.
Editing the settings tab by hand
Excel has no nested cells, so the nested settings use dotted keys, exactly as exported:
overtime.crunch_fraction        0.3
duration_scaling.weights.anim   1
render.render_min_per_frame.epic  45
Rules worth knowing before you type:
- Keep the spelling. A misspelled key is ignored and reported in the import warnings rather than silently applied.
- Percentages accept either form —
20or0.2both mean 20%. - On/off rows take
TRUE/FALSE. holidaysis a comma-separated list ofYYYY-MM-DDdates. Format the cell as text first — otherwise Sheets converts a lone date into a number and the entry is rejected.work_weekis seven comma-separated values, Mon→Sun,1= working day. Any other length is rejected.- Deleting a row does not delete the value. Rows are applied on top of what you already have, so a sheet with one row changes one thing. To switch a duration-scaling discipline off, set its weight to
0rather than removing the row. - A tab you delete is simply not imported. That is what makes the per-section exports safe to import.
Exporting to ShotGrid and ftrack
Both export menus (the Bid view and the Schedule view) offer ShotGrid (CSV) and ftrack (CSV). Each downloads one .zip named after the show and the date, for example Neon_Marathon_ShotGrid_2026-09-27.zip. Inside are the CSV files (each prefixed with the show and date, such as Neon_Marathon_ShotGrid_2026-09-27_Shots.csv; the steps below use the short names), a Warnings.csv listing anything that could not be mapped, and a README.txt.
- From Bid, every task gets its labour hours and man-days. These leave out the feedback buffer and markups, so the tasks add up to the labour subtotal, not the price.
- From Schedule, tasks also get start and due dates. The dates are the window of each department's lane, so all comp tasks share the comp lane's dates. Refine them per task in the tracker.
- Schedule hours can differ from Bid hours. The Schedule view prices from the breakdown and does not apply the re-grades or dropped lines you set in the Bid view.
- Tasks: one per department on each shot and asset. Priced work the breakdown did not tag also becomes a task, and
Warnings.csvlists it. - Asset names stay exactly as in the breakdown (camelCase), because the shot-to-asset links are matched on that name.
- Sequence titles and shot sluglines go at the start of the descriptions, because neither tracker has a default field for them.
Read Warnings.csv first. Rows land there when:
- a department has no pipeline step;
- an asset type has no match in the tracker (an
fxasset gets an empty Type); - a shot names an asset that does not exist;
- a frame range cannot be read;
- a line you dropped in the bid is still tagged in the breakdown.
PXLbid never drops those rows silently.
Check the bid units on one task first. Neither vendor documents how its importer reads a plain number in a bid column. Import one task, confirm it shows the bid you expect (for example 12 hours, or 1.5 days), then import the rest.
ShotGrid (Flow Production Tracking)
The column headers are ShotGrid's default field names (Shot Code, Sequence, Cut In, Assets, Task Name, Link, Pipeline Step, Bid, Start Date, Due Date). Import the files in this order, dragging each one onto the importer on its own page:
Sequences.csvon the Sequences page.Assets.csvon the Assets page.Shots.csvon the Shots page. The Sequence and Assets columns link by name.Tasks.csvon the Tasks page. Link is the shot code or the asset name.
In the importer, check each column is matched to the field you expect.
- Cut In, Cut Out and Cut Duration: some sites also have Smart Cut fields with the same names. Pick the plain Cut fields.
- Bid is in hours and Bid (days) holds the same bid in man-days. Map only one of them to the Bid field.
- Assets: several assets in one cell are separated by
,. Autodesk does not document the separator, so check the importer preview splits them. - Re-importing overwrites links. Importing
Shots.csvinto shots that already exist replaces their Assets links rather than adding to them, so use it to create new shots. - Pipeline steps are matched by name, and step lists differ from site to site. Create the steps first, or change the names in
DEPARTMENT_MAPinsrc/utils/exportProductionTracking.jsto match your site.
ftrack
The ftrack import wizard maps columns by hand, so the headers are plain labels.
- Open
Import.csvin a spreadsheet or a text editor and copy everything, including the header row. - In ftrack, open the project's spreadsheet page, click Import and paste.
- Map the columns:
- Sequence and Sequence description to the sequence's name and description.
- Shot and Shot description to the shot's name and description.
- Task to the task name, and Task type to the task type.
- Start date and End date to the task dates.
- Exactly one of Bid (hours) or Bid (days) to the task bid.
- Check the summary, then click Import.
- Task types are matched by name, so create any missing type first.
- Asset builds are not imported. The wizard documents sequences, shots and tasks only.
AssetBuilds.csvis a reference sheet listing each asset build, its type, the shots it appears in and its asset tasks. Create those in ftrack by hand. - Frame ranges are only in the ShotGrid export, because the ftrack import documentation names no frame attribute.
Teaching the AI your house rules
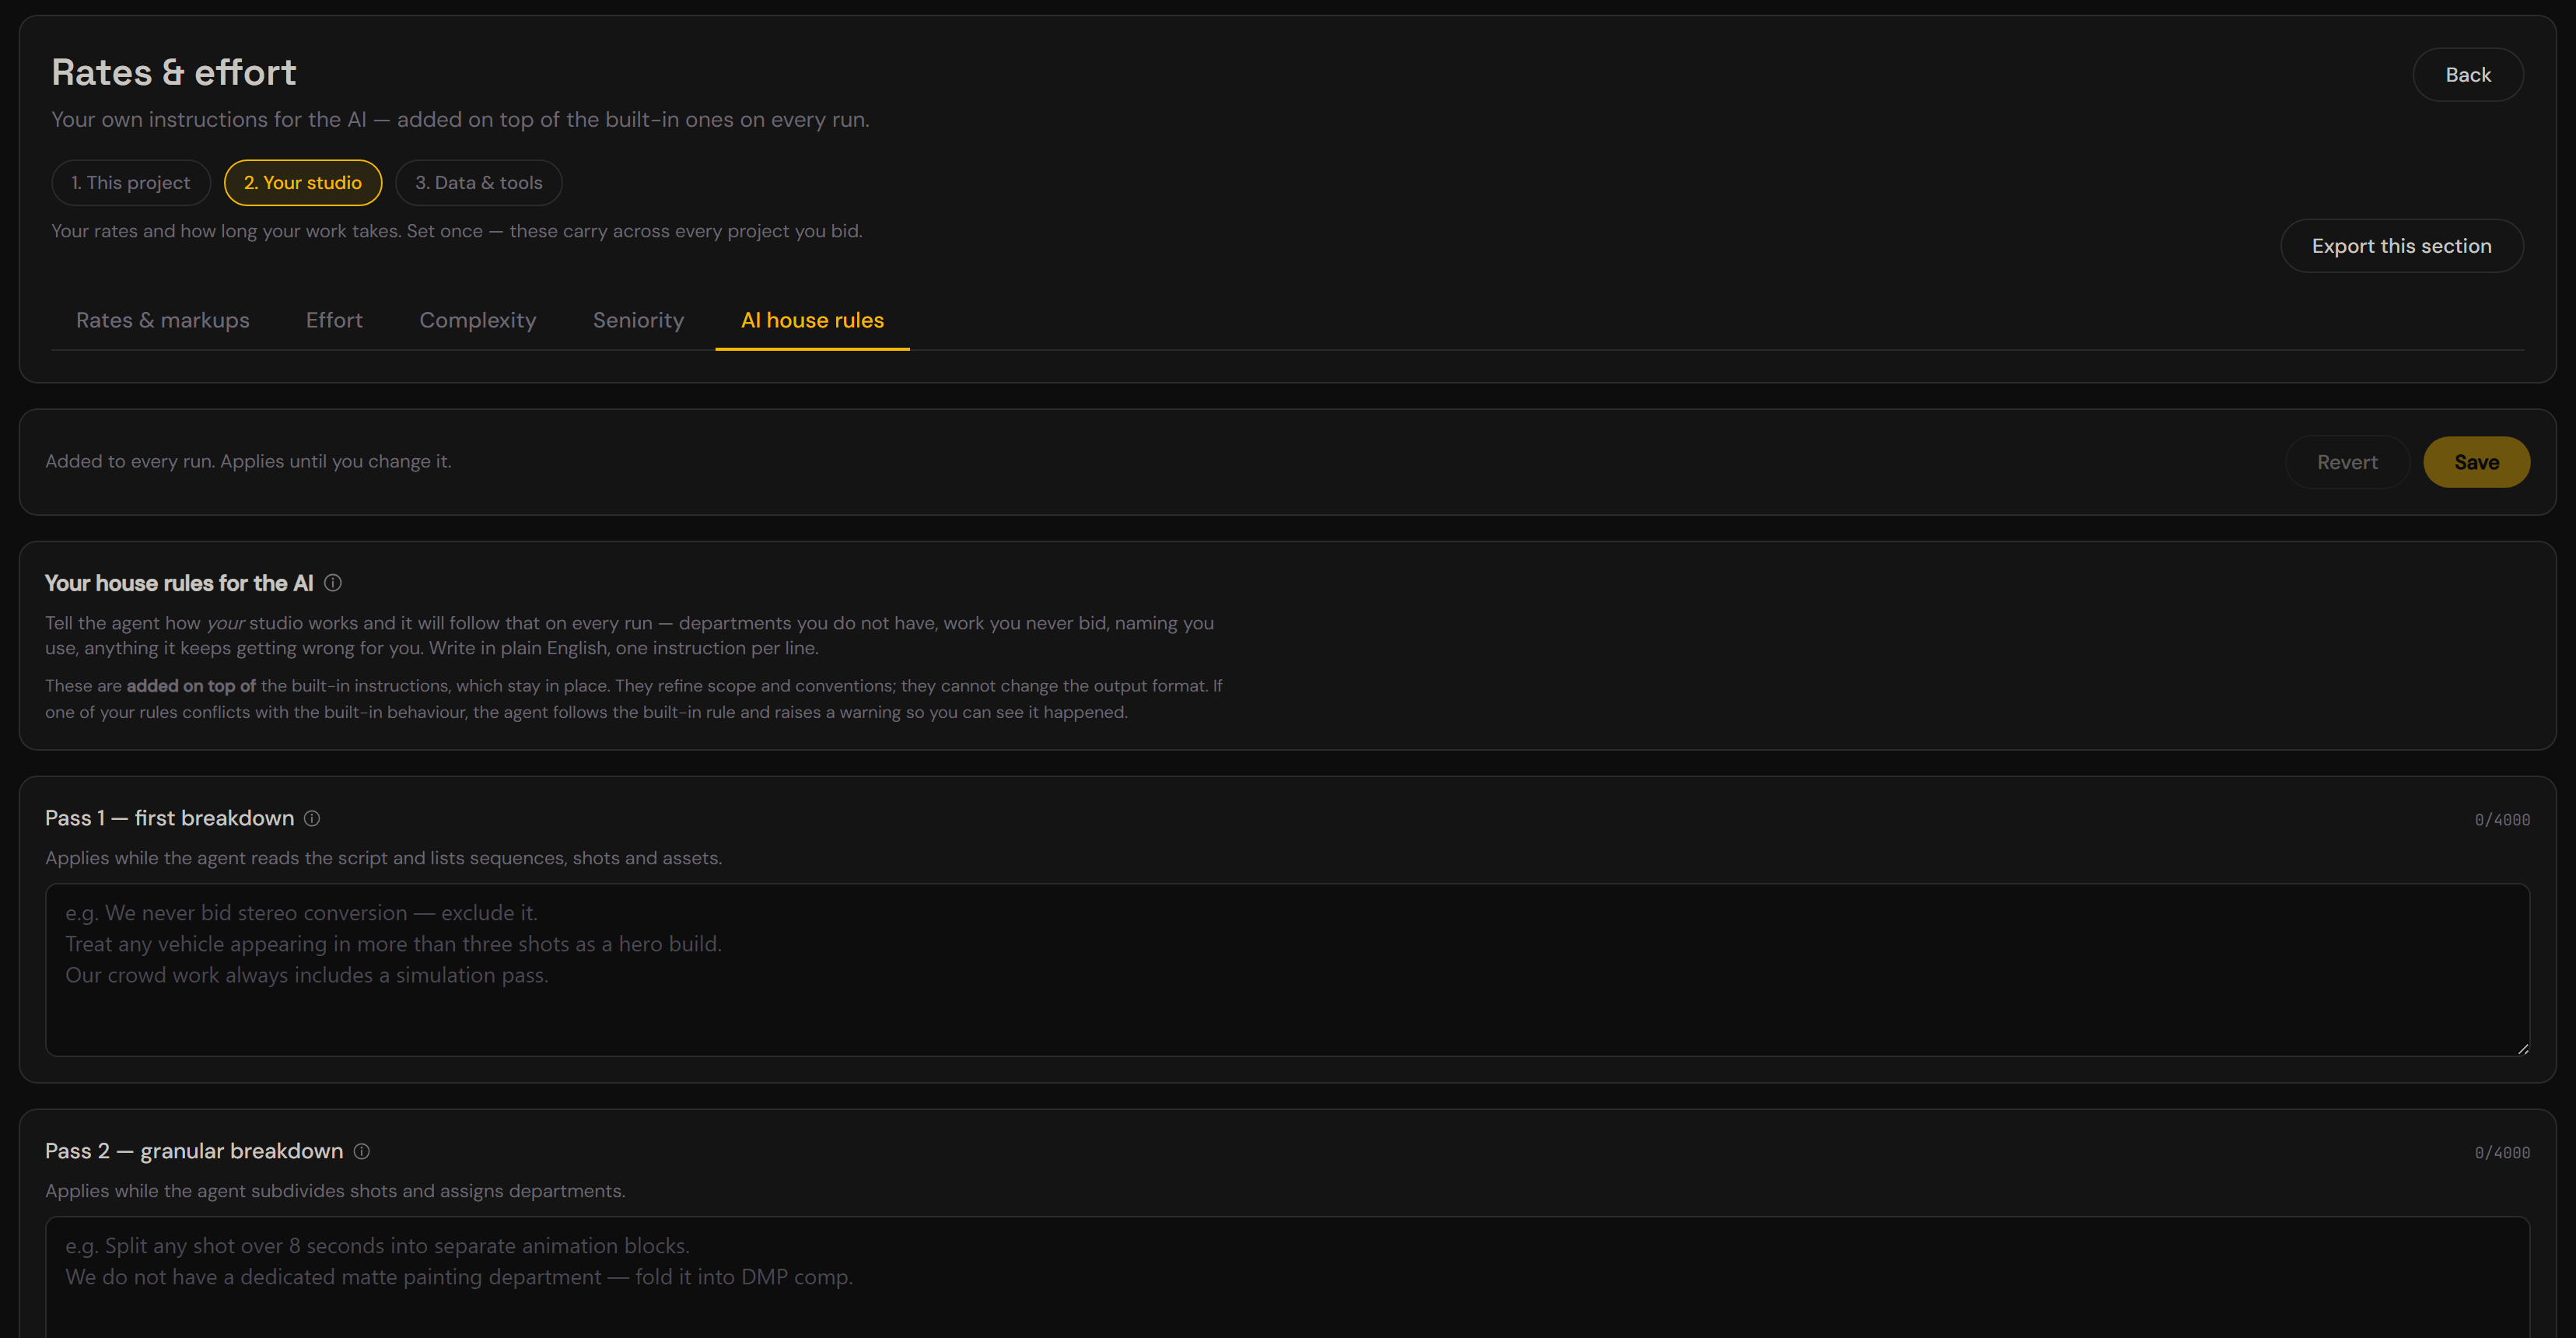
Rates & effort > 2. Your studio > AI house rules.
Tell the agent how your studio works and it applies that on every run — a department you do not have, work you never bid, naming conventions you use, or anything it keeps getting wrong for you. Plain English, one instruction per line. For example:
We never bid stereo conversion - exclude it.
Treat any vehicle appearing in more than three shots as a hero build.
We have no dedicated matte painting department - fold it into comp.
There are three boxes, one per stage: the first breakdown, the granular pass, and the bid review. Put each rule where it applies.
These are added on top of the built-in instructions, which stay in place. They refine scope, naming and conventions; they cannot change the output format. If one of your rules conflicts with the built-in behaviour, the agent follows the built-in rule and raises a warning so you can see it happened.
Your house rules are stored in your browser. They are not shared with other PXLbid users, but they are sent with every pass of that stage, as part of the request.
Where the numbers come from (and where they don't)
Every effort baseline in Rates & effort carries a provenance tag, because the honest answer differs wildly cell by cell:
- sourced — a named senior practitioner or primary data. Exactly one cell qualifies: animation, from Scott Squires (VES Fellow, ex-ILM), at 8–12.8 hours per second of screen time.
- derived — arithmetic from such a figure. Six cells.
- practitioner — Cris's own call as a working VFX/CG Supervisor, where no published figure exists.
- unsourced — a considered estimate with no public data behind it. This is most of the file.
That last number deserves saying plainly: no per-discipline artist-hour data for VFX asset builds exists publicly, at any tier. Not one cell. 52 of the 53 asset baselines and 9 of the 15 shot baselines are estimates, sitting on an explicit internal ratio spine.
So treat the absolute hours as a starting point, not a finding. What is defensible is the proportions — a creature costs more than a character, a rig costs more than a texture pass — and that is what Quick Tune scales when you answer one question. Replace the absolutes with your studio's actuals and they stop being estimates.
Where the sourced figure lands matters too. Squires' 8 h/sec describes a hero shot, so it sits at high complexity, not at the average. A med 5-second single-character animation shot is 25h (5 h/sec); the same shot graded high is 40h (8 h/sec) and epic is 62h (12.4 h/sec). Installing his number at the average would have double-counted it the moment the complexity tier was applied.
The full audit trail, including a list of rejected sources, is in src/config/effort-research.json.
How shot length changes the price
Every department scales with duration_sec, on its own curve — so estimating shot length carelessly propagates straight into the number.
- Frame-by-frame, essentially linear: animation, rotoscoping, rotoanim. 50 frames really is five times 10 frames.
- Steeply: FX, cloth/hair sim, crowd — caches break and interactions multiply over a longer run.
- Meaningfully: compositing (a 2000-frame shot is a different job from a 20-frame one: render time, and it often has to be split into sub-shots), enhancement.
- It depends: lighting. A car chase relights constantly through the shot; a locked interior does not.
Two departments depend on the camera, not the clock. If a shot is marked camera: static — a locked-off plate — matchmove becomes a single-frame line-up (SFLU): one solve, however long the shot runs. A ten-minute locked-off shot costs the same matchmove as a two-second one. DMP behaves the same way: one projection for a static camera, several (first/mid/last frame) across a long move.
If the AI can't tell whether the camera moves, it leaves the field off and the bid assumes animated — the more expensive, safer assumption. Guessing "static" is the one that makes a bid too cheap.
A crowd is two costs, not one. The crowd system — setup, simulation, caching, integration — is priced per shot and is flat in agent count, because 5 agents and 500 agents are one Houdini setup. The crowd's own asset builds are separate: the base body variants, plus the wardrobe, armour, weapons and props layered on them. Those are frequently forgotten and are often the larger number, so Pass 1 asks about them and the producer review flags a crowd shot with no crowd assets.
Where your script goes (NDA)
This is the question every producer should ask before putting a client's pages into a tool they did not write, so here is the whole answer.
Opened on this machine. The file you drop is opened and parsed in your browser: TXT directly, PDF via pdf.js, DOCX via mammoth. Loading a script uploads none of its content: you can drop a script in, read it, and close the tab without any of its text leaving your machine. Loading it does send a usage note to PXLbid's beta log, a Google Sheet we keep: that a script was loaded, with your email, name, app version, browser and screen size, at most once every 30 minutes. The note never includes the file name, the title or any text.
The full script is never stored. Script text is not written to browser storage or to your project folder. That is why Pass 2 asks you to re-attach the script after a reload, and that is deliberate, not a bug. The breakdown does carry short verbatim quotes: every shot and asset (and usually every sequence) has one or two lines from the script, with the page number, so you can jump to the source. Those quotes are saved wherever the breakdown is: this browser's storage, the breakdown history, your project folder and any file you export or copy.
Producing a breakdown sends the text to us, then to the model. This is the part no tool of this kind can avoid, so it should be stated plainly rather than glossed. To read your script, the pass sends its text to a PXLbid service we run, which adds the instructions that tell the model how to break a script down and forwards the request to api.anthropic.com using your API key on your Anthropic account. If you chose your own AWS Bedrock or Google Vertex AI account in Settings ("Where your scripts are processed"), it forwards the request there instead, using the cloud credentials you entered. Your key or credentials travel in the same request. So two parties handle the material: us, in transit, and the model provider you chose.
What else goes with a pass. The same request carries your notes for that run, your AI house rules for that stage, and your saved corrections. A second pass also carries the first-pass breakdown, and a bid review carries a trimmed breakdown and the priced bid. Corrections saved as Global go with the passes of every project, not only the one where you made them.
We keep no copy of either. The service holds your script and your key in memory only while the pass runs, which can be several minutes on a long script. Neither is written to a database, saved to disk, or recorded in our logs. We log sizes, token counts and timings so we can tell whether a run succeeded, and never the content. Nobody at PXLbid can go back and read a script you ran, because there is nothing to read. The terms of the model provider you chose govern the model side; PXLbid adds no retention of its own.
Why it works this way (changed in v0.59.0). Earlier versions sent your script from the browser straight to Anthropic, and this page said so. The instructions that make PXLbid work were shipped inside the app, where anyone could read them — and because a tester who left kept a copy, access could not really be withdrawn. Moving those instructions onto a server we control fixed that, and the cost is the extra hop described above. It would have been easy to leave the old wording in place; it is no longer true, so it is gone.
Not used for AI training. On Anthropic direct (the default), every pass runs on your own Anthropic API key, and API use falls under Anthropic's Commercial Terms, which state: "Anthropic may not train models on Customer Content from Services." Anthropic deletes API inputs and outputs within 30 days, except when a request is flagged for a usage-policy review, the law requires longer retention, or your organization has a separate agreement with Anthropic. The five-year training and retention figures you may have read about apply to Claude's consumer plans, not to the API. On your own Bedrock or Vertex account, the model call is made under your agreement with AWS or Google, not under Anthropic's API terms, so the training and retention terms are the ones in that agreement.
If your NDA forbids sending pages to any third-party AI service, or to any intermediary, do not run a pass on that script. The breakdown cannot be produced without that step, and no setting in this app changes it. You can still use Rates & effort, the bid and the schedule on a breakdown produced elsewhere.
Getting your client's OK
Not using AI for training is not the same as having permission to share the pages. Most NDAs are about who receives the material, so the clean route is to tell your client up front and get their agreement in writing. Until you have it, try PXLbid on a released or public script: the breakdown and pricing work exactly the same way.
A request you can send as it is:
Before we start the breakdown, one quick confirmation.

We use PXLbid, an AI-assisted tool, to read the script and flag VFX work early, so nothing is missed in the bid. The script is processed through PXLbid and the Anthropic Claude API under commercial terms that do not allow it to be used for AI training. PXLbid keeps no copy, and Anthropic deletes API inputs and outputs within 30 days, except when a request is flagged for a usage-policy review or the law requires longer retention.

Could you confirm this is fine under our NDA, or add the short clause below to it?
A clause your client can add to the NDA or to a one-page addendum. It is a starting point for their lawyer, not legal advice:
AI-assisted script analysis.

The Recipient may process the Confidential Information, including scripts and screenplay pages, with AI-assisted software for the sole purpose of preparing VFX breakdowns, bids and schedules for this project.

The approved services are PXLbid and the Anthropic Claude API, which PXLbid uses to analyze the text. The Recipient will use these services only under commercial terms that prohibit using the material to train AI models, and will not use any consumer AI service for this purpose.

The material remains Confidential Information under this Agreement, and all other obligations of this Agreement continue to apply.
If you run on your own Bedrock or Vertex account, name that service (for example "Claude on AWS Bedrock under our AWS agreement") in place of "the Anthropic Claude API" in both texts.
The same note appears in the app itself, on the screen where you load a script.
Known limits and gotchas
- Project folders need Chrome or Edge. Saving breakdowns to a folder on your disk uses a browser API that Firefox and Safari do not implement. On those the header says "no project folder" and everything else works as normal — nothing is lost, and nothing fails silently. This is a browser limitation, not something PXLbid can work around.
.doc(old Word binary) is not supported — use PDF, DOCX, or TXT. The static build does not extract from old .doc format.
- The full script is never saved. Pass 2 needs the script re-attached after a page reload. This is intentional (NDA-safe). The breakdown is saved, including its short verbatim quotes from the script, but the script itself is not.
- Browser storage only — everything lives in this browser on this machine. No sync, no server. Clearing your browser's site data deletes all saved breakdowns and your Rates & effort settings.
- Use Recent and Export (download JSON) to back up work.
- Use Export current config (in Rates & effort → Templates & Data) to back up your rates & effort and round-trip it via Google Sheets.
- 20-breakdown history cap — only the 20 most recent breakdowns are kept. Older ones are pruned automatically.
- Your Rates & effort settings are entirely yours, never shared with anyone. Every other user has their own.
- Unsaved Rates & effort edits — each Rates & effort tab saves independently. If you
change something and switch tab, zone, or press Back, you are asked whether to discard it. Press Save first to keep it.
- No server-side diagnostics — the service that relays a pass logs only
- During the current beta the Send button may be disabled. That means
sizes, token counts and timings, never your script, your key or the output. So when something fails there is no record of what you were working on for us to inspect. If a run fails, use the Feedback dialog and include what you were doing; do not assume we can see the problem.
the collection endpoint is not switched on yet — it is not a bug in your browser. Use Copy instead and email the copied report to Cris. The dialog says which mode it is in.
Sending feedback
Click Feedback (top bar). A dialog opens asking for a message.
What gets sent: your message, the project title (if any), the app state (which screen you're on, recent clicks), and the app version.
What never gets sent: the script, the breakdown, your bid, your API key, your library config, or any sensitive data.
Use this to report bugs ("Pass 2 crashed"), confusing UX ("the Export button is hard to find"), or ideas ("add a lock/unlock toggle").
Workflow tips
- Calibrate once, bid many times. Set your rates and effort baselines in Rates & effort once, and every new project uses them.
- Use Quick Tune for fast setup. Five multipliers get you 90% of the way. Fine-tune disciplines later if needed.
- Deterministic Mode for production. Three-run consensus is slower and costs ~3× as much, but variance drops sharply. Use it for client quotes.
- Re-grade in the Bid. That's where producers live — complexity and seniority are the levers you use.
- Save JSON backups. After Checkpoint 1, download a JSON. Reload it with "Load JSON from disk" if something goes wrong.
- Export config regularly. Use Rates & effort → Templates & Data → Export current config to back up your tuning, round-trip it through Google Sheets if you want to collaborate.
- Compare versions. From the start screen, Compare versions... puts two breakdowns side by side — useful for checking Pass 2 changes or undoing edits. It lives on the start screen, not in the top bar.
Troubleshooting
"Test connection" fails. Check the key was pasted whole — it starts with sk-ant- and is long. If it was, the key itself has been rejected: it may have been deleted from your Anthropic account, or copied from a different organisation. Make a new one at platform.claude.com/settings/keys.
"Test connection" passes but a real run fails. Almost always an empty balance. The test is a one-token request and can succeed on a near-zero account while a full pass cannot. Open Billing and buy credits — and remember API credit is separate from a Claude Pro/Max subscription. PXLbid names this case explicitly when it happens and links you straight there.
A run fails, or the breakdown comes back empty. Try a shorter script first to confirm the key and connection work at all. If a specific script reproduces it, tell us via Feedback and say which model was selected in Settings — the model matters and it is the first thing we will check.
The bid totals look wrong. Check the gold "not calibrated" banner. If it is showing, the numbers are our placeholders, not yours — see Your first ten minutes. If it is not showing, the figures are coming from your own Rates & effort values, and the fastest way to find the culprit is Rates & effort > Rates & markups (day rate and markups) before Effort.
Everything disappeared. Your work lives in this browser profile on this machine. A different browser, a different machine, or cleared site data all start empty. Check Recent first; if it is empty, the data is not recoverable from our side — we have no copy of it.
The app went blank or showed an error card. Press Reload PXLbid on the card; your breakdown and Rates & effort settings are saved and will come back. Use Copy error report first and send it to us — that report is the only record of what happened.
Questions this guide does not answer: send them through the Feedback button — gaps in this document are useful feedback too.